
One of my favorite subjects to photograph in the spring and summertime is bees on flowers. It’s fun watching the little worker bees buzz around, collecting pollen. They have a lot of character and make great photographic subjects. In this article, I put together some tips and techniques I’ve discovered over the years to help you get the best bee photos possible.
When it comes to getting a great close-up of a bee, you’ll want to have macro capability on your camera. This could either be the lens you use with an interchangeable macro lens, or a camera with a macro function on it.
I use FUJINON lenses with my FUJIFILM X-T3, and currently have two macro lenses that I use: a 60mm macro, and an 80mm macro. The 60mm macro is only a 2:1 macro lens, whereas the 80mm is a 1:1 (true) macro lens. This basically means that the 80mm lens can focus a lot closer than the 60mm lens can. If you are serious about macro photography, I suggest investing in a true 1:1 macro lens to get the best quality images out of your gear.
However, with that said, because FUJIFILM cameras are crop-frame cameras, using the 60mm still gives me incredible close-up images. The frame itself is already cropped in due to the nature of the type of camera it is, so having a 2:1 crop ratio does not severely impact my photos. If you use a full-frame camera, however, you will see a greater difference in focusing distance than you would with a crop-frame camera, so the capability of the macro lens will be more apparent.
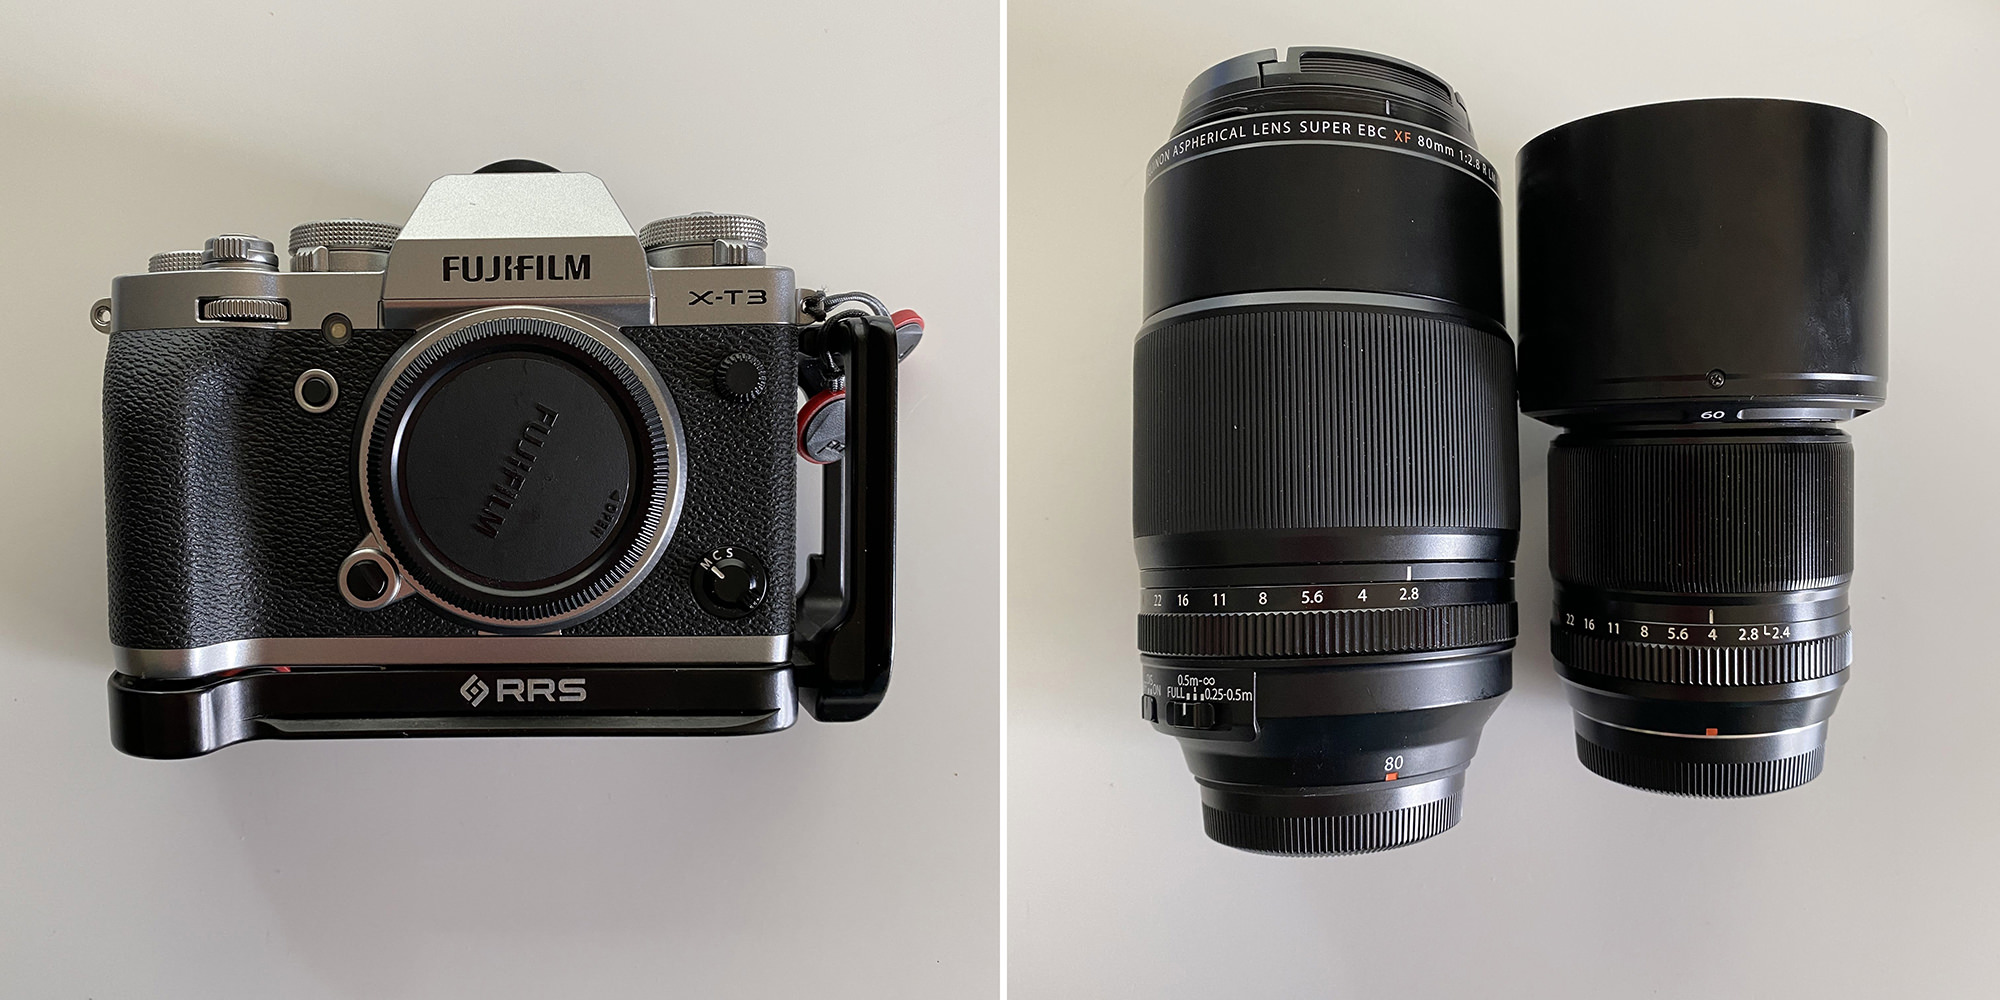
I use a FUJIFILM X-T3 and either the 80mm or 60mm macro lenses for my bee photography.
Diffused and even light across the bees, flowers, and background will give you the best results. There is still a LOT of light during the day when it is overcast, and sometimes these are the best times to create a bee image. Or, if you are in the shade on a sunny day, that can be even better as you will get a powerful amount of light (yes, even in the shade!). But the quality of the light will wrap around the subject and make everything just look beautiful. If you don’t have natural shade where you want to photograph, you can always add your own. I have a lavender bush in my backyard and have been known to use a diffusion panel to give my scene better light to work with.
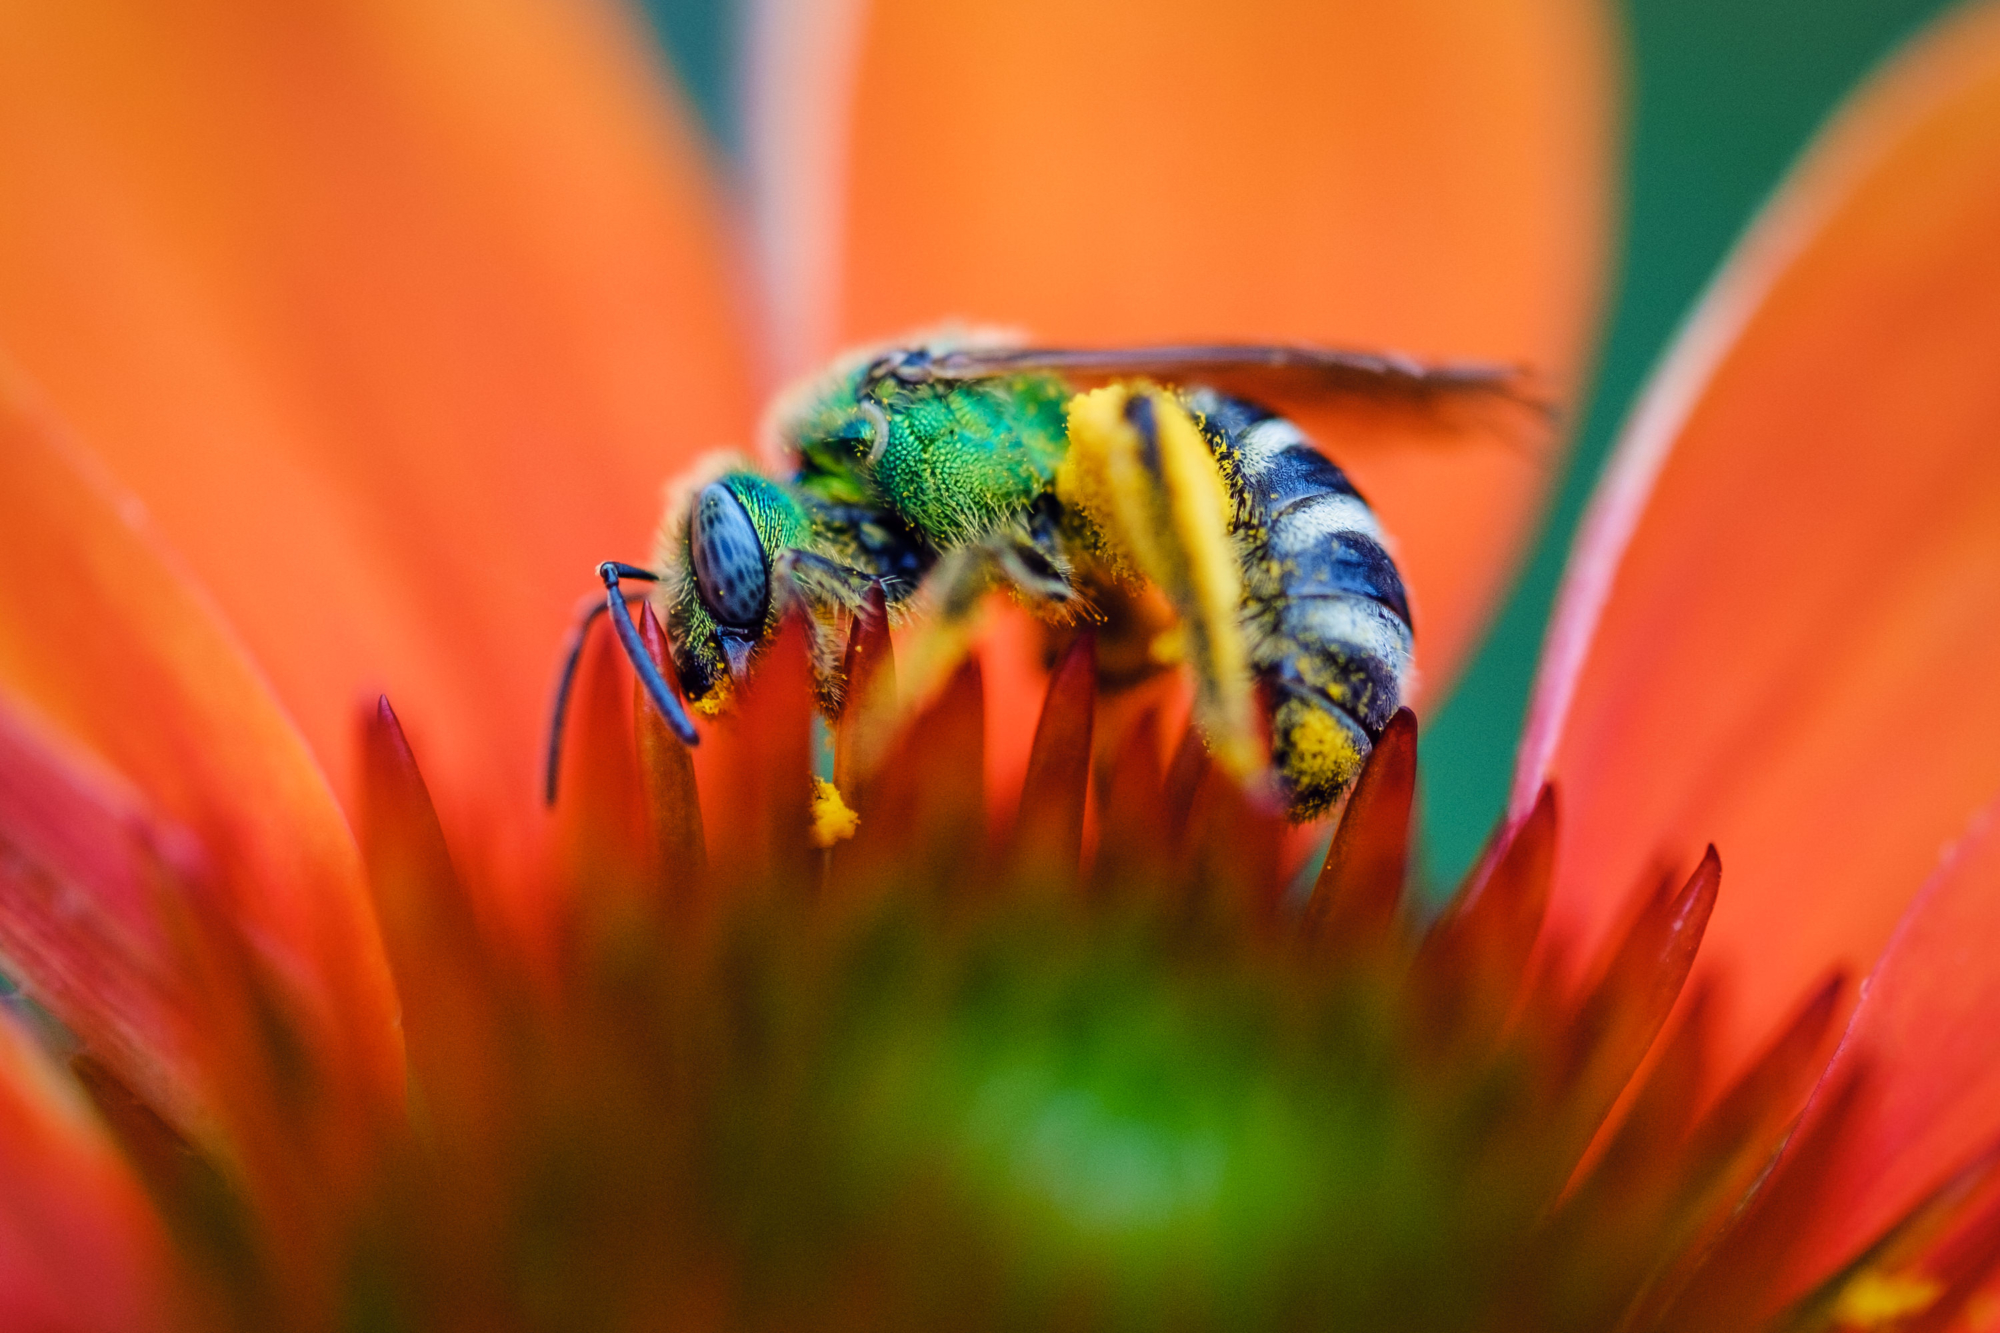
Green sweat bee on a coneflower (diffused light).
FUJIFILM X-T3, 80mm macro lens, 1/1000 sec at ƒ/2.8, ISO 320
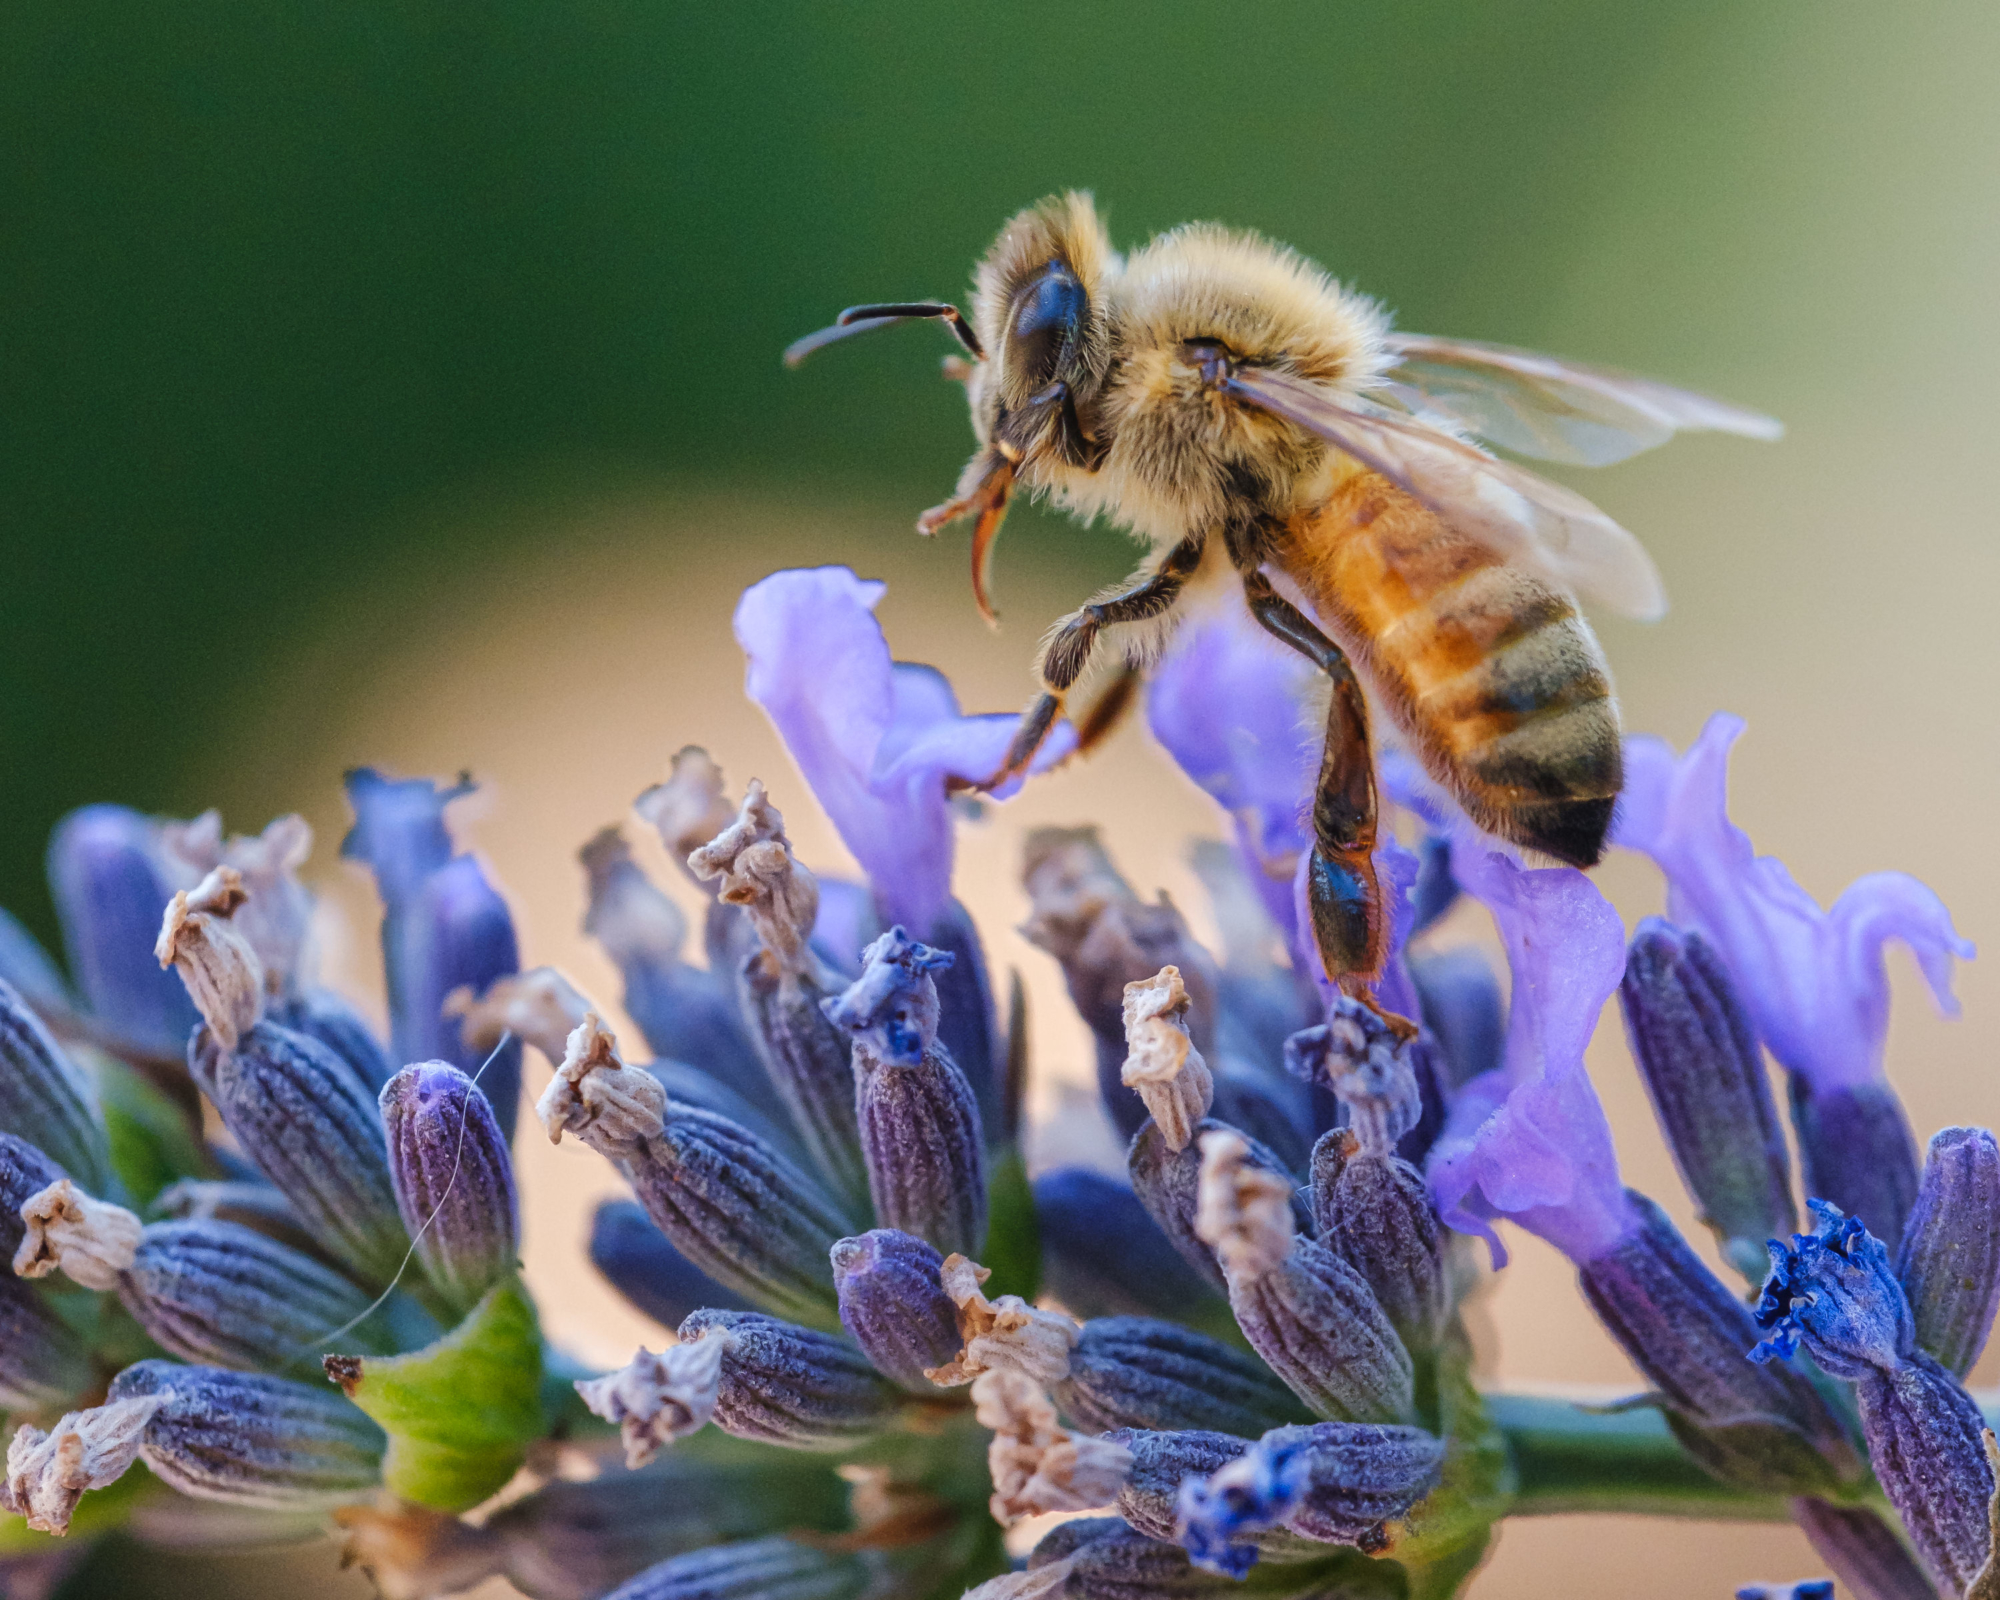
If you have no choice to photograph in the sun, you can still get some amazing images. I was visiting a lavender field this summer, and we have had only sunny days this year, so the “normal” Oregon clouds were nowhere to be found. Instead of positioning myself so that the sun was behind me, which would front-light the bees, I decided to position my camera so that the bees were being back-lit by the sun. This was a great workaround and also gave the bee bodies a gorgeous orange glow, with the sun shining through. It was a bit more challenging to photograph but yielded some great results.

Honey bee backlit by the sun.
FUJIFILM X-T3, 80mm macro lens, 1/2000 sec at ƒ/3.6, ISO 320
I’ve found that the best composition for bees is to get them at a side profile view. This angle is much more compelling and shows a lot of detail and the shape of the insects, and it also helps separate out the bee from the rest of the scene. You can also see their eyes more clearly, and oftentimes you can get the face-first in a flower. However, a cute little bee butt is always a classic, so don’t be afraid to go outside the box.

Bee butts can be cute, too!
FUJIFILM X-T3, 80mm macro lens, 1/1000 sec at ƒ/2.8, ISO 160

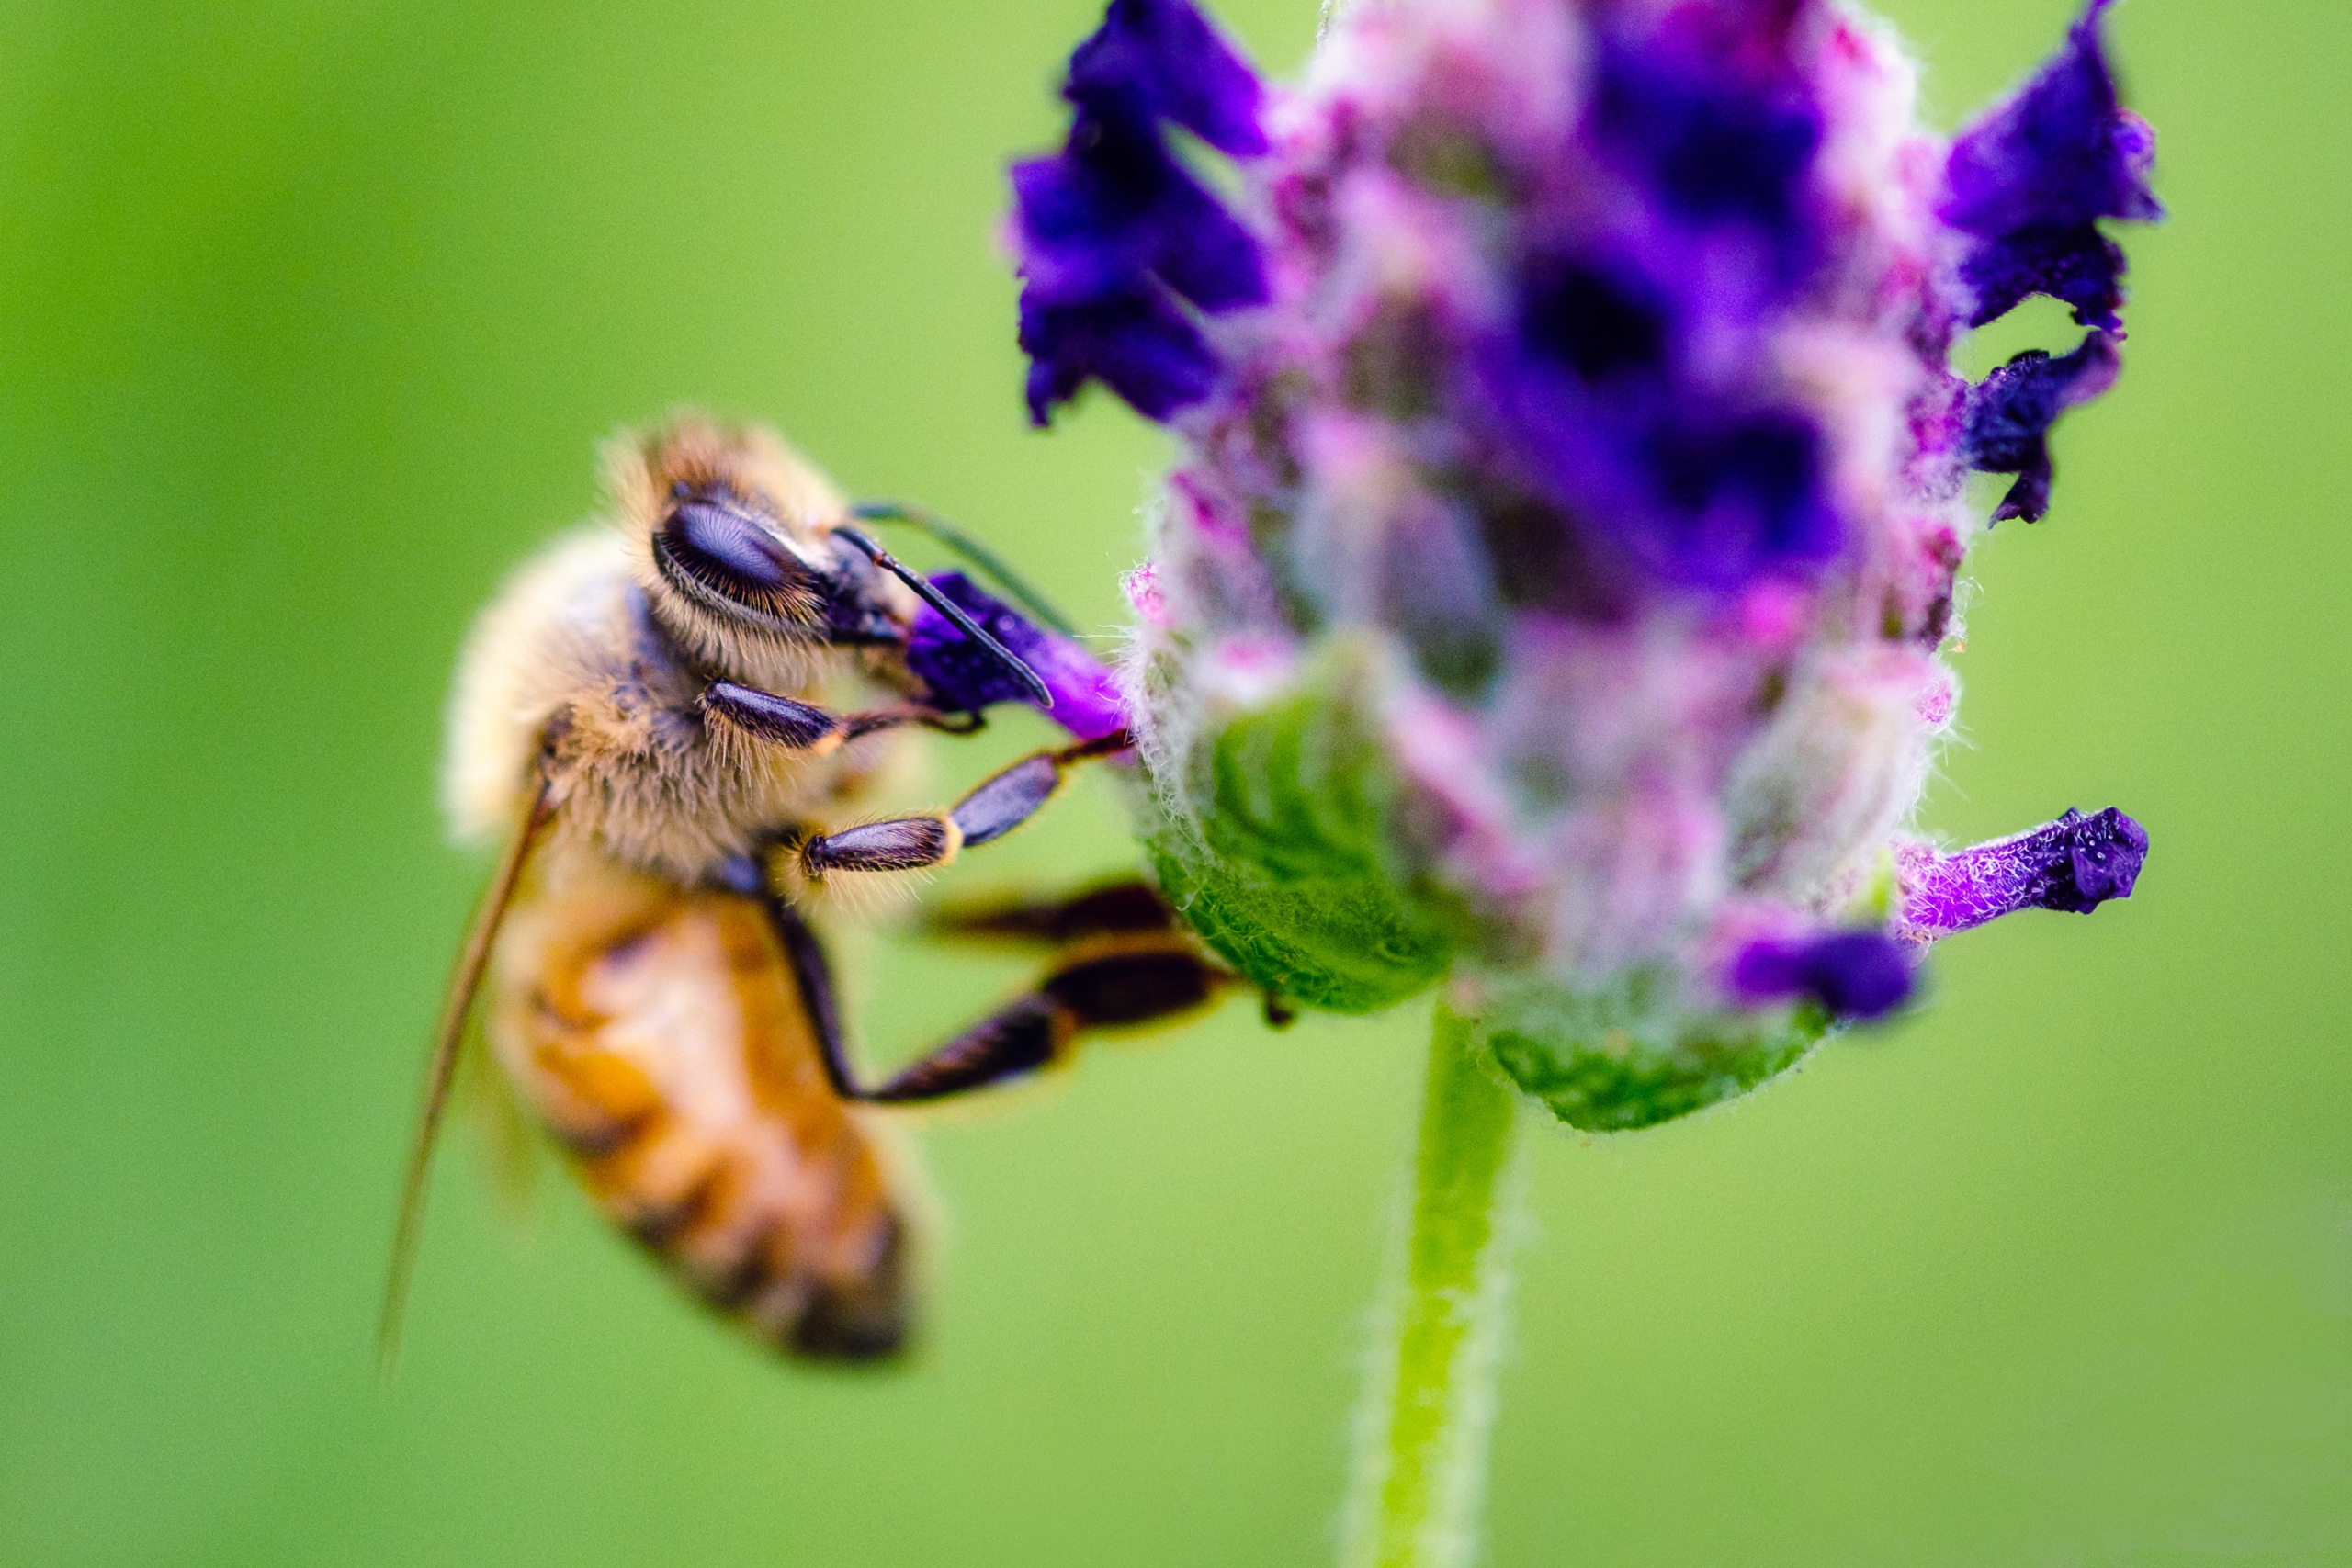
Honeybee on lavender.
FUJIFILM X-T3, 60mm macro lens, 1/1000 sec at ƒ/2.4, ISO 800
The exact camera settings you use will be dependent on the amount of light you have in your scene, as well as other things, such as how far the background is to your subject, your lens choice, and more. However, there are some guidelines that I follow when setting up for some bee photography.
- Shutter speed: Technically speaking, the shutter speed is the most important setting with this setup. You want to make sure that the shutter speed is fast enough to catch the bee in action, otherwise, you could end up with blur. I usually set mine no less than 1/500 sec, and oftentimes keep it at 1/1000 sec or higher.
- Aperture: If you want to blur your background then set your aperture to a wide setting, such as ƒ/2.8 or so. Keep in mind that the more you blur the background, the greater chance you have of missing focus on your bee, due to the much smaller depth of field area you can focus on.
- ISO: I keep my ISO setting to “auto” most of the time. When it is bright outside I will end up with a lower setting, but as the light fades, the ISO value will go up, adding grain to the image. However, a tack-sharp bee photo with some added grain is much better than an out-of-focus shot with a lower ISO.
If you use a mirrorless camera, another thing to consider is the shutter type. Most cameras default to a mechanical shutter, but with mirrorless, you also have the option of using an electronic shutter. While this does have advantages (higher shutter speed and silent operation being two of the best), it can affect movement, particularly the wings of the bees. This is called a rolling shutter effect, and it makes the wings look bent and warped if you catch the bee in flight.

Using an electronic shutter with this photo warped the bee’s wings, an issue called “rolling shutter”.
FUJIFILM X-T3, 80mm macro lens, 1/2000 sec at ƒ/4, ISO 2000
First and foremost, you want to make sure you are focusing on the correct area. Do your best to focus on the eyes to get as much detail as possible. Even with insects, humans will gravitate to looking at the eyes before anything else, so it’s important that the eyes are in focus to prevent adding tension to the frame.
There are also a few different methods I have used for focusing while creating my images to get in-focus photographs:
Autofocus: I’ve had good luck using the autofocus on my Fujifilm X-T3 and 80mm macro lens. Some macro lenses are slower, so they don’t want to catch focus as quickly, but the 80mm lens seems to work well. It also helps when the bees are not moving very fast!
Manual focusing: When auto-focus does not work well, you may want to try the manual-focus method. This method uses a lot of frames but can get you some great images in a difficult environment (or with gear that does not have autofocus on the lens).
- To use this method, first, you want to determine a focusing point that you will pre-set. I will usually frame up a flower, knowing where the bee will be on it, to see how close I want to focus on it in my lens.
- Next, set your camera to a “continuous high” mode. This allows you to press the shutter and create multiple frames at once.
- Now, when a bee lands in an area you can photograph it, move your camera back-and-forth to try and catch the focus on the bee, all while pressing the shutter. You’ll create a lot of throwaways but you are more likely to get one or two in focus with a manually-focused lens.
It’s important to focus on the eyes of the bee when creating your photos.
FUJIFILM X-T3, 80mm macro lens, 1/1000 sec at ƒ/5.6, ISO 5000
This video shows how I pre-focus on a spot and move the camera back-and-forth to catch the bee in focus.
One of my favorite subjects to photograph in the spring and summertime is bees on flowers. It’s fun watching the little worker bees buzz around, collecting pollen. They have a lot of character and make great photographic subjects. In this article, I put together some tips and techniques I’ve discovered over the years to help you get the best bee photos possible.
When it comes to getting a great close-up of a bee, you’ll want to have macro capability on your camera. This could either be the lens you use with an interchangeable macro lens, or a camera with a macro function on it.
I use FUJINON lenses with my FUJIFILM X-T3, and currently have two macro lenses that I use: a 60mm macro, and an 80mm macro. The 60mm macro is only a 2:1 macro lens, whereas the 80mm is a 1:1 (true) macro lens. This basically means that the 80mm lens can focus a lot closer than the 60mm lens can. If you are serious about macro photography, I suggest investing in a true 1:1 macro lens to get the best quality images out of your gear.
However, with that said, because FUJIFILM cameras are crop-frame cameras, using the 60mm still gives me incredible close-up images. The frame itself is already cropped in due to the nature of the type of camera it is, so having a 2:1 crop ratio does not severely impact my photos. If you use a full-frame camera, however, you will see a greater difference in focusing distance than you would with a crop-frame camera, so the capability of the macro lens will be more apparent.
I use a FUJIFILM X-T3 and either the 80mm or 60mm macro lenses for my bee photography.
Diffused and even light across the bees, flowers, and background will give you the best results. There is still a LOT of light during the day when it is overcast, and sometimes these are the best times to create a bee image. Or, if you are in the shade on a sunny day, that can be even better as you will get a powerful amount of light (yes, even in the shade!). But the quality of the light will wrap around the subject and make everything just look beautiful. If you don’t have natural shade where you want to photograph, you can always add your own. I have a lavender bush in my backyard and have been known to use a diffusion panel to give my scene better light to work with.
Green sweat bee on a coneflower (diffused light).
FUJIFILM X-T3, 80mm macro lens, 1/1000 sec at ƒ/2.8, ISO 320
If you have no choice to photograph in the sun, you can still get some amazing images. I was visiting a lavender field this summer, and we have had only sunny days this year, so the “normal” Oregon clouds were nowhere to be found. Instead of positioning myself so that the sun was behind me, which would front-light the bees, I decided to position my camera so that the bees were being back-lit by the sun. This was a great workaround and also gave the bee bodies a gorgeous orange glow, with the sun shining through. It was a bit more challenging to photograph but yielded some great results.
Honey bee backlit by the sun.
FUJIFILM X-T3, 80mm macro lens, 1/2000 sec at ƒ/3.6, ISO 320
I’ve found that the best composition for bees is to get them at a side profile view. This angle is much more compelling and shows a lot of detail and the shape of the insects, and it also helps separate out the bee from the rest of the scene. You can also see their eyes more clearly, and oftentimes you can get the face-first in a flower. However, a cute little bee butt is always a classic, so don’t be afraid to go outside the box.
Bee butts can be cute, too!
FUJIFILM X-T3, 80mm macro lens, 1/1000 sec at ƒ/2.8, ISO 160
Honeybee on lavender.
FUJIFILM X-T3, 60mm macro lens, 1/1000 sec at ƒ/2.4, ISO 800
The exact camera settings you use will be dependent on the amount of light you have in your scene, as well as other things, such as how far the background is to your subject, your lens choice, and more. However, there are some guidelines that I follow when setting up for some bee photography.
- Shutter speed: Technically speaking, the shutter speed is the most important setting with this setup. You want to make sure that the shutter speed is fast enough to catch the bee in action, otherwise, you could end up with blur. I usually set mine no less than 1/500 sec, and oftentimes keep it at 1/1000 sec or higher.
- Aperture: If you want to blur your background then set your aperture to a wide setting, such as ƒ/2.8 or so. Keep in mind that the more you blur the background, the greater chance you have of missing focus on your bee, due to the much smaller depth of field area you can focus on.
- ISO: I keep my ISO setting to “auto” most of the time. When it is bright outside I will end up with a lower setting, but as the light fades, the ISO value will go up, adding grain to the image. However, a tack-sharp bee photo with some added grain is much better than an out-of-focus shot with a lower ISO.
If you use a mirrorless camera, another thing to consider is the shutter type. Most cameras default to a mechanical shutter, but with mirrorless, you also have the option of using an electronic shutter. While this does have advantages (higher shutter speed and silent operation being two of the best), it can affect movement, particularly the wings of the bees. This is called a rolling shutter effect, and it makes the wings look bent and warped if you catch the bee in flight.
Using an electronic shutter with this photo warped the bee’s wings, an issue called “rolling shutter”.
FUJIFILM X-T3, 80mm macro lens, 1/2000 sec at ƒ/4, ISO 2000
First and foremost, you want to make sure you are focusing on the correct area. Do your best to focus on the eyes to get as much detail as possible. Even with insects, humans will gravitate to looking at the eyes before anything else, so it’s important that the eyes are in focus to prevent adding tension to the frame.
There are also a few different methods I have used for focusing while creating my images to get in-focus photographs:
Autofocus: I’ve had good luck using the autofocus on my Fujifilm X-T3 and 80mm macro lens. Some macro lenses are slower, so they don’t want to catch focus as quickly, but the 80mm lens seems to work well. It also helps when the bees are not moving very fast!
Manual focusing: When auto-focus does not work well, you may want to try the manual-focus method. This method uses a lot of frames but can get you some great images in a difficult environment (or with gear that does not have autofocus on the lens).
- To use this method, first, you want to determine a focusing point that you will pre-set. I will usually frame up a flower, knowing where the bee will be on it, to see how close I want to focus on it in my lens.
- Next, set your camera to a “continuous high” mode. This allows you to press the shutter and create multiple frames at once.
- Now, when a bee lands in an area you can photograph it, move your camera back-and-forth to try and catch the focus on the bee, all while pressing the shutter. You’ll create a lot of throwaways but you are more likely to get one or two in focus with a manually-focused lens.
It’s important to focus on the eyes of the bee when creating your photos.
FUJIFILM X-T3, 80mm macro lens, 1/1000 sec at ƒ/5.6, ISO 5000
This video shows how I pre-focus on a spot and move the camera back-and-forth to catch the bee in focus.

Nicole is a photographer, published author, and educator specializing in Lightroom, Photoshop, and photography. She is best known for her books on food photography but is widely versed in various photographic genres, including landscape, nature, stock, travel, and experimental imagery.


Thank you. Good tips!
THANK YOU for this! I was just out this morning (before reading your article) trying to get bees on Lariope flowers and it was a total flop. I will definitely be trying some of your tips!
Excellent tips Nicole. Here in BC, as in Oregon we have had mostly sunny days. Heading to a sunflower farm tomorrow so your timing was spot on.
Very good tips! Thank you Nicole.
Is the 80mm a 1:1 macro on both a crop-frame and a full-frame?
If both cameras have the same pixel count, and you fill the frame with the same size bee, which one gives a higher pixel count of the bee? And what is the sharpnest significance?
Thanx for all you do.
Yes, it’s the same macro on both types of cameras. However, on a crop-frame camera, you have the ability to fill the bee in your frame more than you would with a full-frame camera. If both cameras have the same pixel count, then you will get more out of a macro shot with a crop-frame camera.
However, with other lenses, this goes the other direction. If you want to shoot REALLY wide, you will be able to do that more with a full-frame camera than with a crop-frame camera using the same lens.
Thanks for the information. My flower garden is full of bees. I’ll be out this week, to practice the techniques.
The main problem I often faced was that in shooting some flowers a bee would suddenly come into the frame and I didn’t get the shot before I put my bee settings in a custom function. Before that, I’d often fail to switch quickly enough from flower settings to critter settings (what I call bees, birds, etc.). I’d then get the shots back in Lightroom only to be disappointed how blurry the bee was; or if not the body, its wings were blurry). Oh well, live and learn. Anyway, great info above!