

Adding a watermark to your photos can serve many purposes. It can help protect your images from unauthorized use, promote your brand, or even serve as a visual signature that establishes copyright ownership. Whatever your reason for using a watermark, using Photoshop and the Creative Cloud Library makes it easy to quickly apply your watermark to any image with only a few simple steps.
In this tutorial, I’ll show you a simple, efficient way to protect and personalize your photographs using Adobe Photoshop. I’ll also be tapping into the power of Creative Cloud Libraries, making it incredibly easy to apply your watermark consistently across various images. Let’s get started!
Table of Contents:
Step 1: Create your watermark image
The watermark you use on your images can be made out of text or an existing logo, or you can even use your written signature. I’ll use my Nicolesy logo from an existing PNG file for this tutorial. So, to get started, I first open the PNG file in Photoshop.
Note: It’s best to use a document with a transparent background.

Here’s how to create your watermark file from scratch:
- Create a new Photoshop document with a transparent background (I recommend a document size of at least 1000 px wide to accommodate a wide range of image documents the watermark will be added to).
- If you want to create a text watermark, activate the Type tool and type out your name or business. Set the font settings to your desired look, and set the color to White. To add the © symbol, type Opt + G (Mac) or Alt + 0 1 6 9 (Windows).
- To create a signature watermark, activate the Brush tool. Set the brush hardness to 0, and the color to white, and set the size to something that is not too thick. Then, draw your signature on the image.
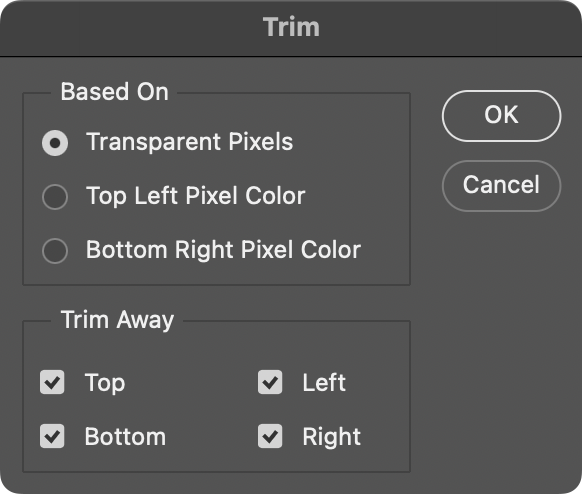
- Remove any excess space around your image by going to Image > Trim. Set the option to Transparent Pixels, and click OK.


Step 2: Save the watermark to the Creative Cloud Library
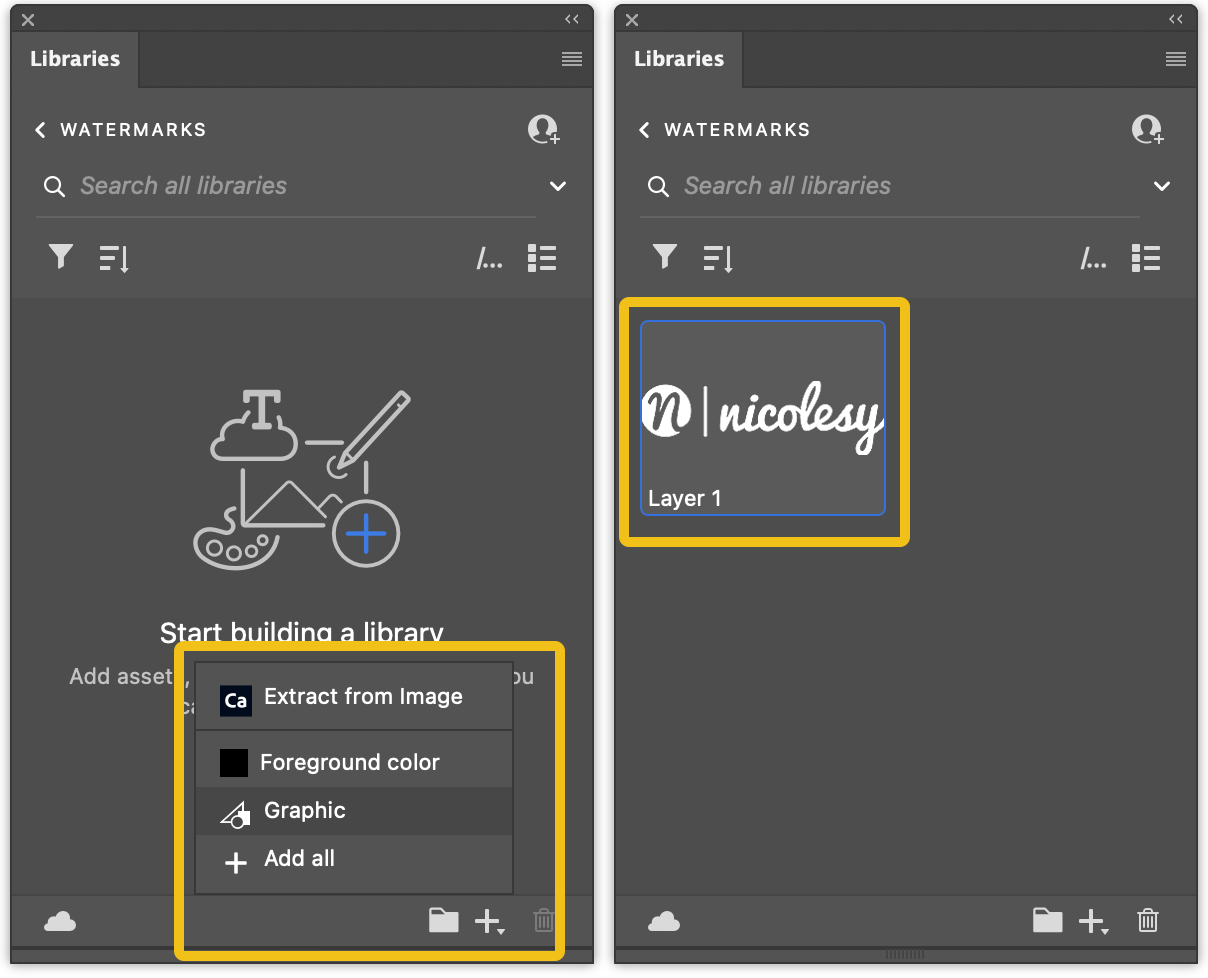
Now, it’s time to save it to the Creative Cloud Library so that you can access it from within Photoshop. Open the Libraries panel (Window > Libraries) and click “Create New Library” at the top. Name the new Library (I’ll name mine “Watermarks”) and click Create.
With your watermark file still open, click the + icon at the bottom of the Libraries panel. Choose Graphic from the pop-up list. Your watermark image is now saved to your library and can be accessed from Photoshop at any time, on any of your computers.
You can now close your watermark file. There is no need to save the file because it has been added to the Creative Cloud.
Step 3: Open your photo
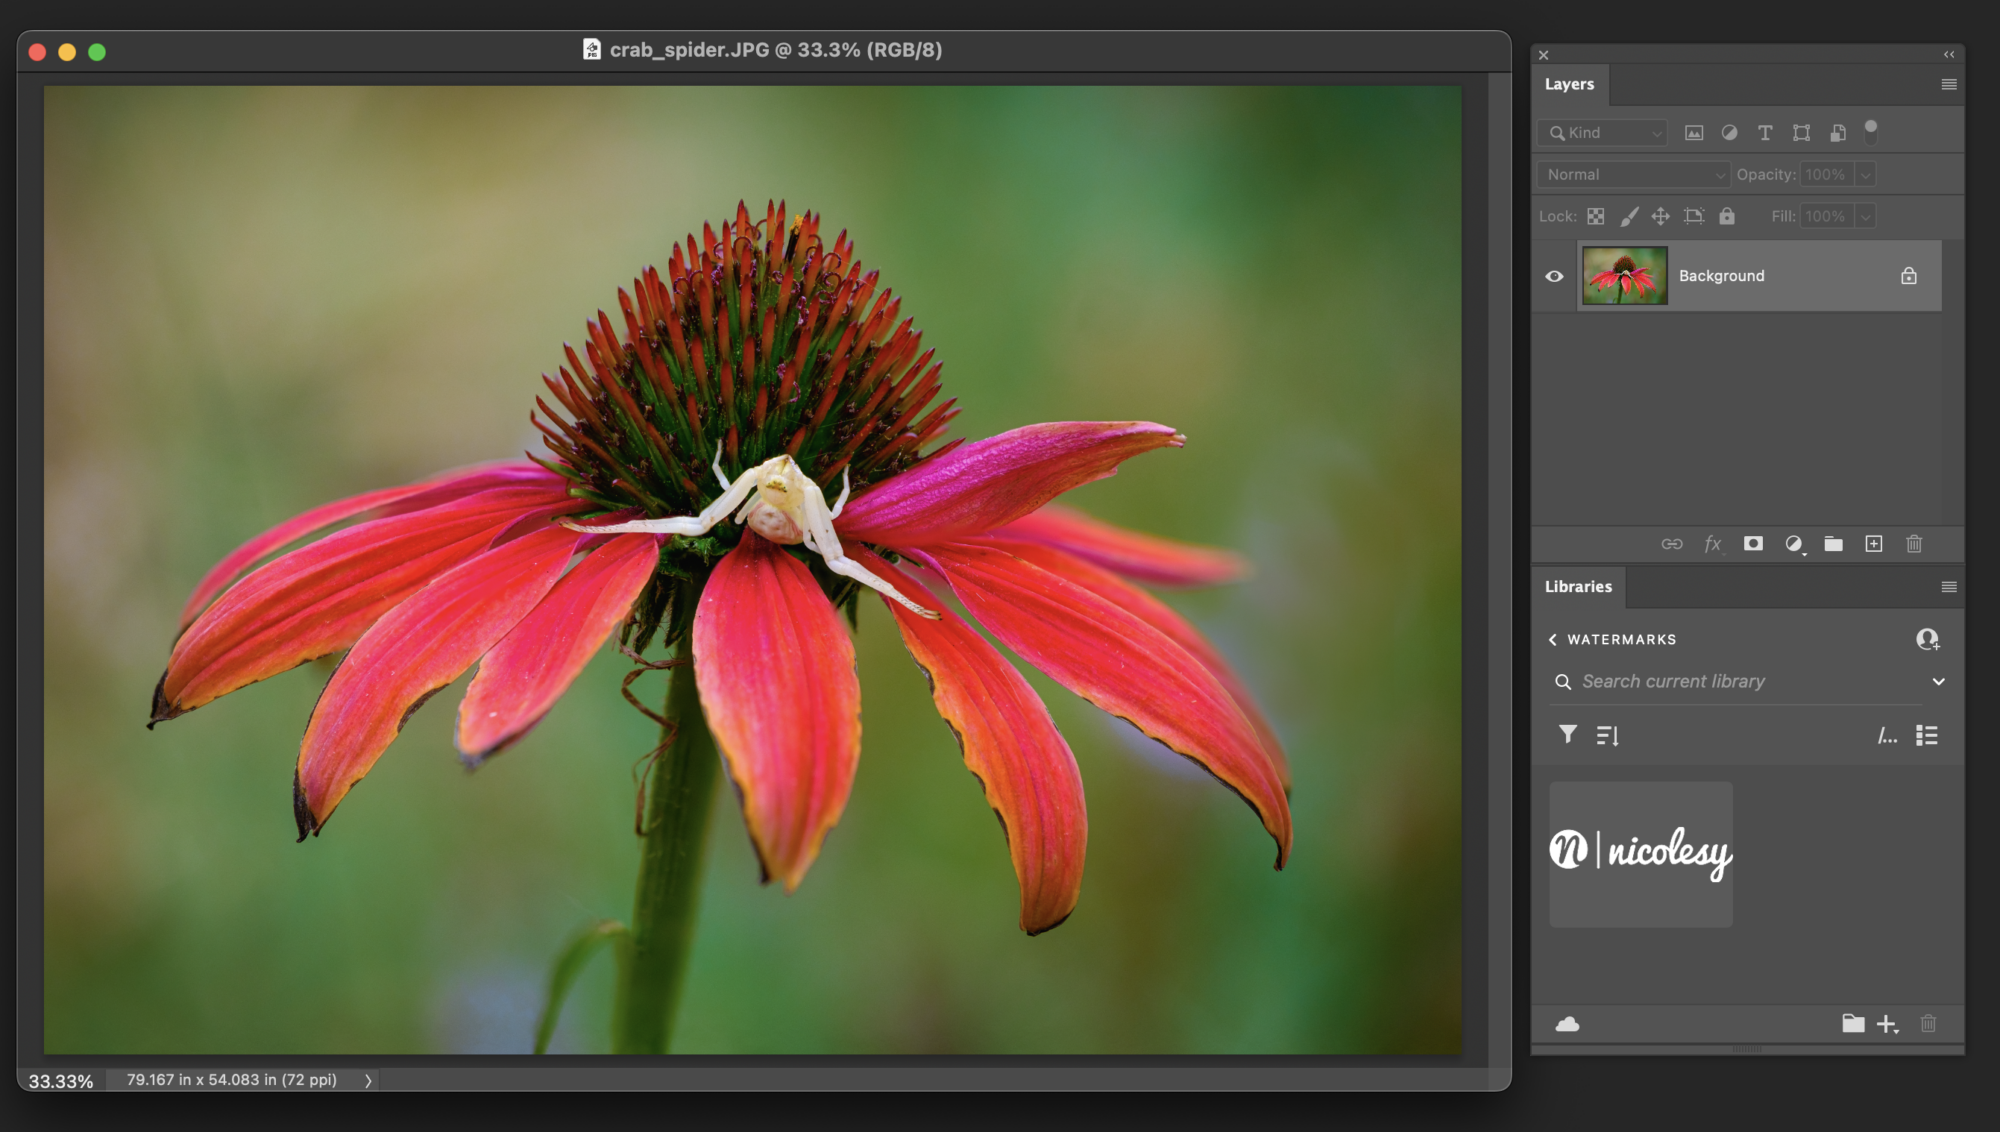
Next, open the photo to which you want to apply the watermark. You will also want to ensure you have both the Layers and Libraries panels open.
Step 4: Add the watermark
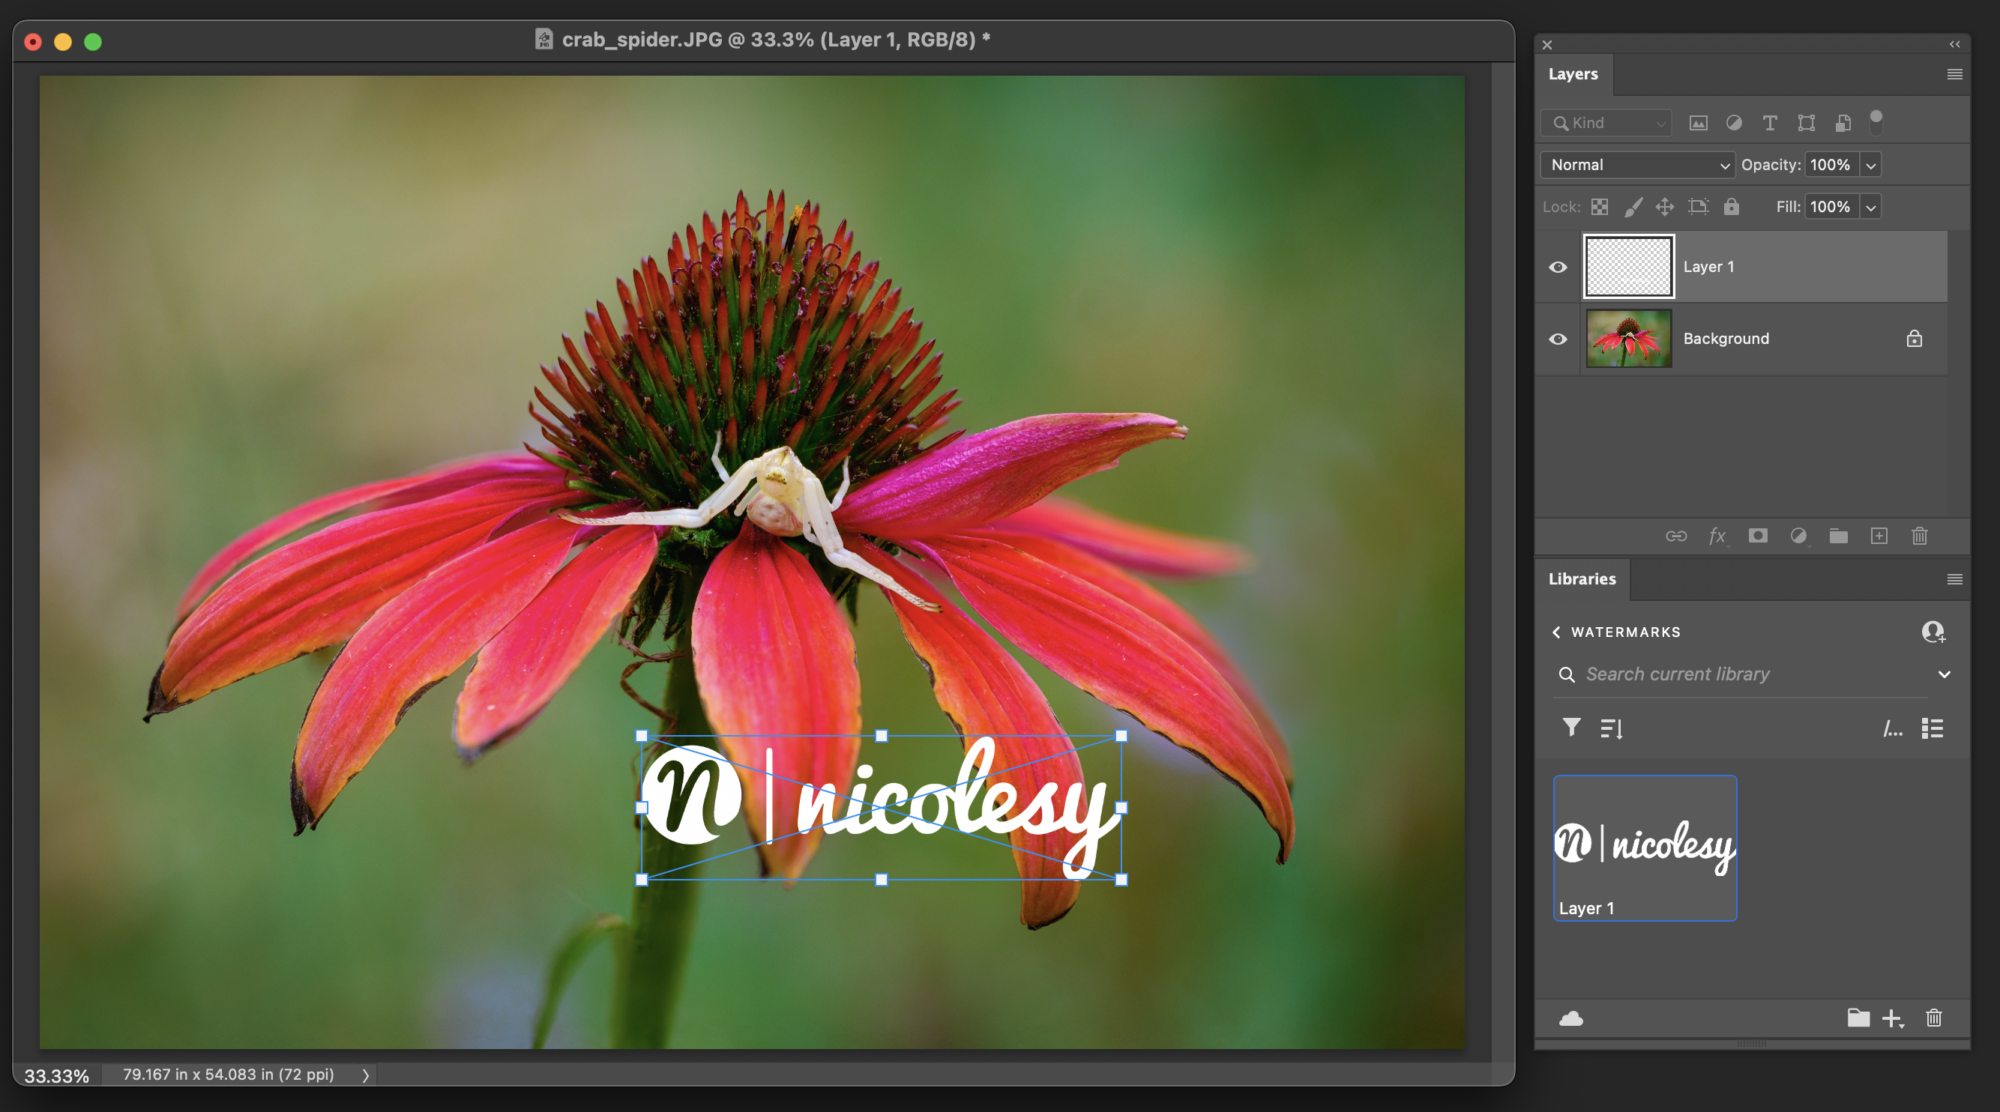
From the Libraries panel, drag and drop the watermark image to your photo document. This adds the watermark as a new layer in the Layers panel.
Note: This adds the watermark image as a Smart Object, with the object linked to the original Creative Cloud file. If you prefer to add it as an independent layer, you can press and hold the Opt (Mac) or Alt (Win) key while dragging.
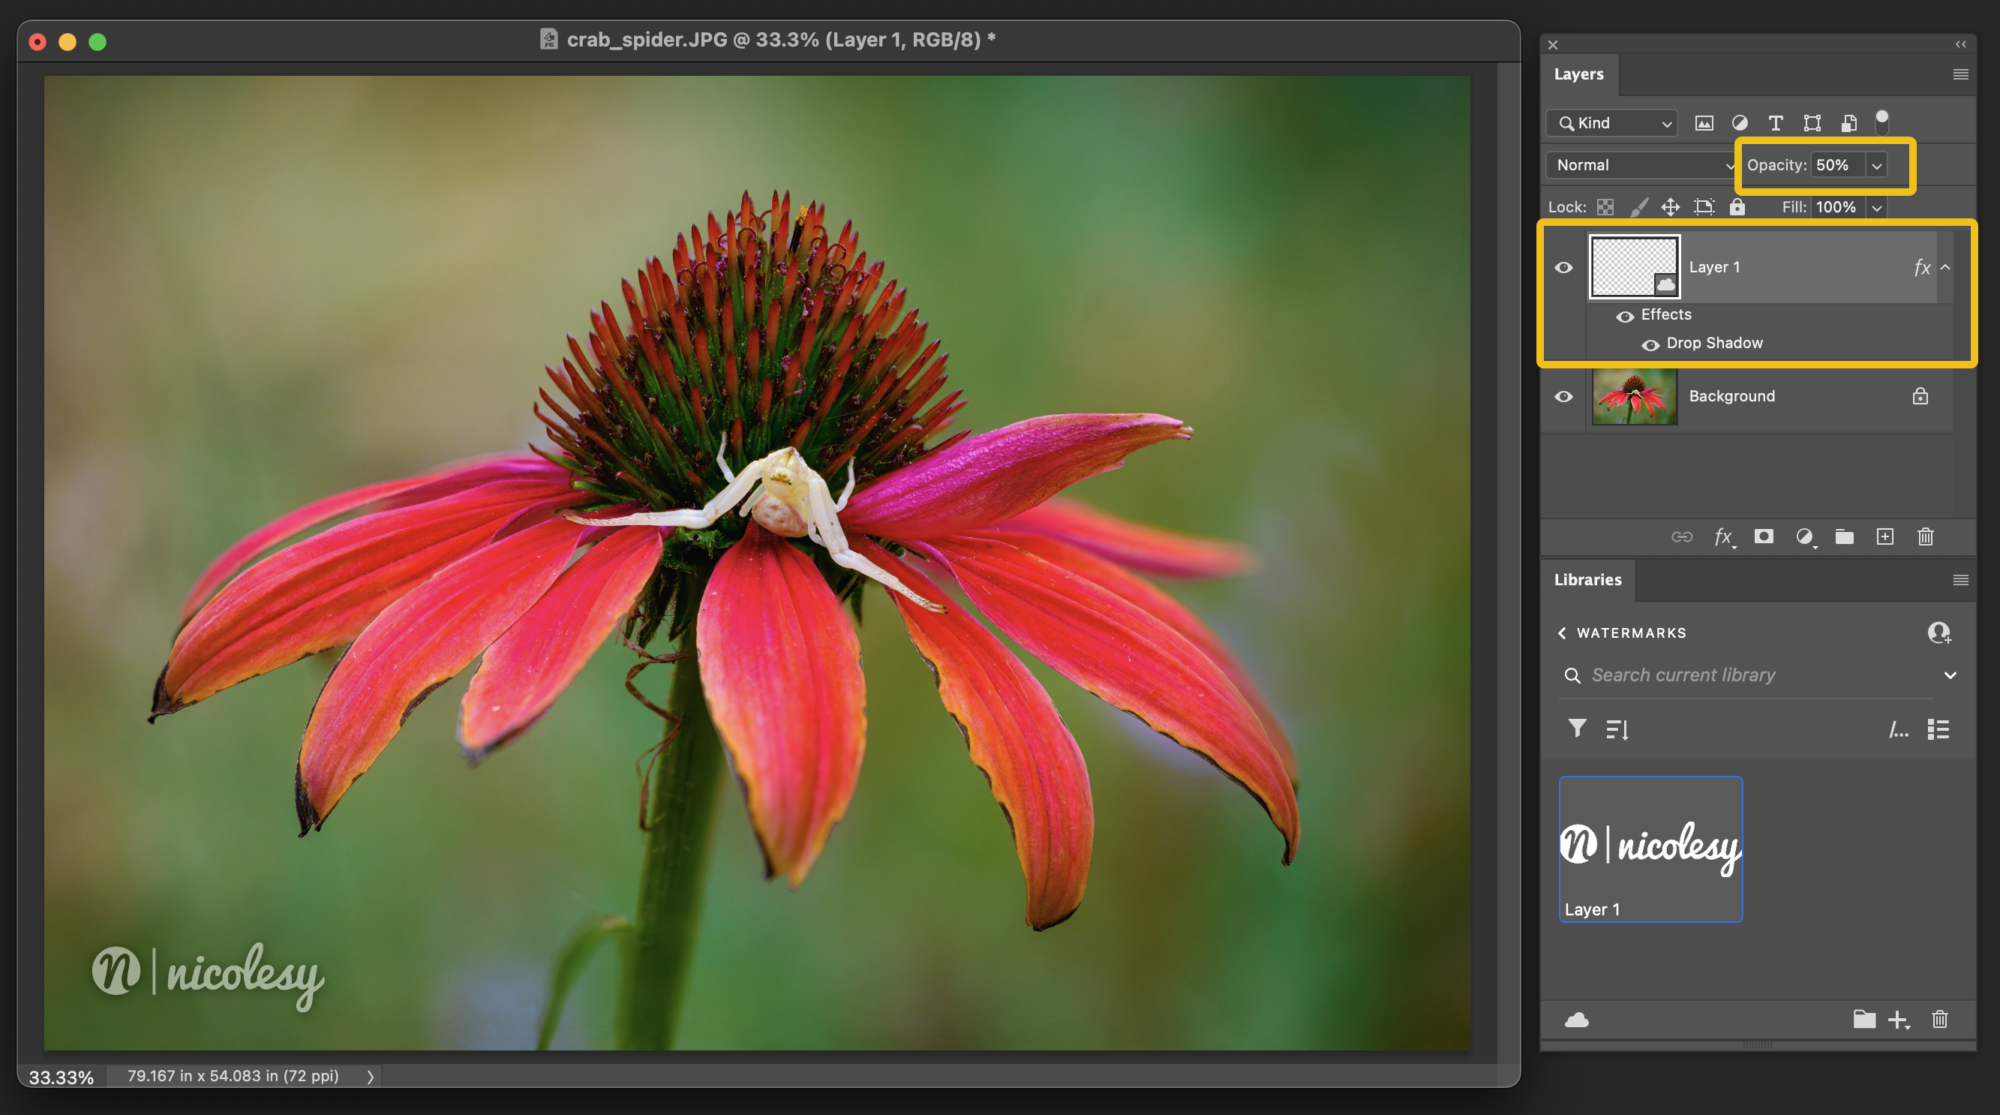
Step 5: Reposition and stylize the watermark
Position the watermark in your photo using the Move tool (keyboard shortcut = V). You can also resize the watermark to make it smaller or larger using the shortcut Cmd = T (Mac) or Ctrl + T (Win).
You can also stylize the watermark to blend better with the photo. Some options include:
- Layer Opacity: Lower the opacity of the watermark layer to make it more subdued.
- Drop Shadow: Add a drop shadow using Layer Styles to help separate the watermark from the photo to make it more visible.
Note: To add a layer style, go to Layer > Layer Style and choose the style you want to add. Or, double-click the layer in the blank space (next to the layer name).
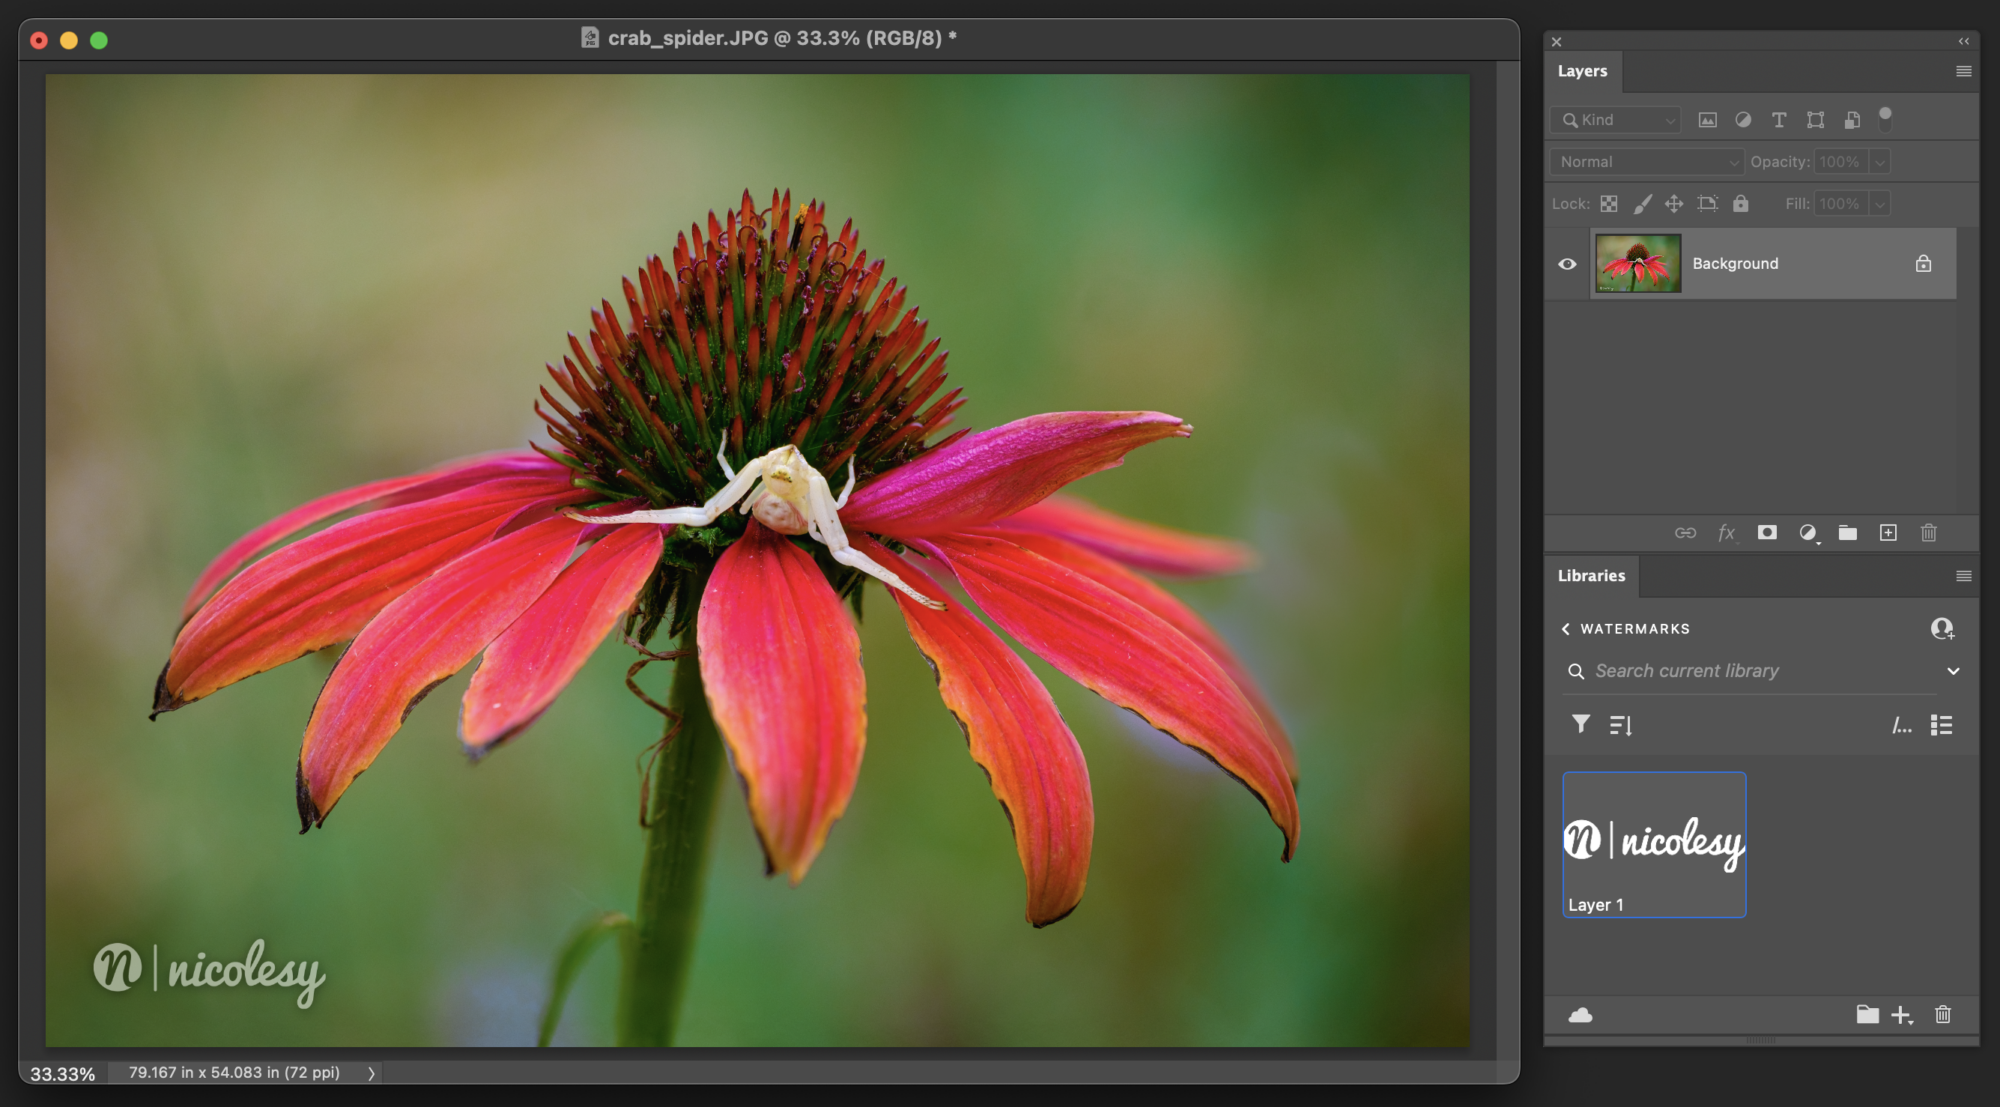
Finally, flatten and save the file (Layer > Flatten Image), and you will now have a watermark applied to your photo. You can continue using the same watermark from the Libraries panel on other images without having to locate it on your computer.
Adding a watermark to your photos can serve many purposes. It can help protect your images from unauthorized use, promote your brand, or even serve as a visual signature that establishes copyright ownership. Whatever your reason for using a watermark, using Photoshop and the Creative Cloud Library makes it easy to quickly apply your watermark to any image with only a few simple steps.
In this tutorial, I’ll show you a simple, efficient way to protect and personalize your photographs using Adobe Photoshop. I’ll also be tapping into the power of Creative Cloud Libraries, making it incredibly easy to apply your watermark consistently across various images. Let’s get started!
Table of Contents:
Step 1: Create your watermark image
The watermark you use on your images can be made out of text or an existing logo, or you can even use your written signature. I’ll use my Nicolesy logo from an existing PNG file for this tutorial. So, to get started, I first open the PNG file in Photoshop.
Note: It’s best to use a document with a transparent background.
Here’s how to create your watermark file from scratch:
- Create a new Photoshop document with a transparent background (I recommend a document size of at least 1000 px wide to accommodate a wide range of image documents the watermark will be added to).
- If you want to create a text watermark, activate the Type tool and type out your name or business. Set the font settings to your desired look, and set the color to White. To add the © symbol, type Opt + G (Mac) or Alt + 0 1 6 9 (Windows).
- To create a signature watermark, activate the Brush tool. Set the brush hardness to 0, and the color to white, and set the size to something that is not too thick. Then, draw your signature on the image.
- Remove any excess space around your image by going to Image > Trim. Set the option to Transparent Pixels, and click OK.
Step 2: Save the watermark to the Creative Cloud Library
Now, it’s time to save it to the Creative Cloud Library so that you can access it from within Photoshop. Open the Libraries panel (Window > Libraries) and click “Create New Library” at the top. Name the new Library (I’ll name mine “Watermarks”) and click Create.
With your watermark file still open, click the + icon at the bottom of the Libraries panel. Choose Graphic from the pop-up list. Your watermark image is now saved to your library and can be accessed from Photoshop at any time, on any of your computers.
You can now close your watermark file. There is no need to save the file because it has been added to the Creative Cloud.
Step 3: Open your photo
Next, open the photo to which you want to apply the watermark. You will also want to ensure you have both the Layers and Libraries panels open.
Step 4: Add the watermark
From the Libraries panel, drag and drop the watermark image to your photo document. This adds the watermark as a new layer in the Layers panel.
Note: This adds the watermark image as a Smart Object, with the object linked to the original Creative Cloud file. If you prefer to add it as an independent layer, you can press and hold the Opt (Mac) or Alt (Win) key while dragging.
Step 5: Reposition and stylize the watermark
Position the watermark in your photo using the Move tool (keyboard shortcut = V). You can also resize the watermark to make it smaller or larger using the shortcut Cmd = T (Mac) or Ctrl + T (Win).
You can also stylize the watermark to blend better with the photo. Some options include:
- Layer Opacity: Lower the opacity of the watermark layer to make it more subdued.
- Drop Shadow: Add a drop shadow using Layer Styles to help separate the watermark from the photo to make it more visible.
Note: To add a layer style, go to Layer > Layer Style and choose the style you want to add. Or, double-click the layer in the blank space (next to the layer name).
Finally, flatten and save the file (Layer > Flatten Image), and you will now have a watermark applied to your photo. You can continue using the same watermark from the Libraries panel on other images without having to locate it on your computer.

Nicole is a photographer, published author, and educator specializing in Lightroom, Photoshop, and photography. She is best known for her books on food photography but is widely versed in various photographic genres, including landscape, nature, stock, travel, and experimental imagery.


That’s excellent instruction. Can you do it the same way in Lightroom? Thanks Jeanne K
Yes, you can add watermarks in Lightroom and Lightroom Classic. There’s an option when you export the photo to choose either a graphic or use text.
Very informative and clear instructions.
Thank you Nicole!
Thanks Nicole – appreciated!