

Adobe Photoshop has always been the go-to software for photo editing and graphic design. But with the introduction of Generative Fill AI, Photoshop has taken a giant leap forward. This feature is not just another tool in your Photoshop arsenal; it’s a game-changer. In this article, we’ll delve into the nitty-gritty of Generative Fill AI, explore how it can revolutionize your art styles, and guide you through the setup process for creating stunning art style effects.
Before we dive into the how-to, let’s understand what Generative Fill AI is. It’s an artificial intelligence-powered feature that allows you to fill selected areas of your image with content that is contextually relevant and visually stunning. Think of it as the smarter, more artistic cousin of the traditional fill tool.
Creating art styles over your photos
One of the most exciting applications of Generative Fill AI is its ability to create unique art styles over your existing photos. Imagine turning your simple portrait into a watercolor painting or a chalk art drawing. The possibilities are endless, and the best part is, you don’t have to be an art guru to do it.


50 Photoshop Art Style Prompts
I’ve listed 50 prompts below that you can play with or get creative and develop your own. Experiment to see what unique looks you can discover. (Click any photo to view it larger.)

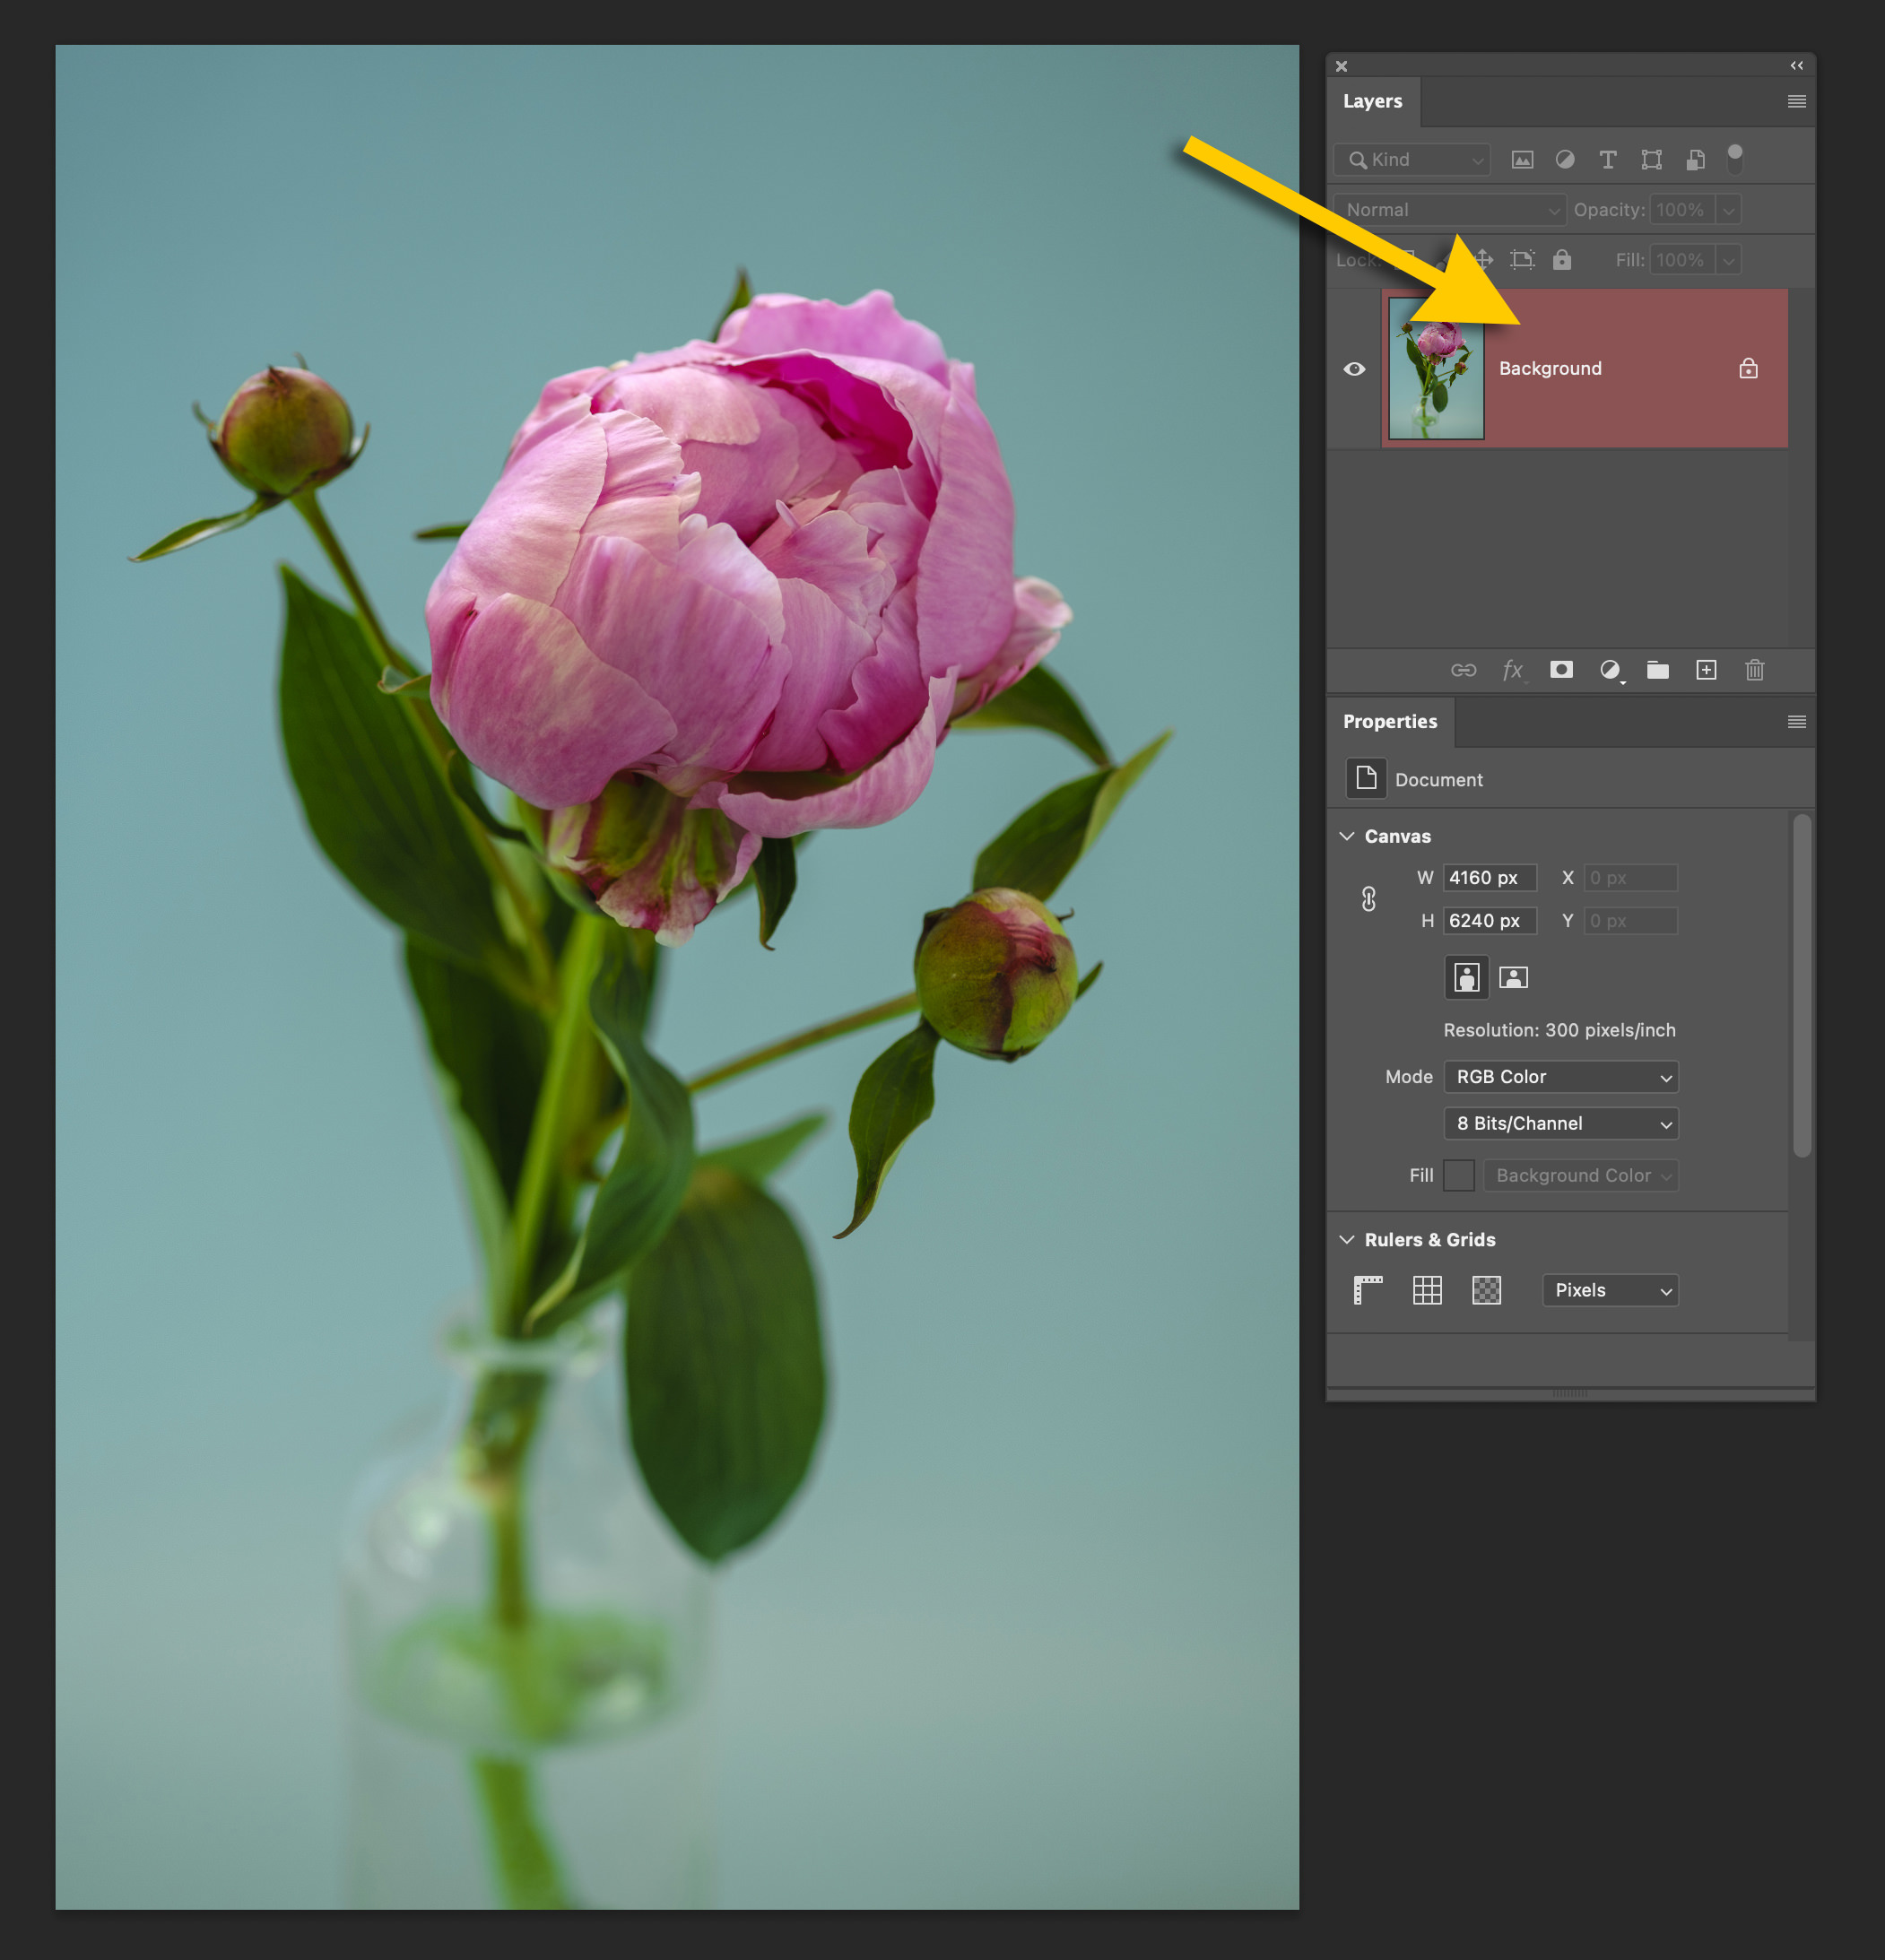
Original Image

Prompt: 3D Render

Prompt: Abstract Painting

Prompt: Acrylic Painting

Prompt: Cartoon Illustration

Prompt: Chalk Drawing

Prompt: Chaotic Painting

Prompt: Charcoal Drawing

Prompt: Childrens Book Illustration

Prompt: Coffee Stain Art

Prompt: Colored Pencil

Prompt: Coloring Page

Prompt: Comic Book Illustration

Prompt: Concrete Texture

Prompt: Cracked Paint

Prompt: Digital Illustration

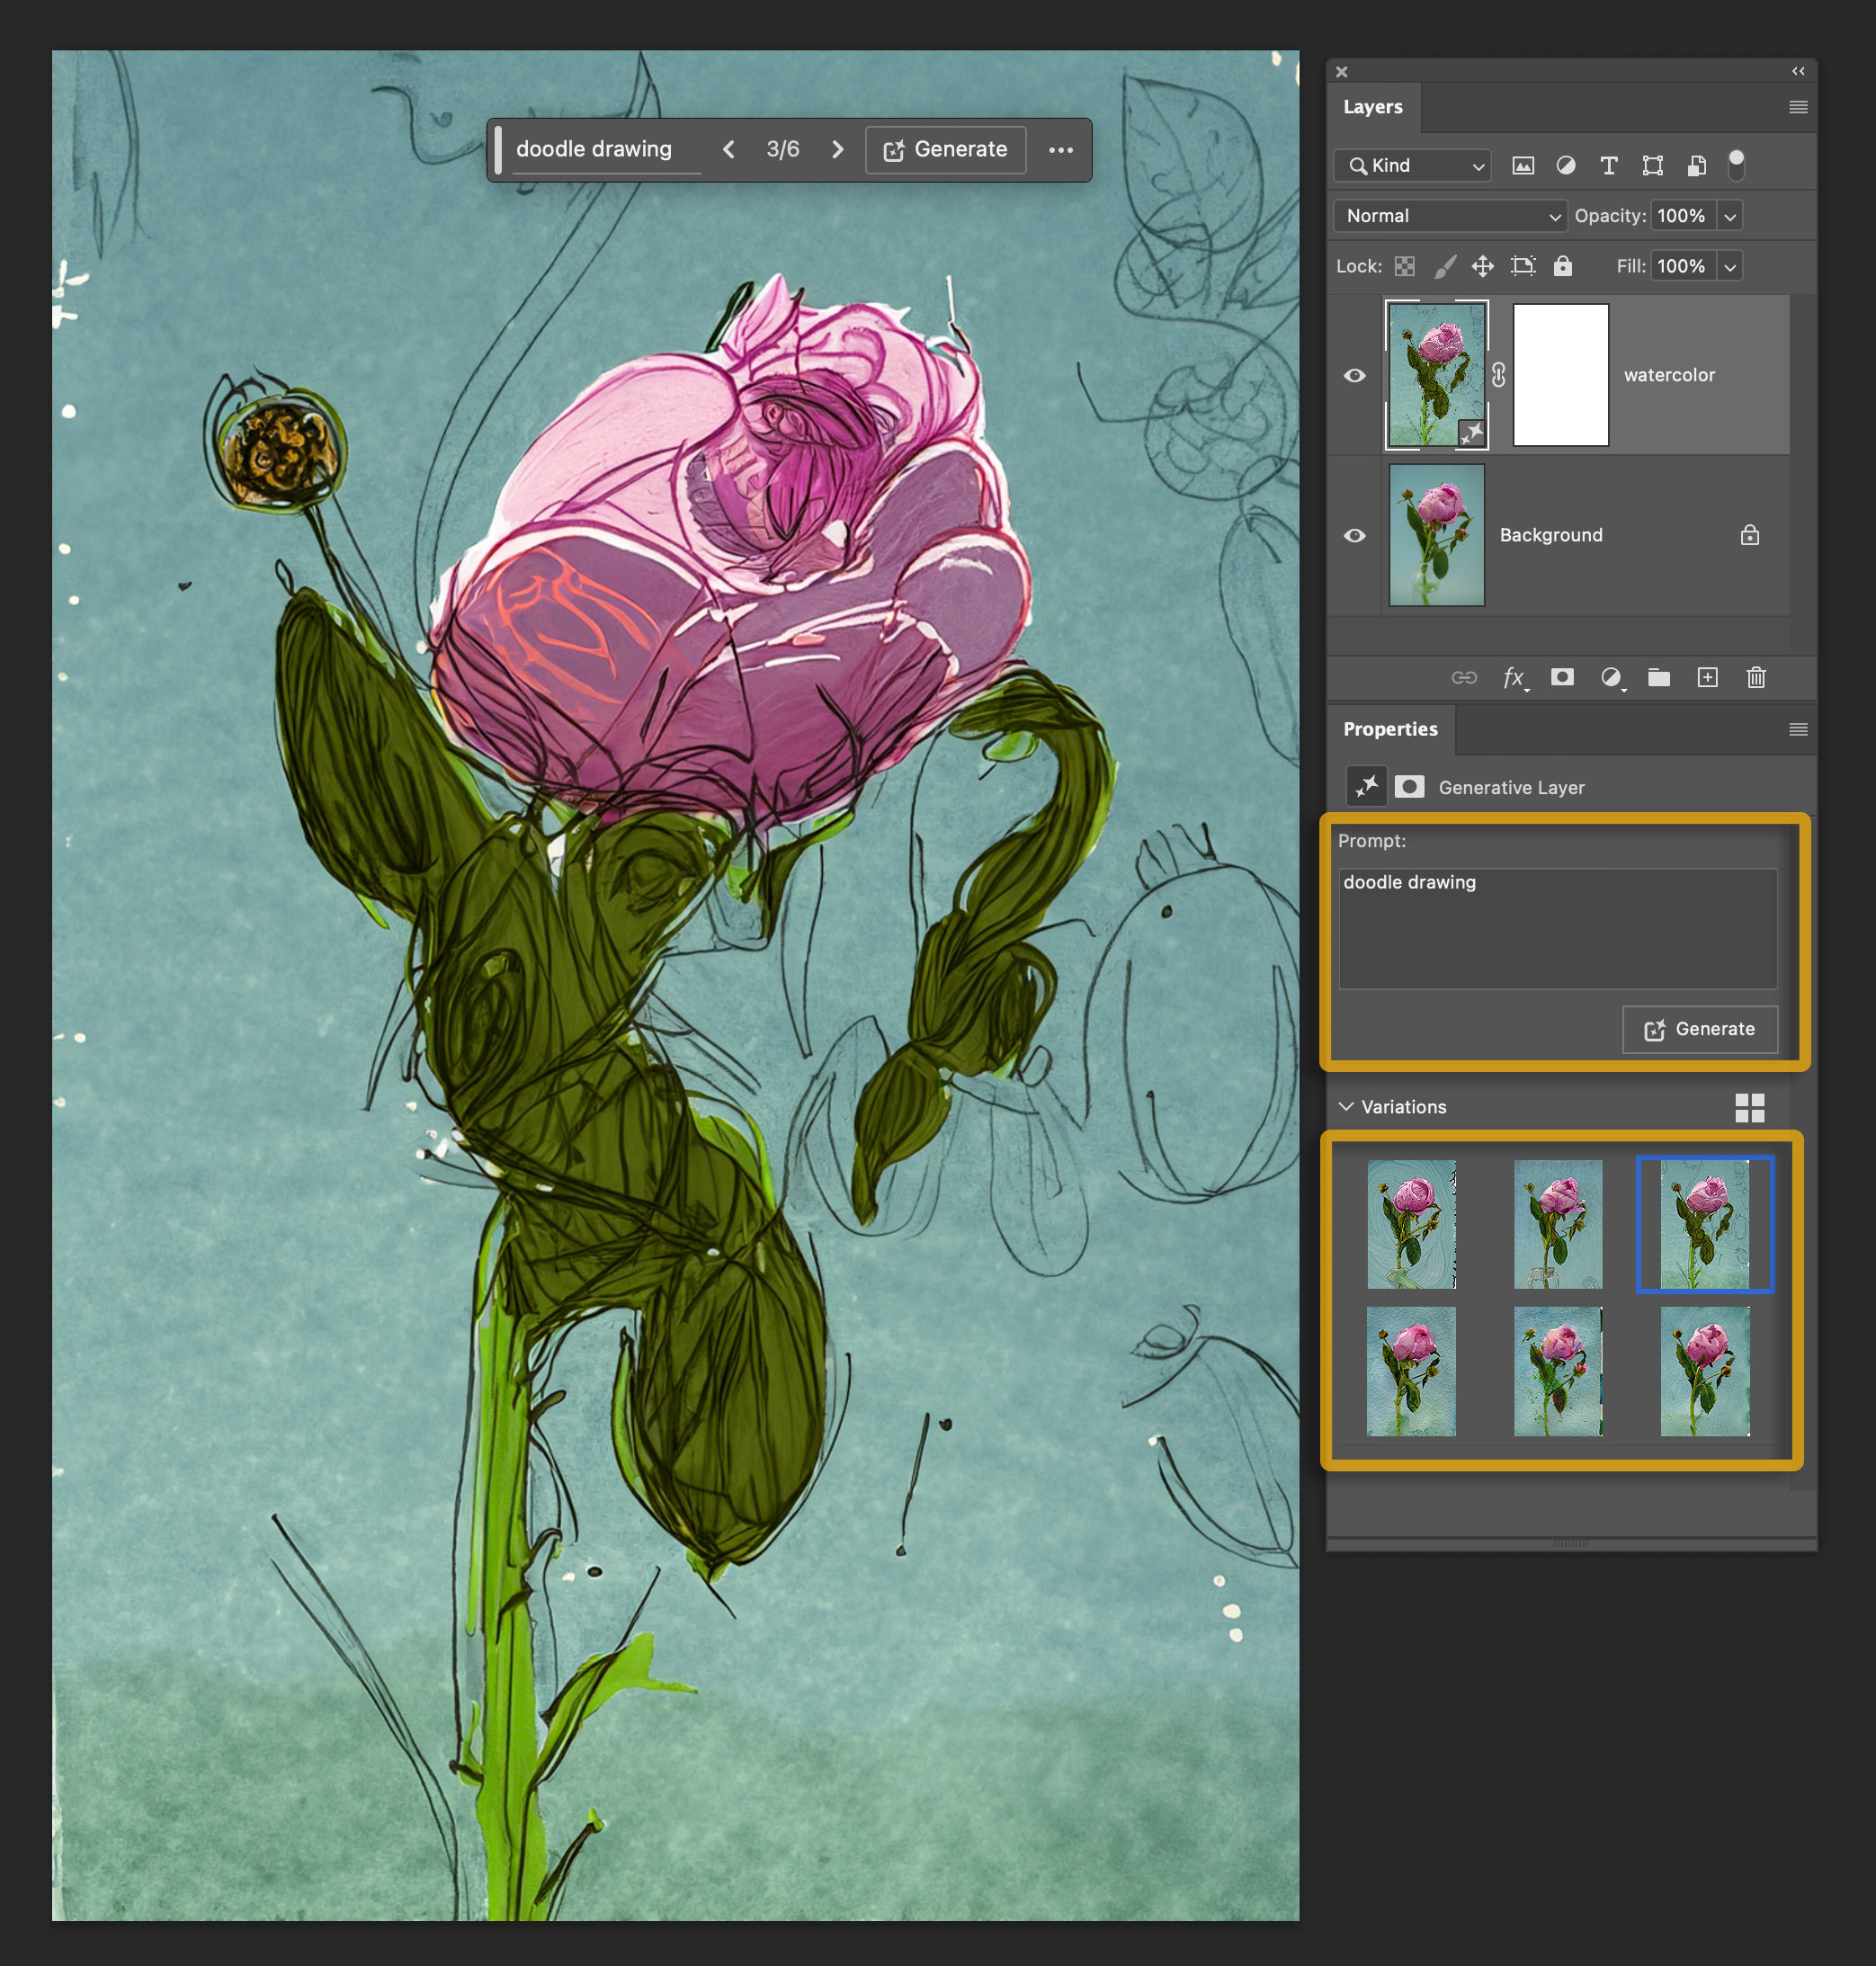
Prompt: Doodle Drawing

Prompt: Dripping Painting

Prompt: Encaustic Painting

Prompt: Felt Painting

Prompt: Fine Art Painting High Detail

Prompt: Fractal Art

Prompt: Geometric Painting

Prompt: Glitch Art

Prompt: Glitter Art

Prompt: Goauche

Prompt: Graffiti Art

Prompt: Graphite Drawing

Prompt: Impressionism Painting

Prompt: Ink Drawing

Prompt: Mosaic

Prompt: Oil Painting

Prompt: Pencil Sketch

Prompt: Psychadelic Painting

Prompt: Scribble Art Drawing

Prompt: Seamless Pattern

Prompt: Smoky

Prompt: Smudge Painting

Prompt: Splash Art

Prompt: Splattering Painting

Prompt: Stained Glass Art

Prompt: Swirl Painting

Prompt: Textile Art

Prompt: Textured Painting

Prompt: Underwater

Prompt: Vector Illustration

Prompt: Vintage Ephemera

Prompt: Water Drops

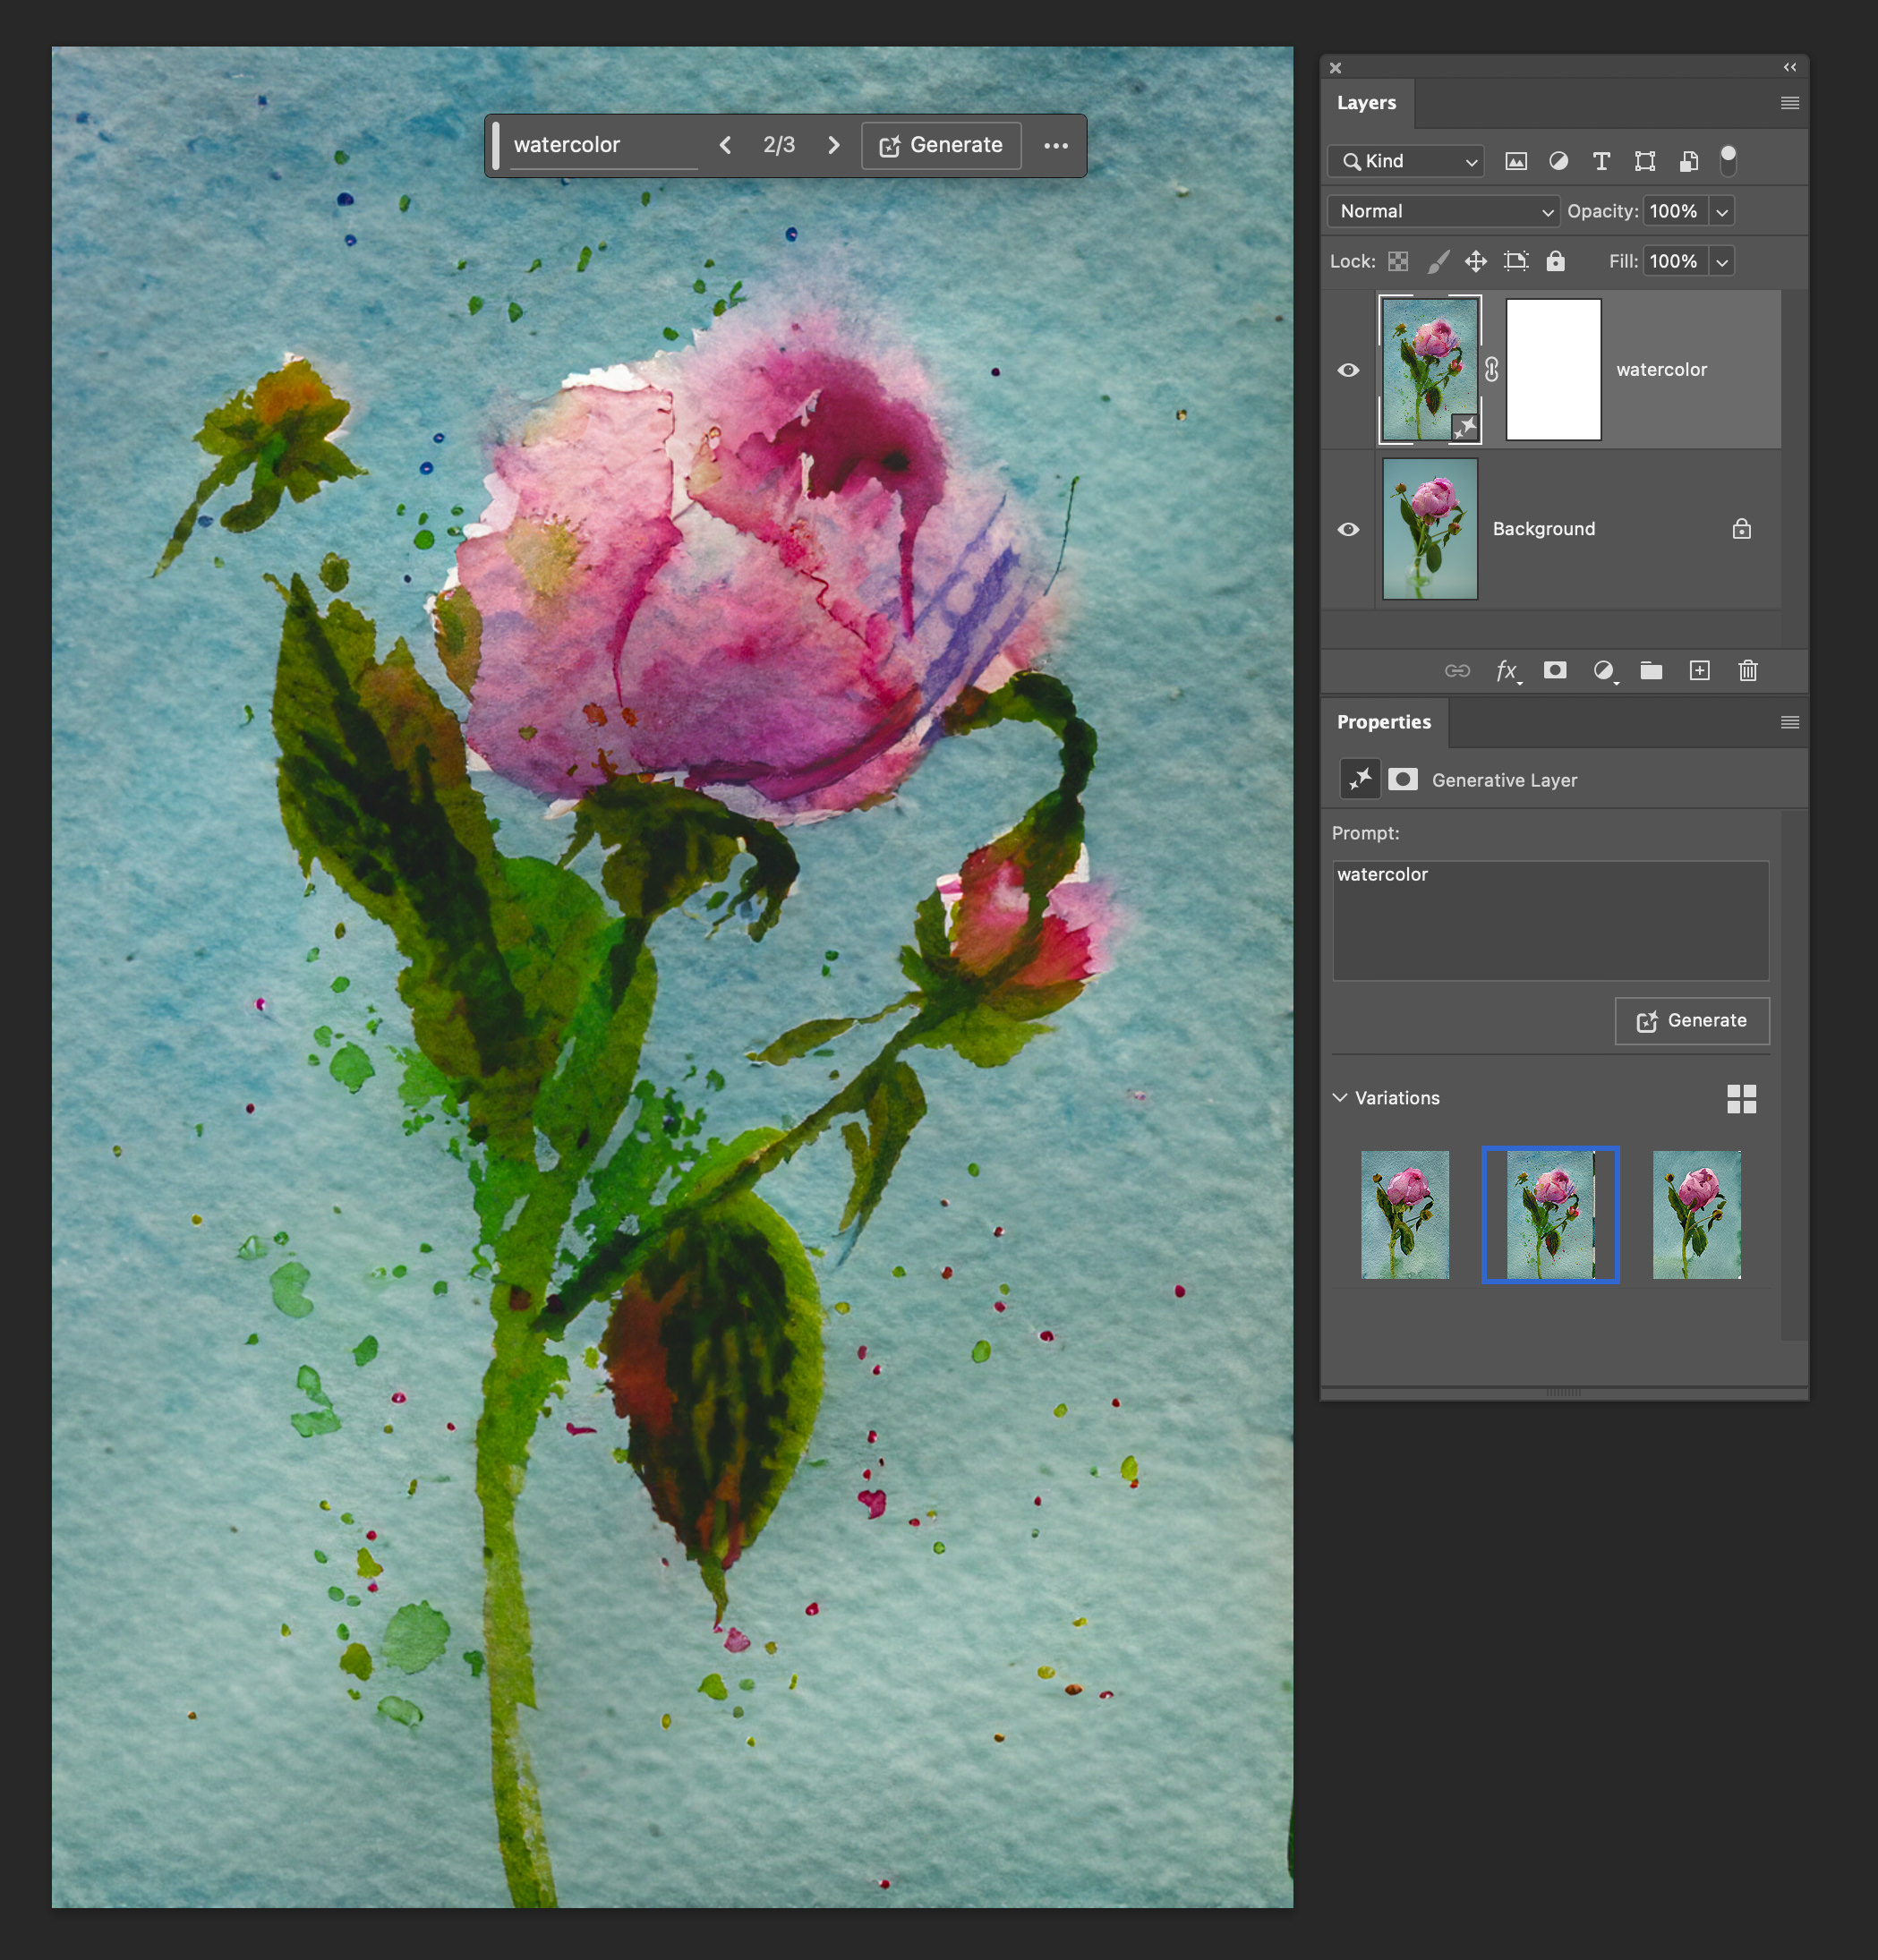
Prompt: Watercolor

Prompt: Woodcut Art

Prompt: Yarn Art
Additional Tips for Mastering Generative Fill AI
- Experiment with Different Prompts: Try using unique phrases for your art styles to see what you can come up with. You may discover something beautiful that you were not expecting.
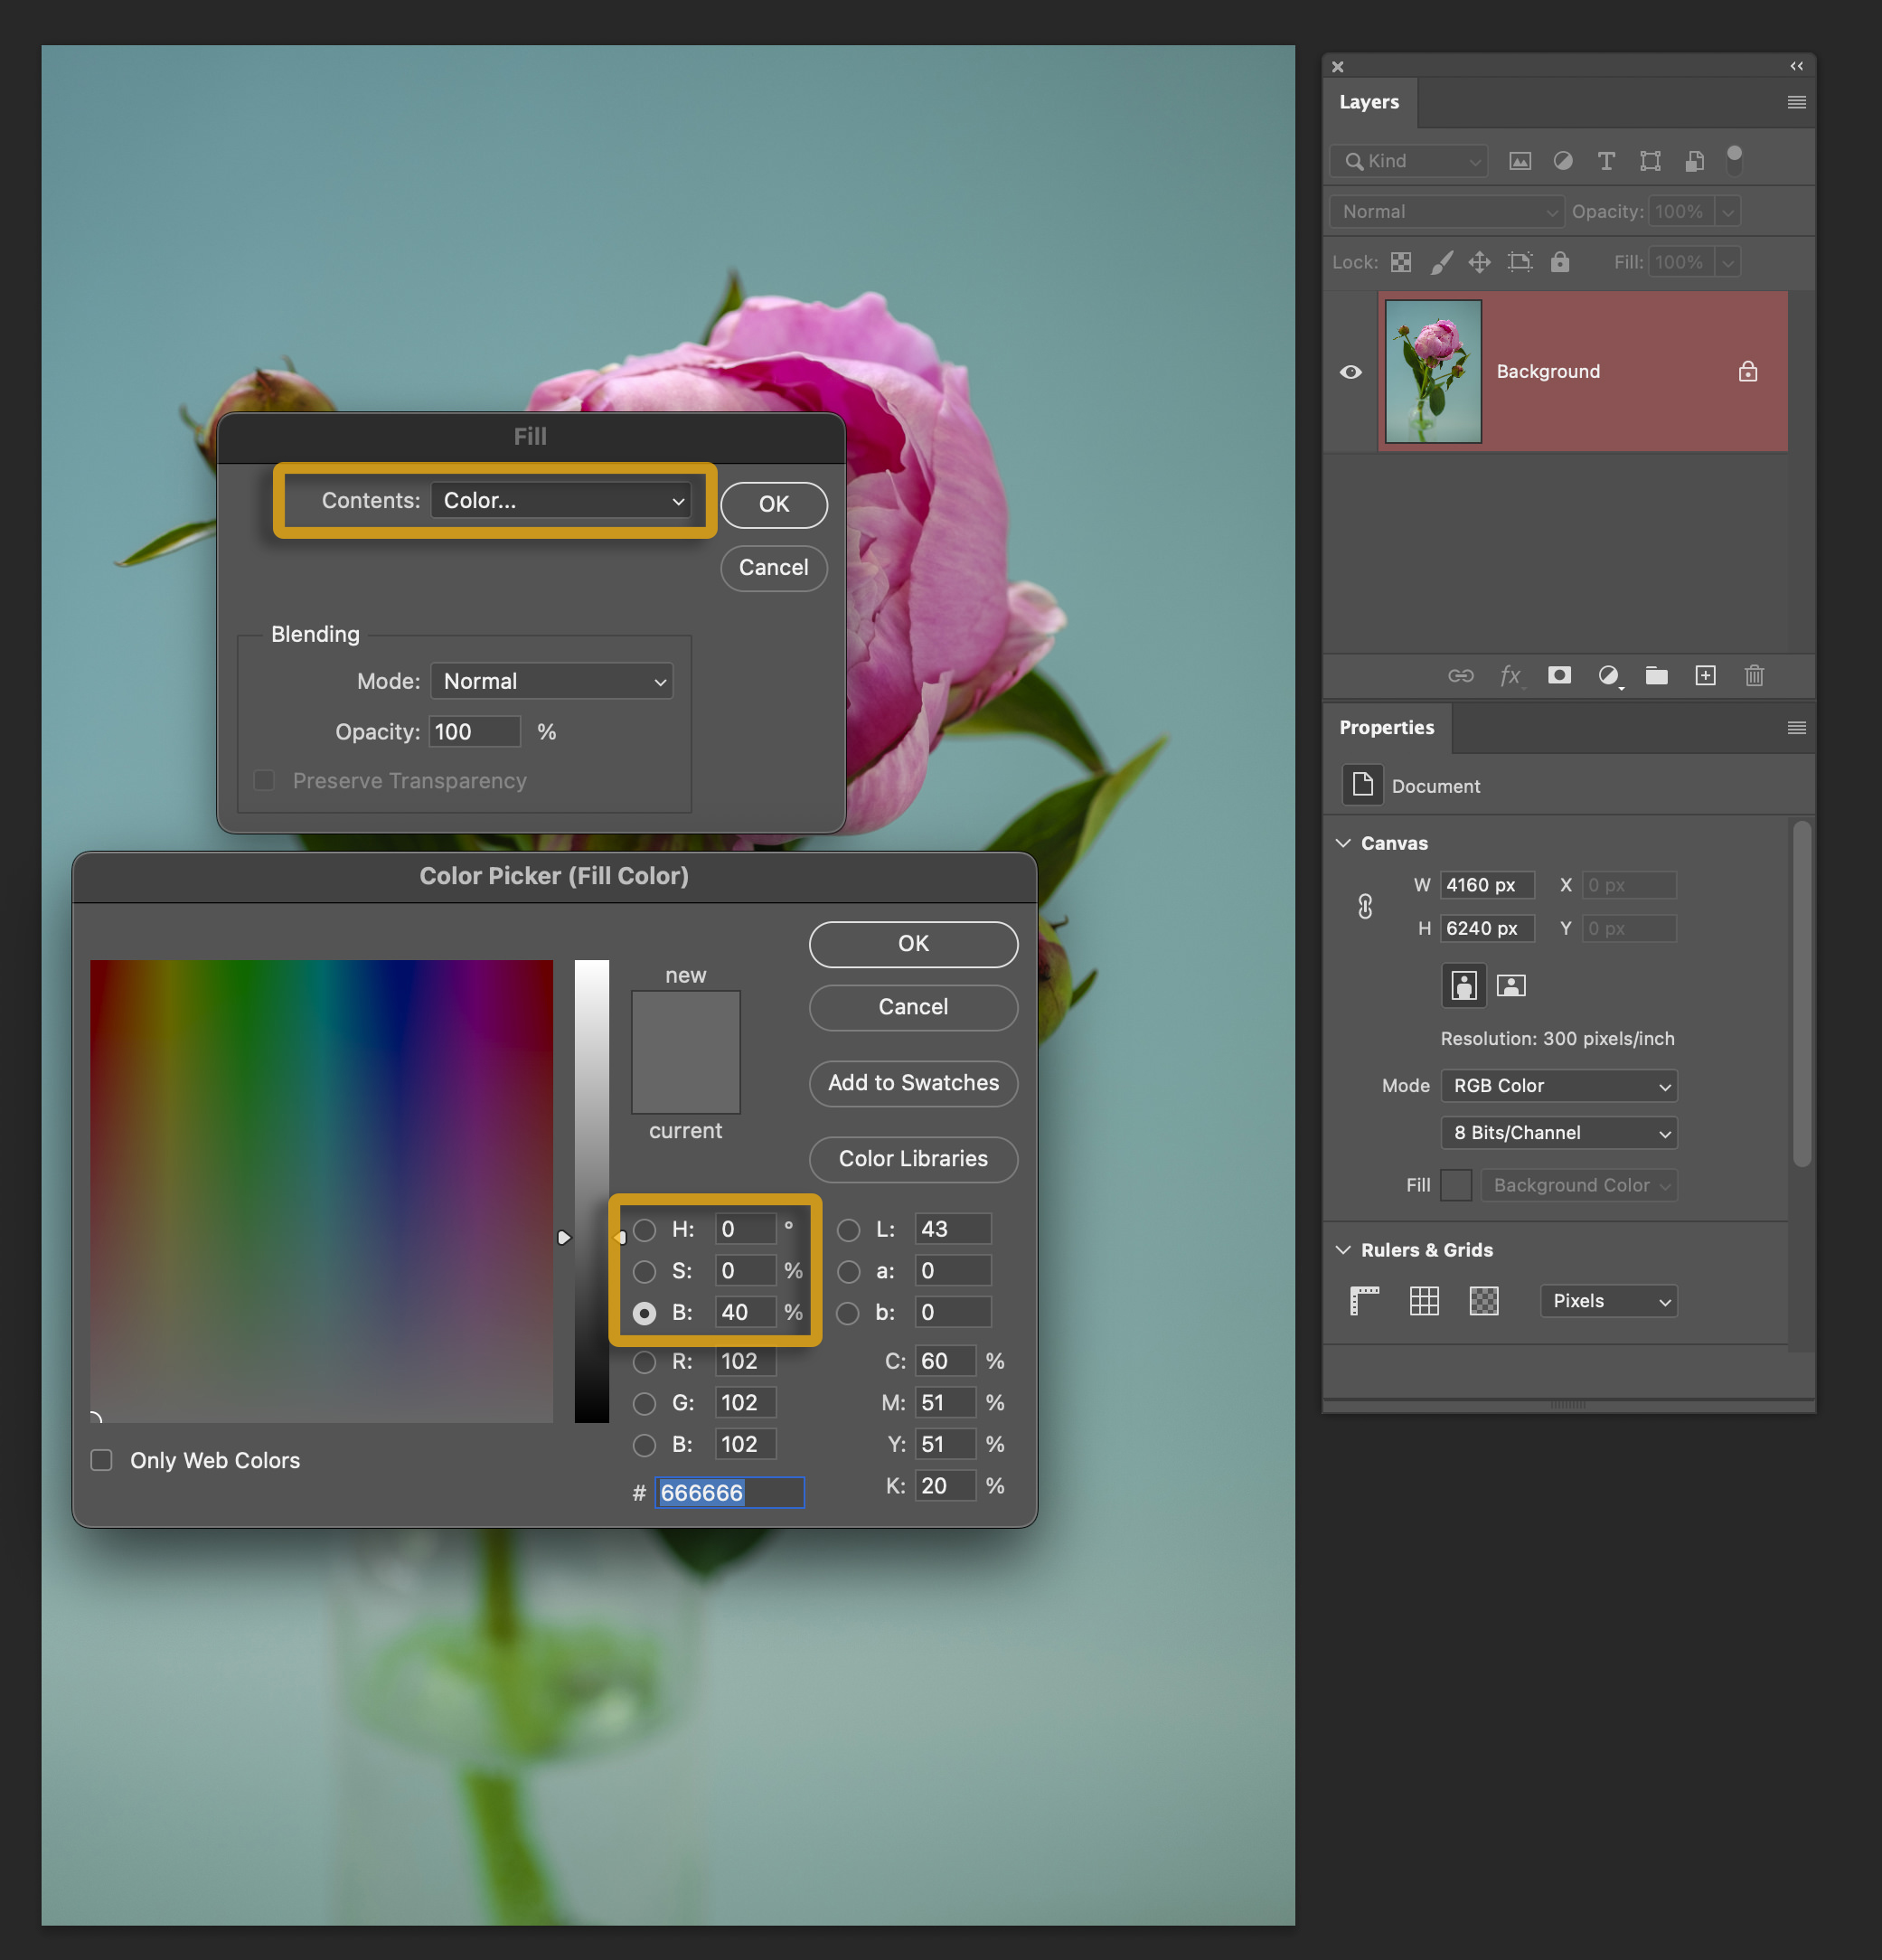
- Adjust the Selection Brightness: Play around with different selection transparency/brightness levels to achieve various effects.
- Make multiple selections: Consider creating multiple selections of different areas to layer the art styles throughout your image.
Limitations of Photoshop’s Generative Fill AI
While Generative Fill AI is a groundbreaking feature, it’s essential to understand its limitations to make the most out of it. Here are some points to consider:
- Resource-Intensive: Generative Fill AI is a powerful tool that can be resource-intensive. It also requires an Internet connection to work and can be very needy in that regard (meaning it will suck up your Internet use while processing).
- Not Always Perfect: As advanced as it is, Generative Fill AI is not foolproof. There may be instances where the generated fill doesn’t match your prompt or fit well with your existing image.
- Limited image resolution: When this article was written, Generative Fill AI could only create a maximum of 1024px wide. This means that the resolution of the AI you create may not match up with your original image’s resolution. Essentially, it will create a 1024px generation and then stretch it to fit your selection.
- Credit uses with your Creative Cloud plan: Starting November 1st, 2023, each time you click the “Generate” button, you will use up one generative credit. The number of monthly credits you have in your account will depend on your plan. You can read more about how generative credits work on Adobe’s website here. After your credits expire, you can still use the AI features, but they will run slower than usual.
AI: The Future of Photo Editing
Generative Fill AI is not just a feature; it’s a revolution in photo editing and graphic design. As a photographer, I fully embrace what AI art has to offer, whether it is creating my own unique images from scratch or editing existing photographs with Photoshop’s new Generative AI Fill and Generative AI Expand. AI is yet another tool for us as artists to work with and develop our own distinct style, and I believe AI is here to stay. So why not make it worth your while?
Adobe Photoshop has always been the go-to software for photo editing and graphic design. But with the introduction of Generative Fill AI, Photoshop has taken a giant leap forward. This feature is not just another tool in your Photoshop arsenal; it’s a game-changer. In this article, we’ll delve into the nitty-gritty of Generative Fill AI, explore how it can revolutionize your art styles, and guide you through the setup process for creating stunning art style effects.
Before we dive into the how-to, let’s understand what Generative Fill AI is. It’s an artificial intelligence-powered feature that allows you to fill selected areas of your image with content that is contextually relevant and visually stunning. Think of it as the smarter, more artistic cousin of the traditional fill tool.
Creating art styles over your photos
One of the most exciting applications of Generative Fill AI is its ability to create unique art styles over your existing photos. Imagine turning your simple portrait into a watercolor painting or a chalk art drawing. The possibilities are endless, and the best part is, you don’t have to be an art guru to do it.
50 Photoshop Art Style Prompts
I’ve listed 50 prompts below that you can play with or get creative and develop your own. Experiment to see what unique looks you can discover. (Click any photo to view it larger.)
Original Image
Prompt: 3D Render
Prompt: Abstract Painting
Prompt: Acrylic Painting
Prompt: Cartoon Illustration
Prompt: Chalk Drawing
Prompt: Chaotic Painting
Prompt: Charcoal Drawing
Prompt: Childrens Book Illustration
Prompt: Coffee Stain Art
Prompt: Colored Pencil
Prompt: Coloring Page
Prompt: Comic Book Illustration
Prompt: Concrete Texture
Prompt: Cracked Paint
Prompt: Digital Illustration
Prompt: Doodle Drawing
Prompt: Dripping Painting
Prompt: Encaustic Painting
Prompt: Felt Painting
Prompt: Fine Art Painting High Detail
Prompt: Fractal Art
Prompt: Geometric Painting
Prompt: Glitch Art
Prompt: Glitter Art
Prompt: Goauche
Prompt: Graffiti Art
Prompt: Graphite Drawing
Prompt: Impressionism Painting
Prompt: Ink Drawing
Prompt: Mosaic
Prompt: Oil Painting
Prompt: Pencil Sketch
Prompt: Psychadelic Painting
Prompt: Scribble Art Drawing
Prompt: Seamless Pattern
Prompt: Smoky
Prompt: Smudge Painting
Prompt: Splash Art
Prompt: Splattering Painting
Prompt: Stained Glass Art
Prompt: Swirl Painting
Prompt: Textile Art
Prompt: Textured Painting
Prompt: Underwater
Prompt: Vector Illustration
Prompt: Vintage Ephemera
Prompt: Water Drops
Prompt: Watercolor
Prompt: Woodcut Art
Prompt: Yarn Art
Additional Tips for Mastering Generative Fill AI
- Experiment with Different Prompts: Try using unique phrases for your art styles to see what you can come up with. You may discover something beautiful that you were not expecting.
- Adjust the Selection Brightness: Play around with different selection transparency/brightness levels to achieve various effects.
- Make multiple selections: Consider creating multiple selections of different areas to layer the art styles throughout your image.
Limitations of Photoshop’s Generative Fill AI
While Generative Fill AI is a groundbreaking feature, it’s essential to understand its limitations to make the most out of it. Here are some points to consider:
- Resource-Intensive: Generative Fill AI is a powerful tool that can be resource-intensive. It also requires an Internet connection to work and can be very needy in that regard (meaning it will suck up your Internet use while processing).
- Not Always Perfect: As advanced as it is, Generative Fill AI is not foolproof. There may be instances where the generated fill doesn’t match your prompt or fit well with your existing image.
- Limited image resolution: When this article was written, Generative Fill AI could only create a maximum of 1024px wide. This means that the resolution of the AI you create may not match up with your original image’s resolution. Essentially, it will create a 1024px generation and then stretch it to fit your selection.
- Credit uses with your Creative Cloud plan: Starting November 1st, 2023, each time you click the “Generate” button, you will use up one generative credit. The number of monthly credits you have in your account will depend on your plan. You can read more about how generative credits work on Adobe’s website here. After your credits expire, you can still use the AI features, but they will run slower than usual.
AI: The Future of Photo Editing
Generative Fill AI is not just a feature; it’s a revolution in photo editing and graphic design. As a photographer, I fully embrace what AI art has to offer, whether it is creating my own unique images from scratch or editing existing photographs with Photoshop’s new Generative AI Fill and Generative AI Expand. AI is yet another tool for us as artists to work with and develop our own distinct style, and I believe AI is here to stay. So why not make it worth your while?

Nicole is a photographer, published author, and educator specializing in Lightroom, Photoshop, and photography. She is best known for her books on food photography but is widely versed in various photographic genres, including landscape, nature, stock, travel, and experimental imagery.


Great article – thank you
This is a wonderful blog! It opens a whole new area to me and the instructions are complete and easy to understand – they lead you by the hand – no need wasting time to figure out how this feature works. Thank you!
Thanks Nicole, a wonderful blog with great prompts and instruction.
That was fun Nicole, thanks for doing it. Question: I got two renderings that I liked. How can I make the selected renderings into a separate layer so that I can combine the two with a little making and blending.
Thanks.
By default, the new generative AI fill creation is on its own layer. You can just use the mask it creates to blend it with your photo.
Great info! Would love to create a photo with minimal lighting shining through the darkness from the background. Thx
Great info, I hadn’t really fully explored the generative fill yet so I had no idea it could do this. I just wrote an action to run through the setup with the quick mask mode to make it quicker to do. Thank you for posting this :)
Writing an action is a great idea!
A great way to leverage Photoshop’s AI. Thank you for the step-by-step instructions. It’s fun to play with.
Very informative, thanks Nichole!
Thank you, very much appreciated.
All the best
Jan
@ianmroczkovvski
Were these removed? This chart was a great visual representation.
bro this just amazing thanks
Maybe I missed it… but your instructions really only work when the background is solid or has no detail
The results you see will always look different than my examples, so sometimes they will work well, and other times you will have to retry or use a different prompt. I have found that many of the painting prompts (oil, watercolor, acrylic, etc.) tend to be more reliable with more image types than some of the other unique prompts. It can take a lot of experimenting with the prompts and patience to get the result you are expecting.