The intersect feature in Lightroom and Lightroom Classic allows you to combine two or more masks, and wherever they overlap is the area your mask is created. It’s a very useful feature, and I’ll be helping you understand how it works in this article and video.
What is “intersect mask”?
The intersect mask feature allows you to create a single mask from two (or more) masks. Simply put, the areas where the intersected masks overlap create the final masked area of your image. You can combine any of the mask options (such as subject, sky, brush, gradient, and so on) to create your intersected mask.
Why use the intersect feature?
While the intersect feature is one you may not use for every image, when the need arises, it is extremely useful. Here are some examples of when you may want to consider using the intersect feature:
- To make edits to a specific area on a subject that cannot easily be created with a brush
- To subdue the horizon of a sky when the edits are too harsh and the horizon line has a rough transition
- When used in conjunction with an AI mask (such as a subject + gradient) to create a soft transition of your edits on one side of the subject (as in the example below)
- To make a specific part of the background or sky brighter or darker
How to use the intersect mask feature
Here are the steps to create an intersect mask in Lightroom and Lightroom Classic. For this example, I would like to brighten the shadow areas on the left of the mason jar, so I need to mask only that part of the image.
Note: These steps show the process using Lightroom Classic. However, the technique is identical in Lightroom (mobile).
Step 1: Create a mask
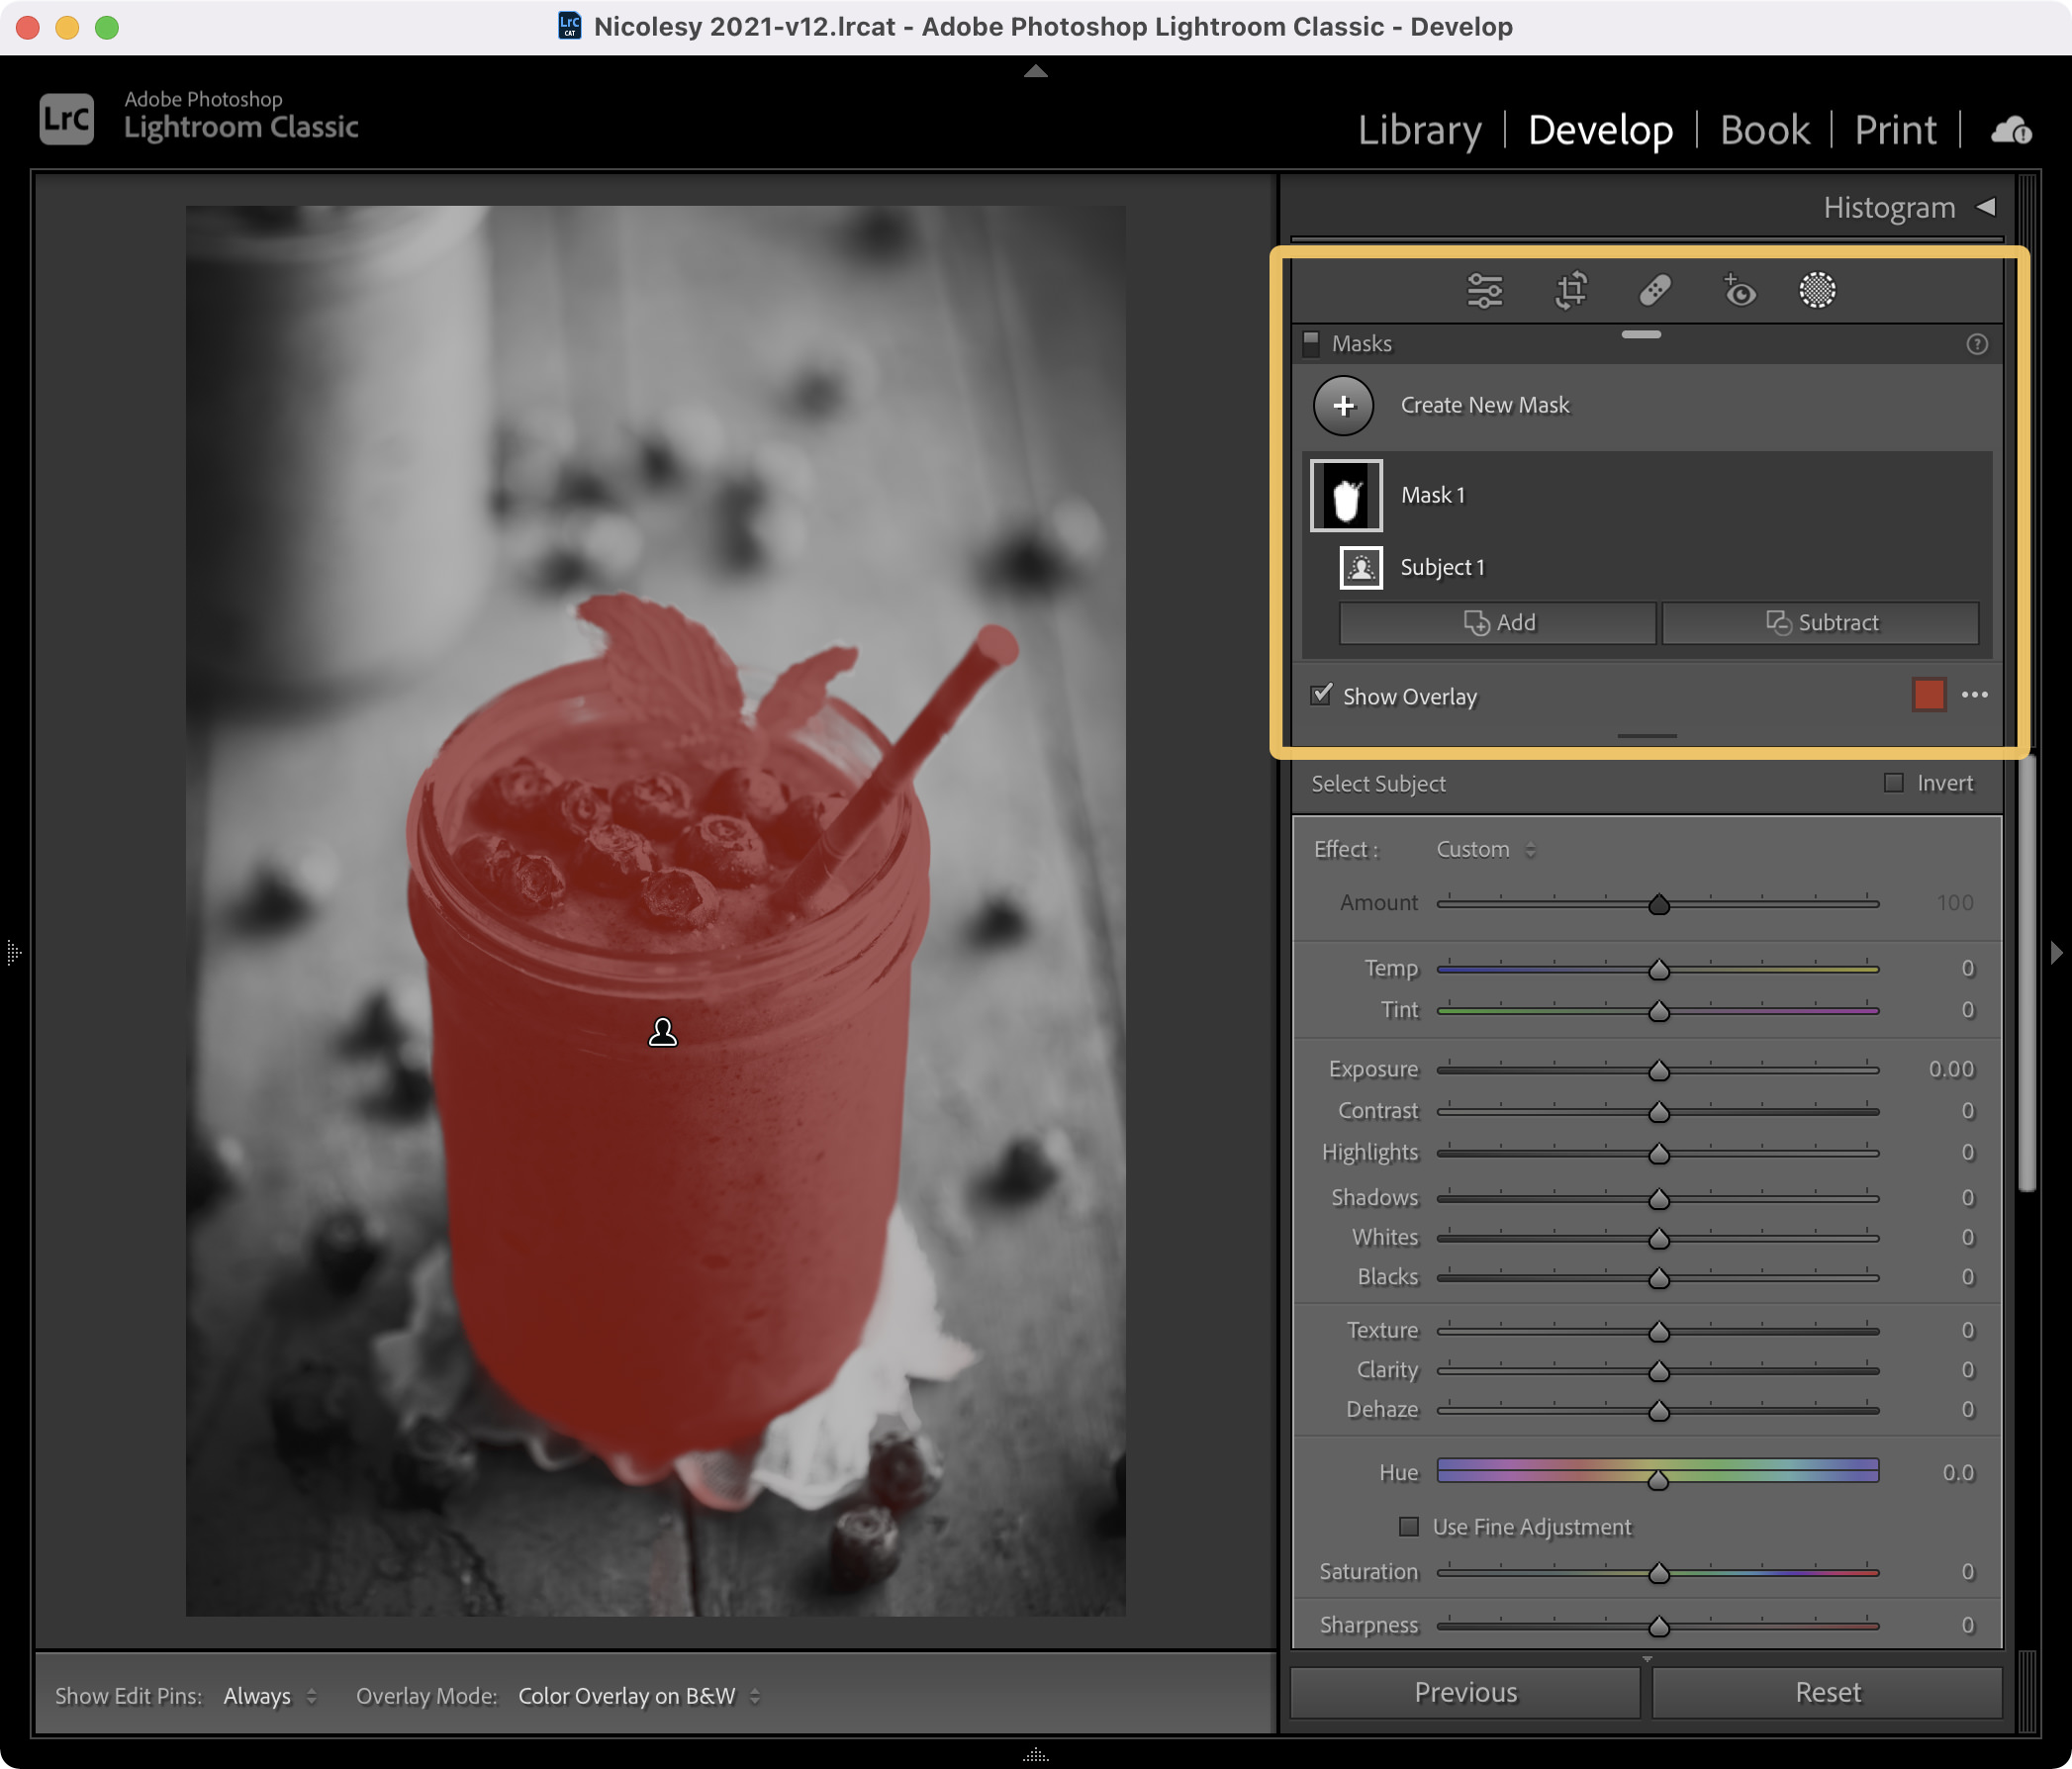
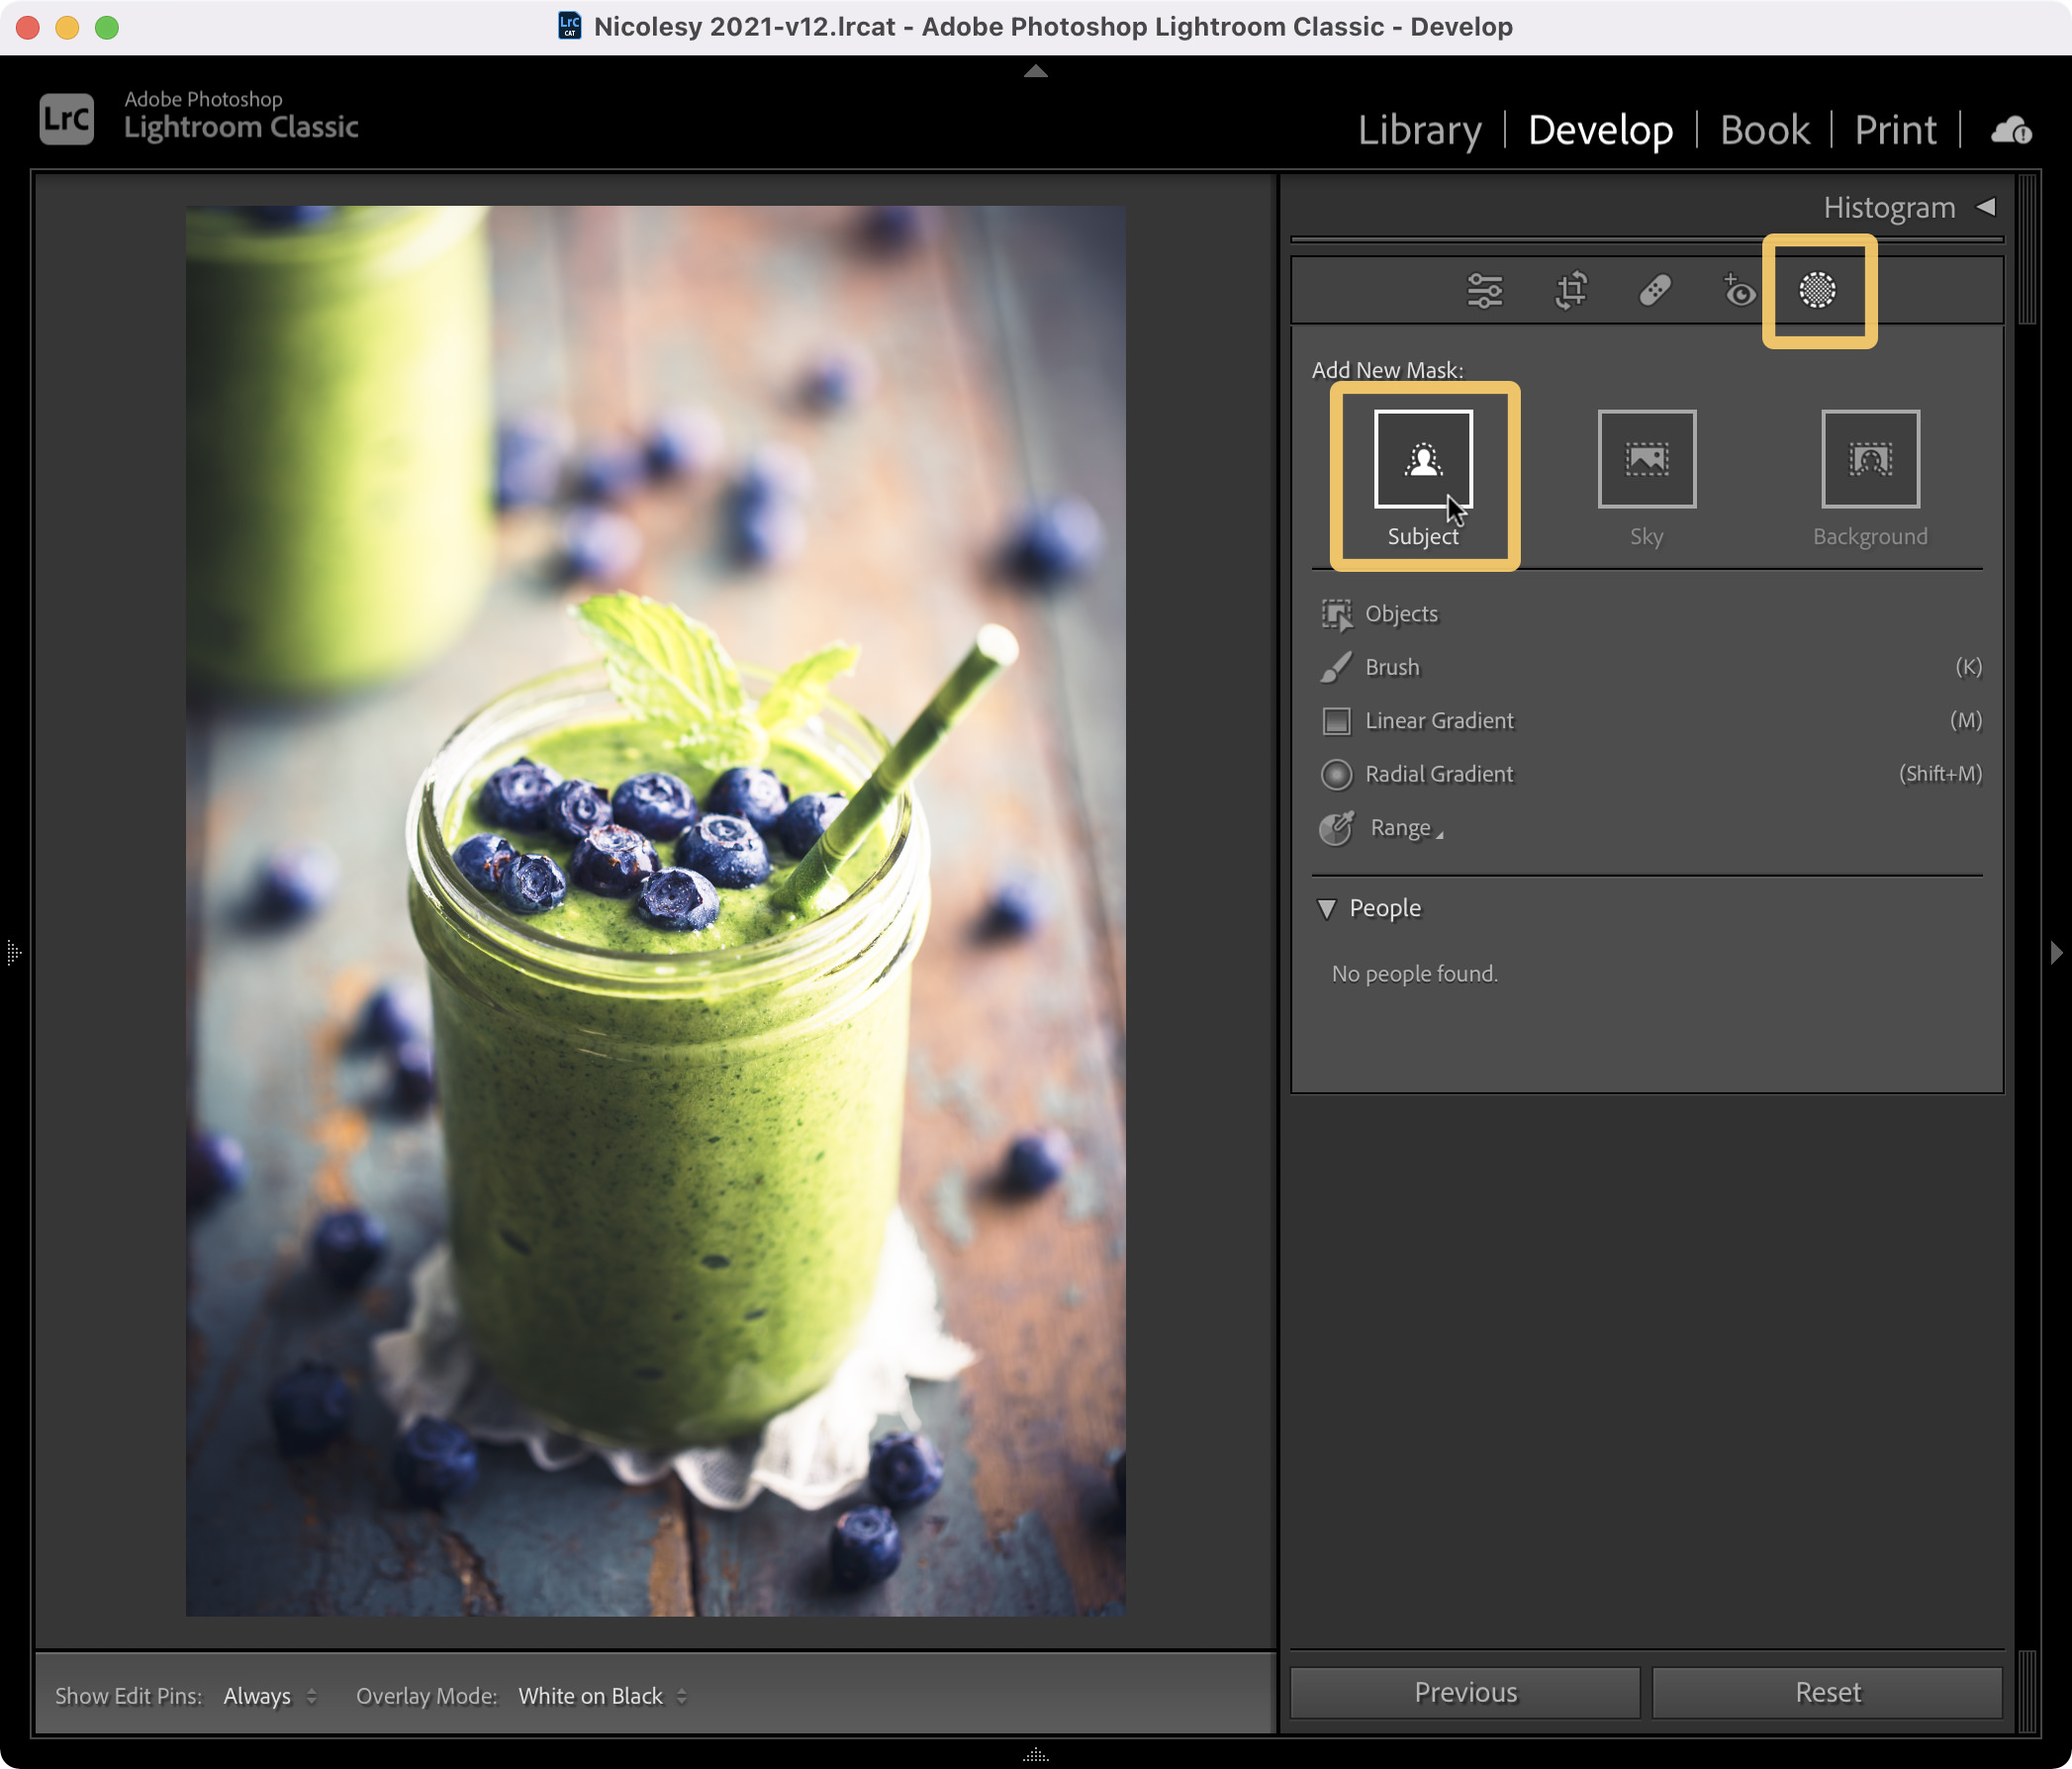
Before creating an intersected mask, you must start with a standard mask. I begin by going to the Develop module and clicking the Mask icon near the top of the panels on the right. Then I select the Subject button to create a mask of the subject. The example below shows a red mask overlay on a black-and-white image to make the mask easier to see.
Step 2: Select the Intersect option
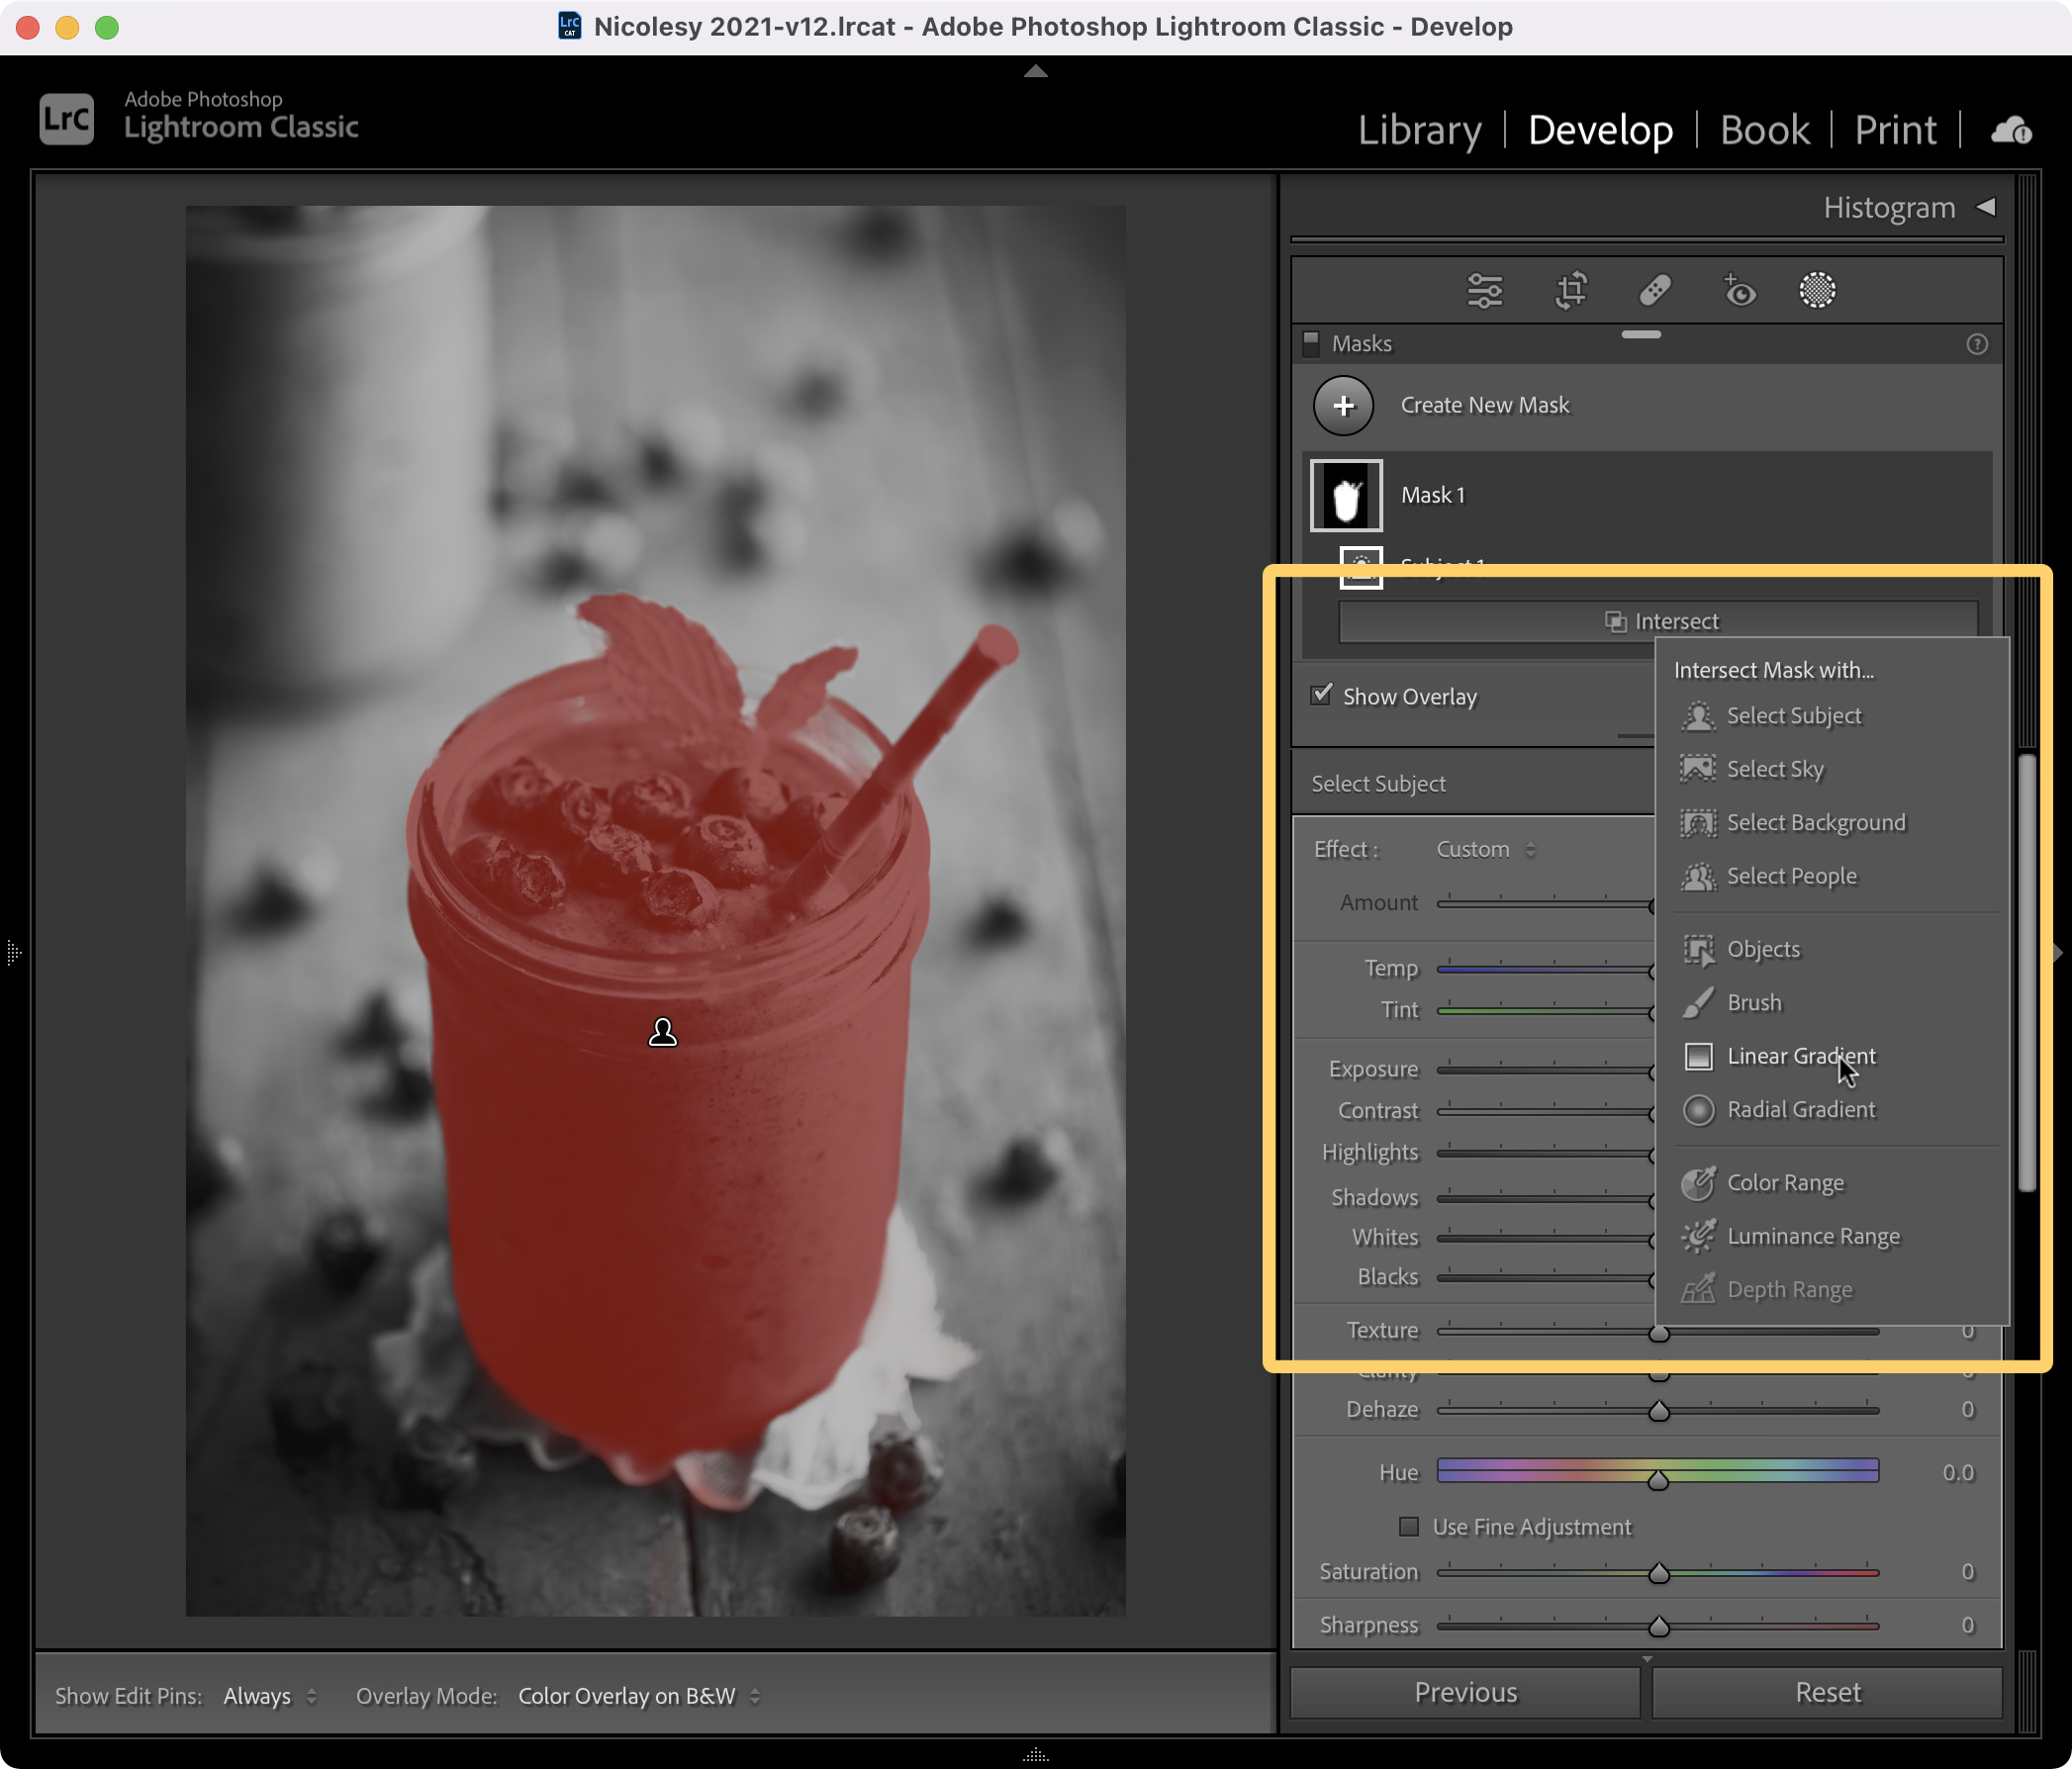
Now it’s time to add the second mask that will “intersect” with the first. To do this, I press and hold the OPT (Mac) or ALT (Win) key, and when I do this, an INTERSECT button appears below the first mask I created. Then, I choose Linear Gradient from the drop-down list.
Step 3: Draw the intersect mask
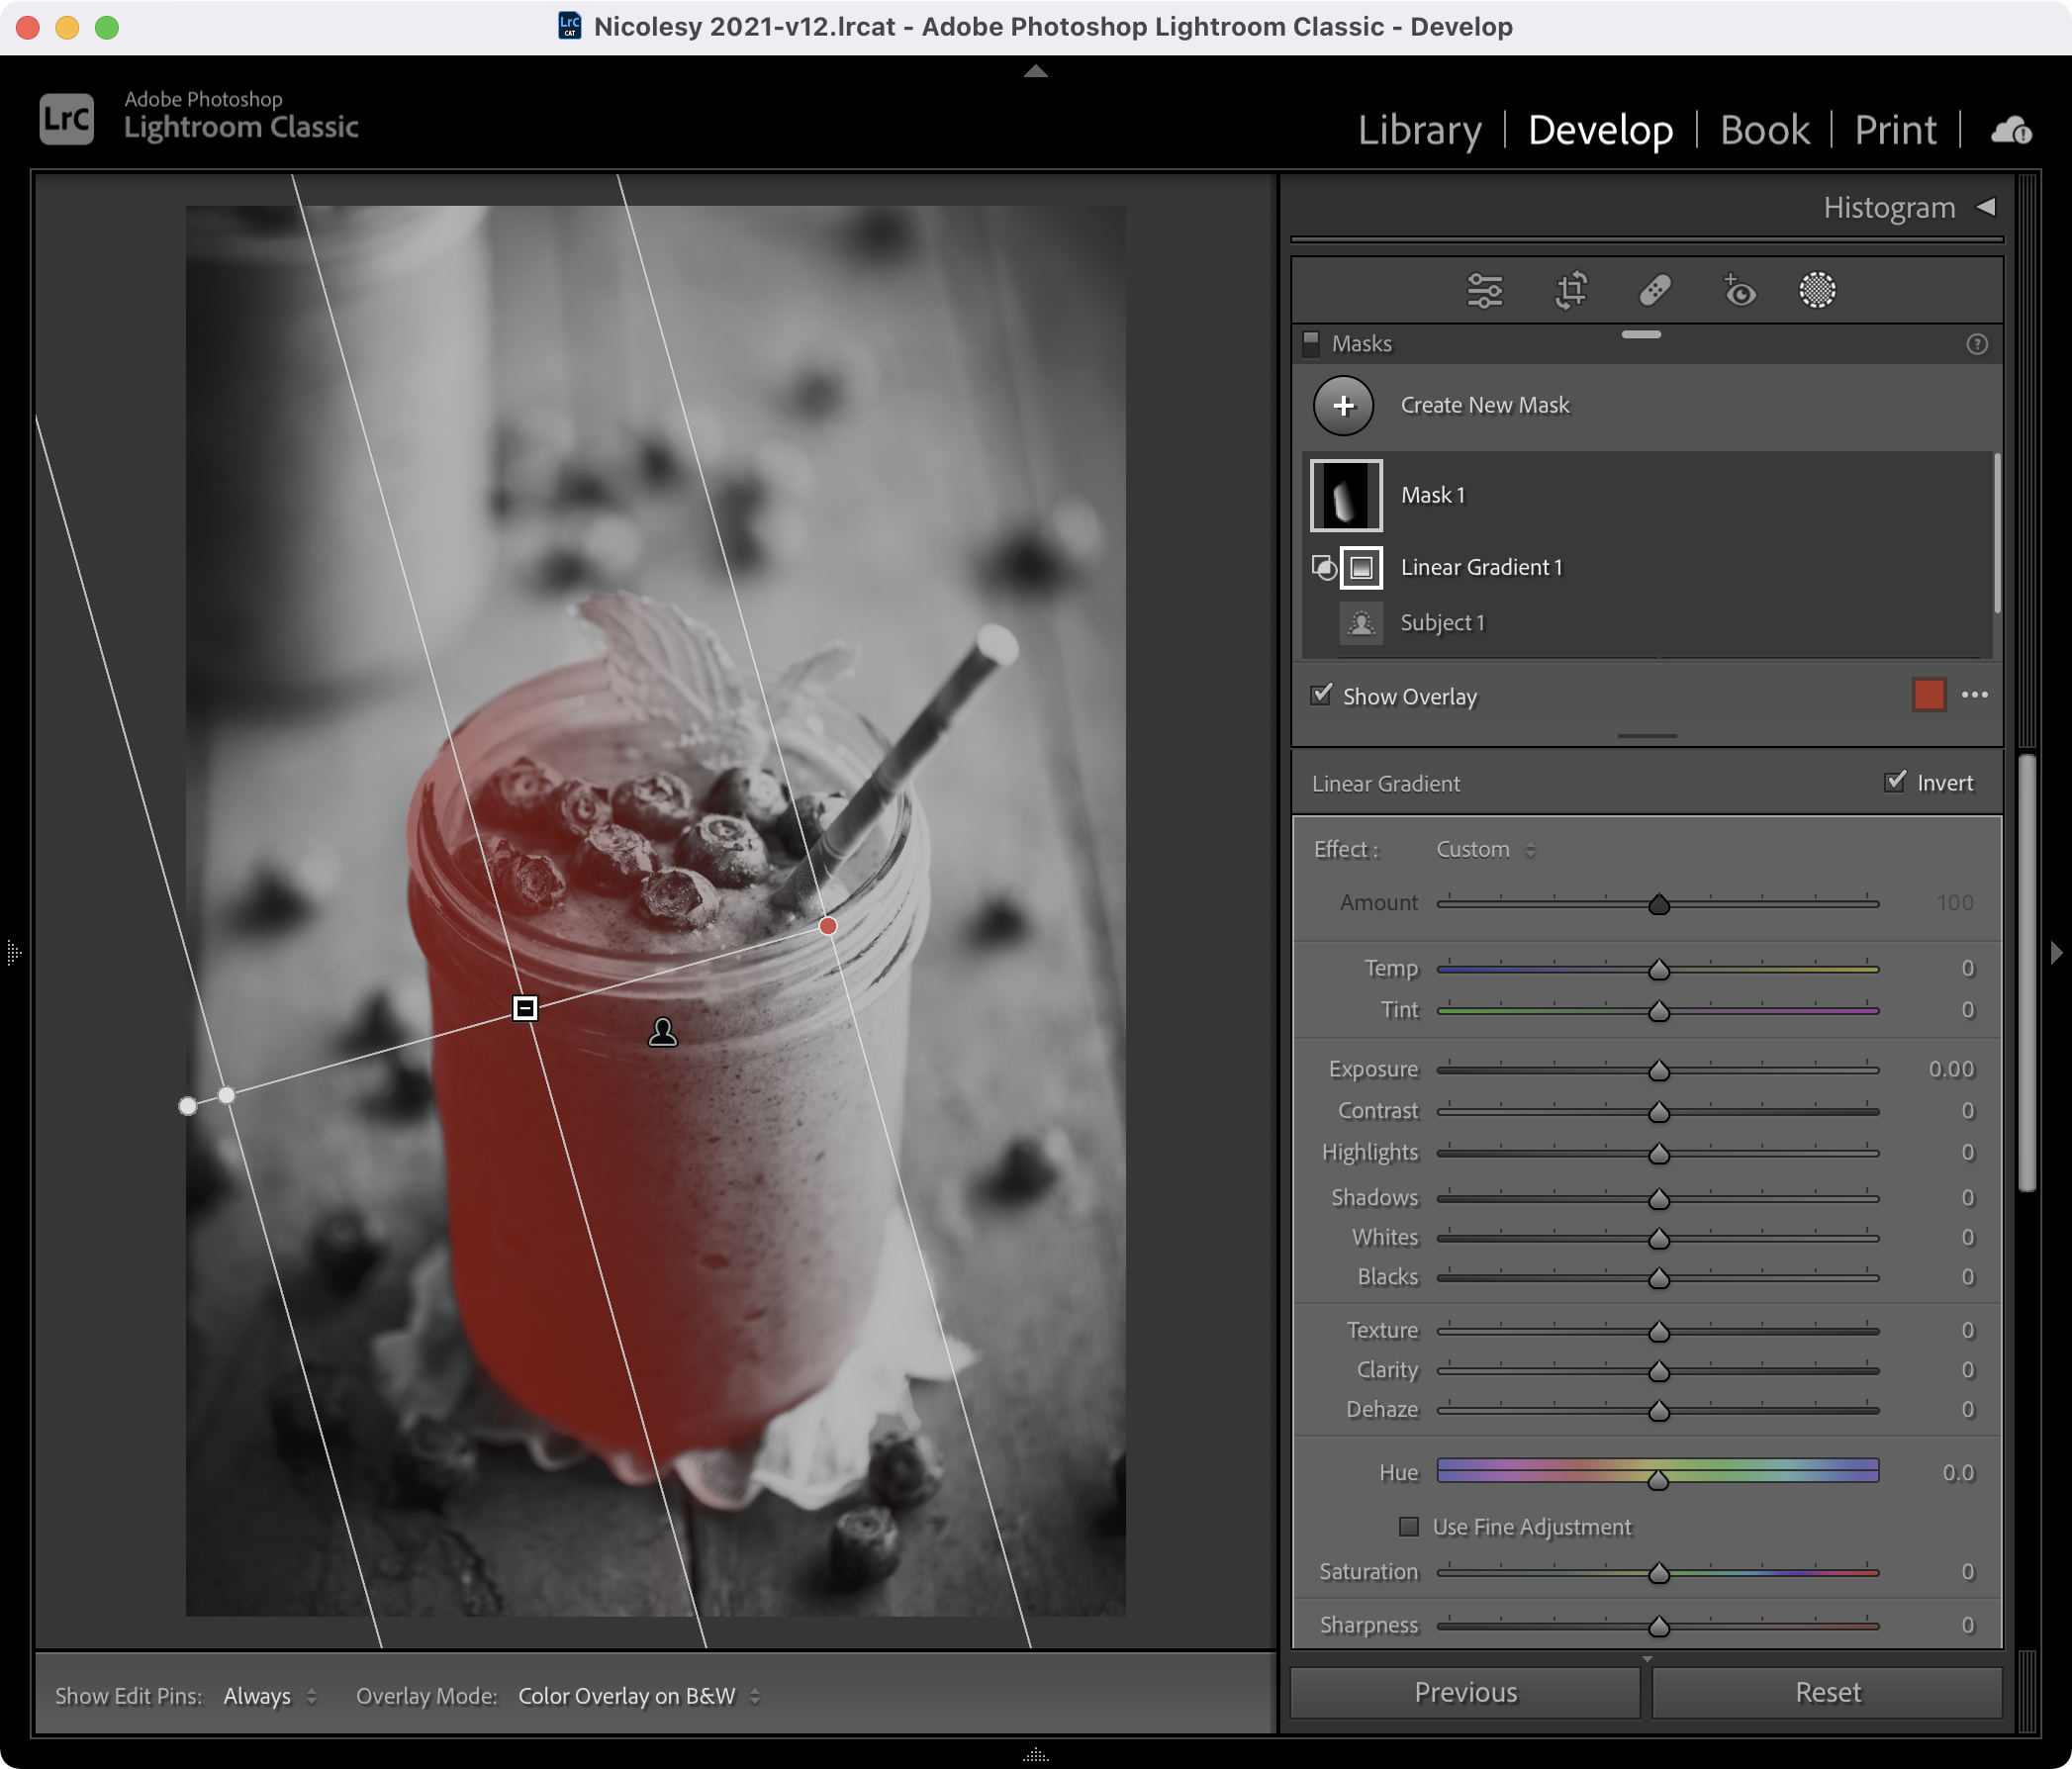
With the Linear Gradient mask selected, I head over to my image and draw a gradient starting from the left side of the frame. As I draw the mask, it creates the gradient only over the areas where the first (subject) mask was formed. The area where these two masks overlap is where my final mask is created.
Step 4: Make edits to the masked area
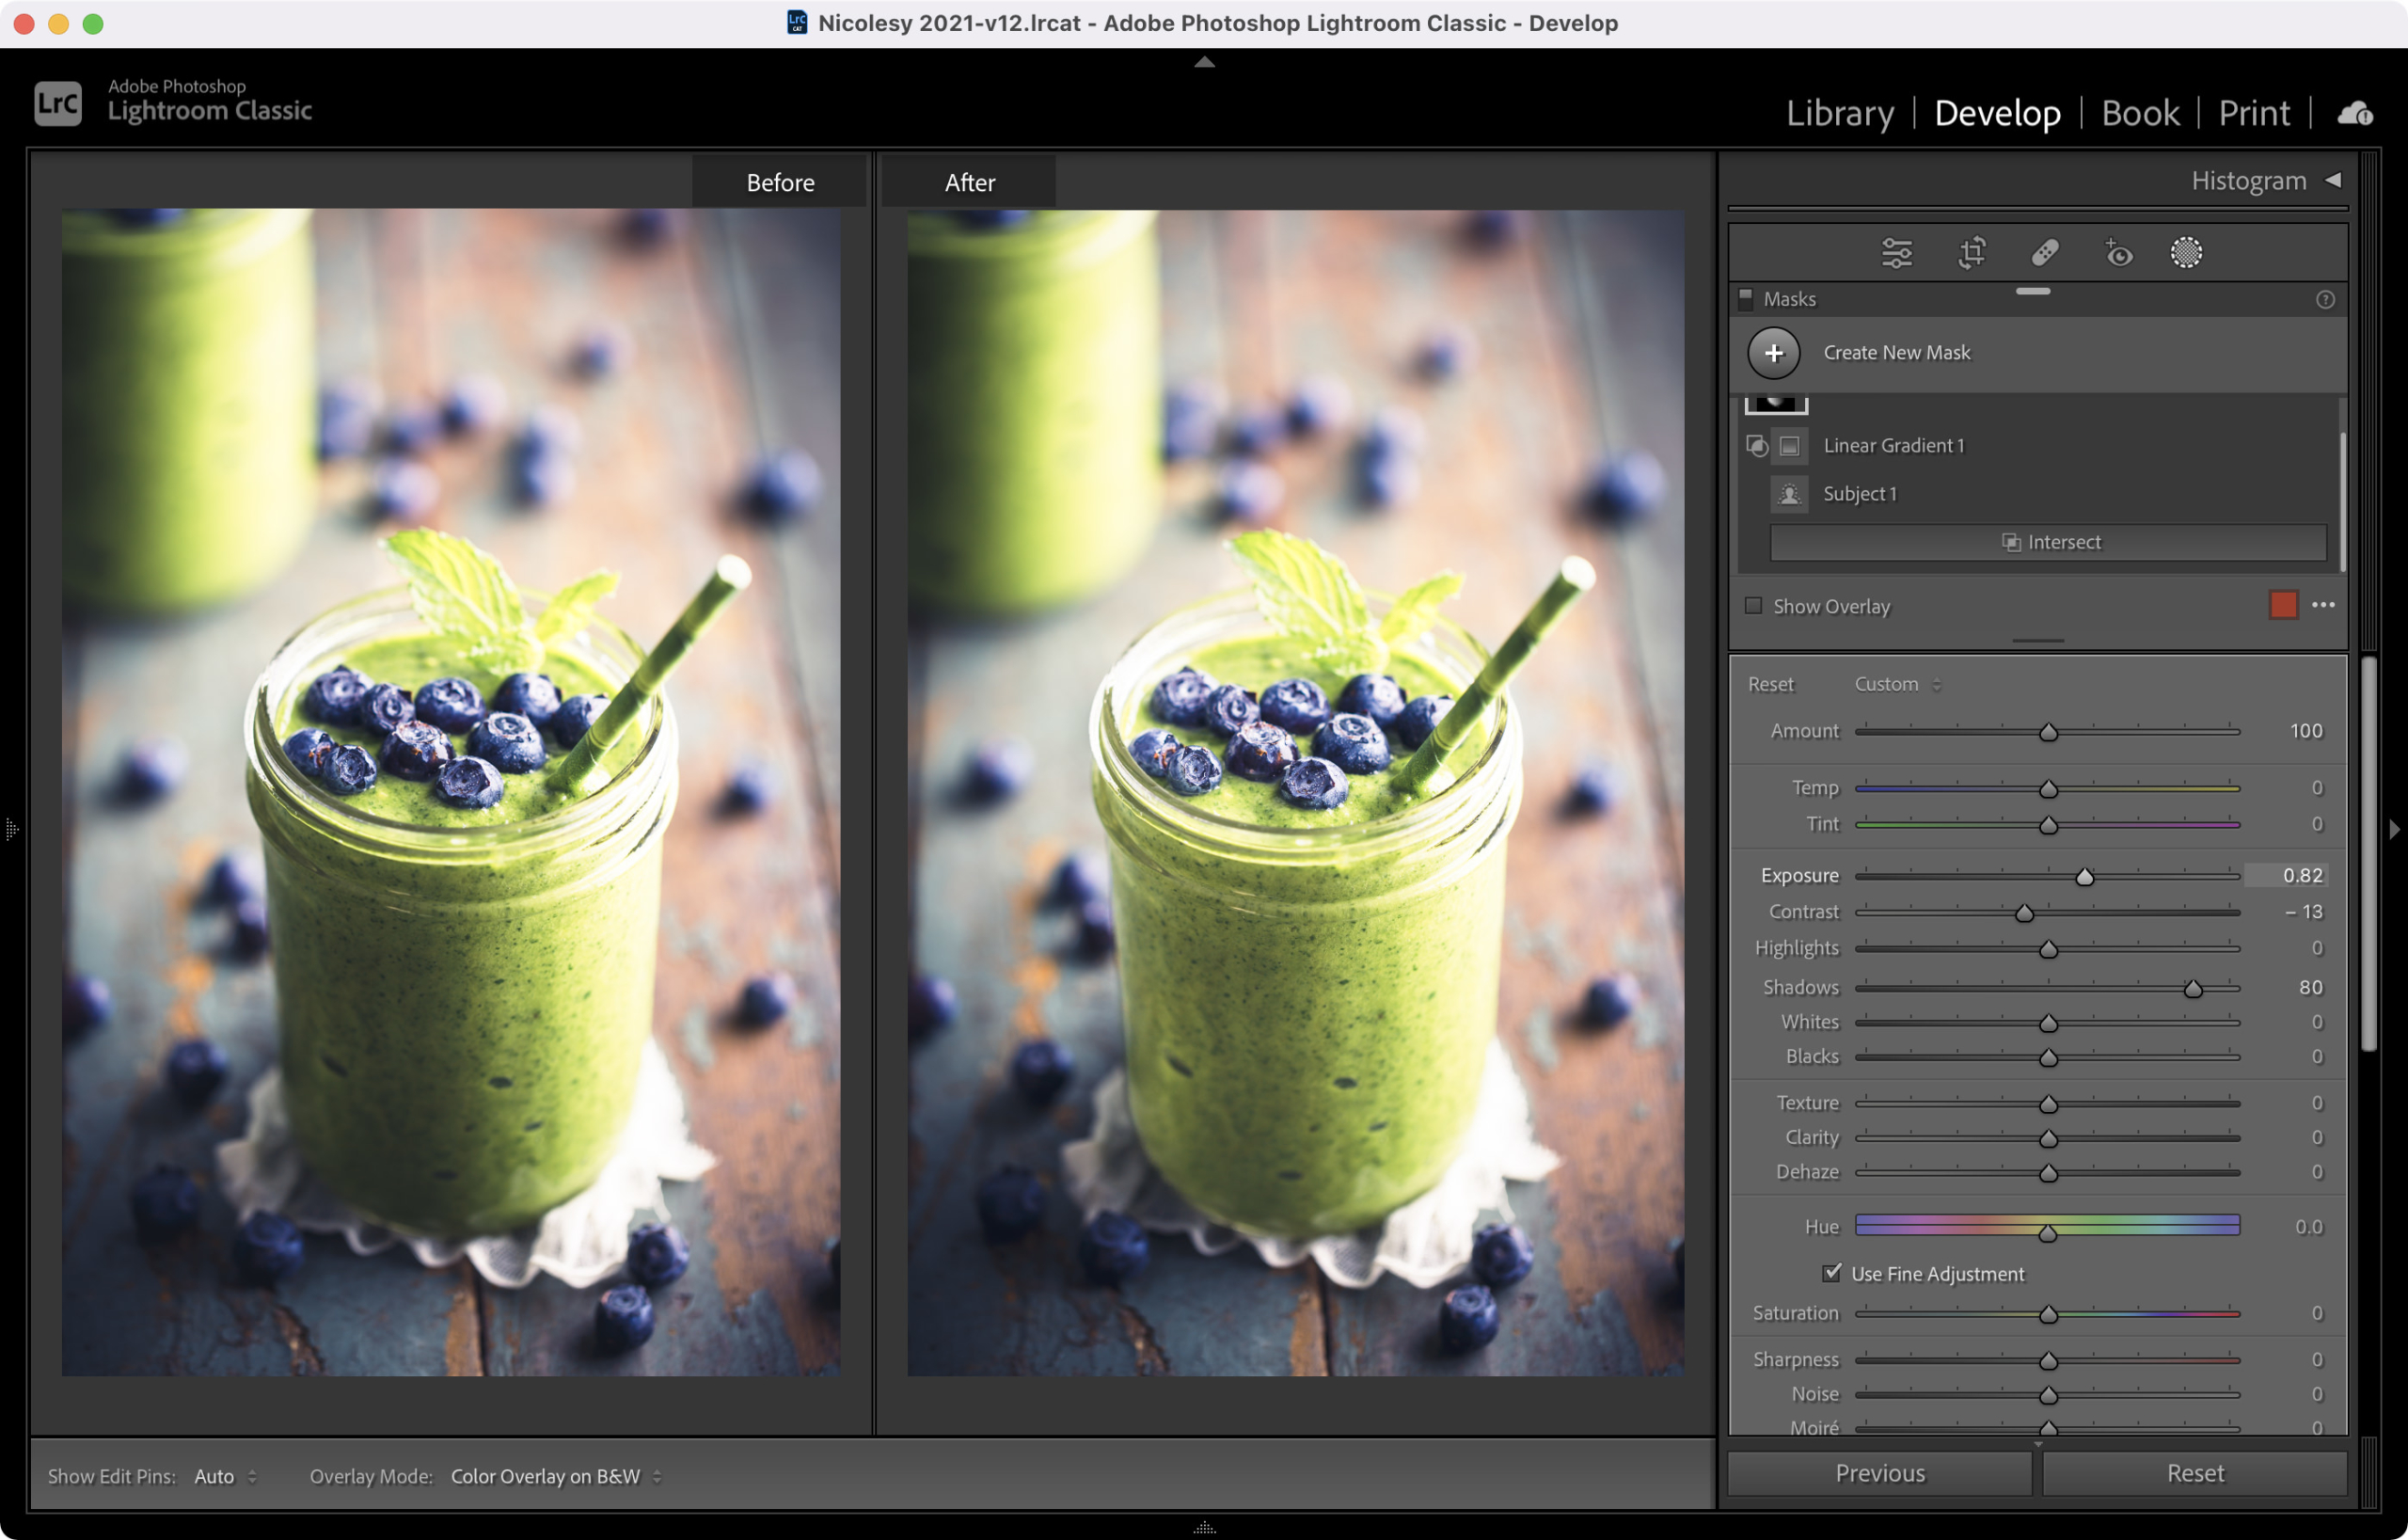
Now that the intersect mask is created, I will edit the masked area with the sliders. For this image, I want to brighten the shadow areas, so I increased the Exposure and Shadows and slightly decreased the Contrast. In the before-and-after photo below, notice how the shadow on the mason jar (the image on the right) is brighter, but those edits did not affect other areas of the photo.
Watch the video tutorial
Learn how to use this feature by watching the video tutorial below. In this video, I show how to use intersect on two different images. Click here to watch this video on YouTube.
The intersect feature in Lightroom and Lightroom Classic allows you to combine two or more masks, and wherever they overlap is the area your mask is created. It’s a very useful feature, and I’ll be helping you understand how it works in this article and video.
What is “intersect mask”?
The intersect mask feature allows you to create a single mask from two (or more) masks. Simply put, the areas where the intersected masks overlap create the final masked area of your image. You can combine any of the mask options (such as subject, sky, brush, gradient, and so on) to create your intersected mask.
Why use the intersect feature?
While the intersect feature is one you may not use for every image, when the need arises, it is extremely useful. Here are some examples of when you may want to consider using the intersect feature:
- To make edits to a specific area on a subject that cannot easily be created with a brush
- To subdue the horizon of a sky when the edits are too harsh and the horizon line has a rough transition
- When used in conjunction with an AI mask (such as a subject + gradient) to create a soft transition of your edits on one side of the subject (as in the example below)
- To make a specific part of the background or sky brighter or darker
How to use the intersect mask feature
Here are the steps to create an intersect mask in Lightroom and Lightroom Classic. For this example, I would like to brighten the shadow areas on the left of the mason jar, so I need to mask only that part of the image.
Note: These steps show the process using Lightroom Classic. However, the technique is identical in Lightroom (mobile).
Step 1: Create a mask
Before creating an intersected mask, you must start with a standard mask. I begin by going to the Develop module and clicking the Mask icon near the top of the panels on the right. Then I select the Subject button to create a mask of the subject. The example below shows a red mask overlay on a black-and-white image to make the mask easier to see.
Step 2: Select the Intersect option
Now it’s time to add the second mask that will “intersect” with the first. To do this, I press and hold the OPT (Mac) or ALT (Win) key, and when I do this, an INTERSECT button appears below the first mask I created. Then, I choose Linear Gradient from the drop-down list.

Step 3: Draw the intersect mask
With the Linear Gradient mask selected, I head over to my image and draw a gradient starting from the left side of the frame. As I draw the mask, it creates the gradient only over the areas where the first (subject) mask was formed. The area where these two masks overlap is where my final mask is created.

Step 4: Make edits to the masked area
Now that the intersect mask is created, I will edit the masked area with the sliders. For this image, I want to brighten the shadow areas, so I increased the Exposure and Shadows and slightly decreased the Contrast. In the before-and-after photo below, notice how the shadow on the mason jar (the image on the right) is brighter, but those edits did not affect other areas of the photo.

Watch the video tutorial
Learn how to use this feature by watching the video tutorial below. In this video, I show how to use intersect on two different images. Click here to watch this video on YouTube.

Nicole is a photographer, published author, and educator specializing in Lightroom, Photoshop, and photography. She is best known for her books on food photography but is widely versed in various photographic genres, including landscape, nature, stock, travel, and experimental imagery.

