
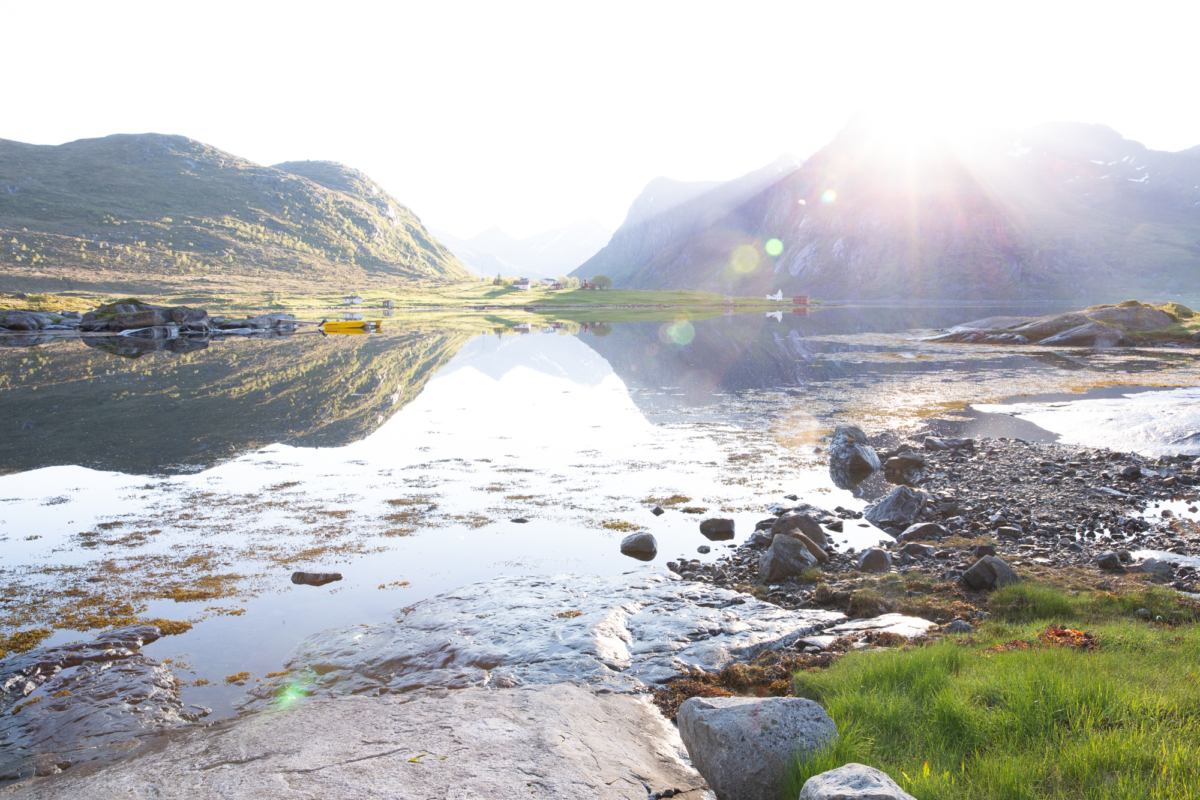
High dynamic range photography, also known as HDR, is a great way to create a photograph and retain as much detail in the highlights and shadows as possible. In its early years, HDR made its way into headlines when photographers created surreal, unnatural, and overly contrasty images (if you’d like to see examples of what not to do, head over to this subreddit). While I may have been slightly guilty of this in my earlier years, my preference for HDR is to create a natural-looking image without the qualities of an over-processed image. In this article, I will share my techniques to create this effect. I will also share how to process these images with Lightroom CC Classic so that you can get the most natural-looking HDR results.
Quick Links:


What is HDR?
HDR (high dynamic range) photography is when you create a photograph from a high-contrast scene that includes detail in the shadows and highlight areas. You can achieve this by photographing multiple images at once using bracketing, and then merging those images together using post-processing software (more on this later in this article). This form of photography is exclusive to digital photography, as film was able to capture more detail in one frame than we can with our current digital cameras.


What scenes work best for HDR?
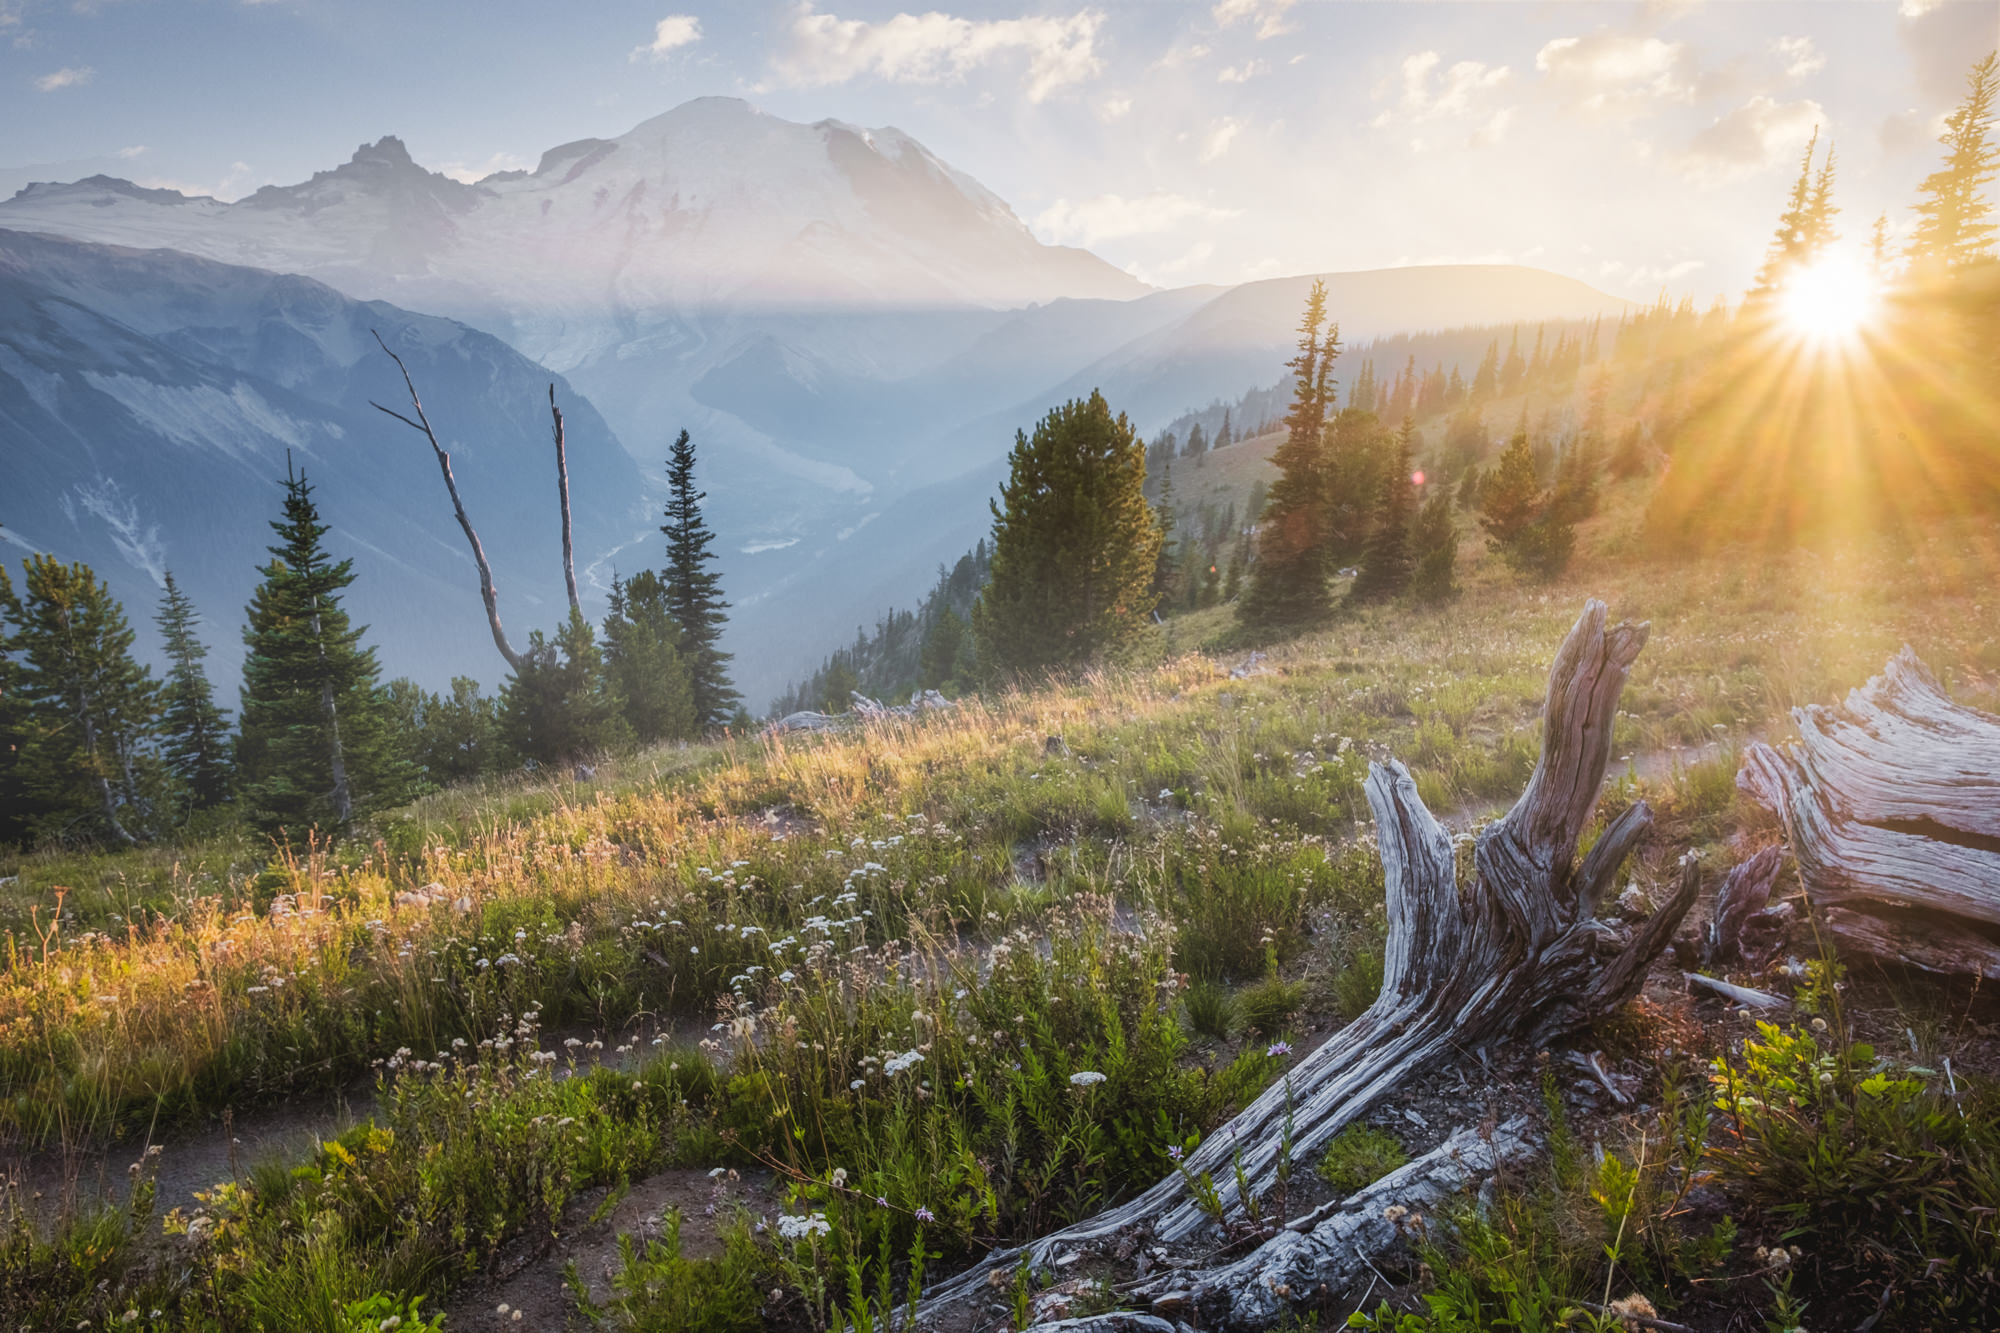
Any scene that has a lot of contrast between the dark areas and bright areas is typically a good candidate for HDR scenes. A good example is a landscape scene where the foreground is much darker than the sky; using HDR will help you get the entire scene with a more balanced exposure overall. Some examples of subjects that work well with HDR include:
- Landscapes
- Cityscapes
- Architecture
- Real-estate photography
Here are some general tips to set you in the right direction:
- Avoid HDR with people, it usually makes them look weird.
- Remember that you still want to photograph in good light. Bad light will almost always equal a subpar photograph, and even though you can bring back detail in the shadows on a sunny day at noon, this doesn’t mean that the photo will transform into a beautiful image. Good light, in this example, would be at sunrise or sunset, or anytime when your subject is casting a long shadow.
- Using a small aperture (where there are a lot of out-of-focus areas in the background or foreground) can sometimes lead to unusual results. Try using your aperture at a smaller setting—such as ƒ/11 or ƒ/16—so that the majority of your scene is in focus.

Photographing for HDR
To create an HDR, you first need to have a series of exposure-bracketed images. This means that you photograph several frames of the same scene (I usually photograph 5 or 7 frames) at different exposures. Most cameras will have some type of bracketing feature, allowing you to configure your settings and press the shutter once to create each frame. You typically will be able to select how many frames you want to photograph, along with the exposure interval between each frame.
For example, with a five-frame bracket and a 1-stop exposure, you would have:
- Two underexposed images
- One “properly” exposed image
- Two overexposed images
Here are some tips on how to accomplish this:
- Use the shutter speed to bracket your photos. Keep both the ISO and APERTURE consistent throughout each frame, so that the SHUTTER SPEED is the only thing changing between each shot.
- Use a tripod. It’s good practice to set your camera on a tripod to ensure the photos will match up properly in post-processing.
- Don’t use too wide of an aperture. You will want to photograph scenes that look best with a narrow depth of field, where most everything is in focus. Adding blur or bokeh to the scene can do funny things when you merge them for HDR.
- Set it to run automatically in your camera. In my Fujifilm X-T3, I have a “BKT” setting on the top-left dial, which is the setting for bracketing my shots. Because I have multiple options for bracketing (focus, ISO, etc.), I need to go into the “Drive Settings” and specify that I want to use “AE bracket”, and then I can choose how many frames, the exposure steps (1 stop, 1.5 stops, etc.), along with a few other settings specific to my camera. Please consult your user manual for information on setting this up with your specific camera brand and model.
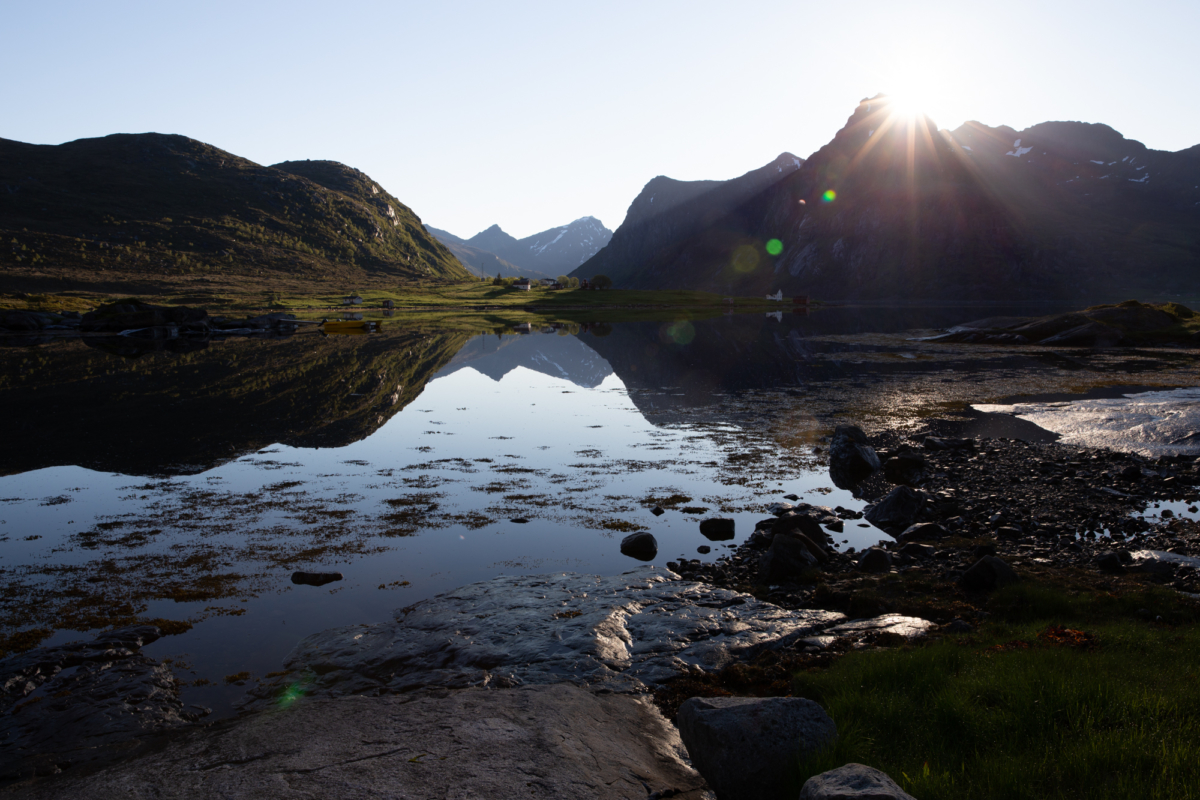
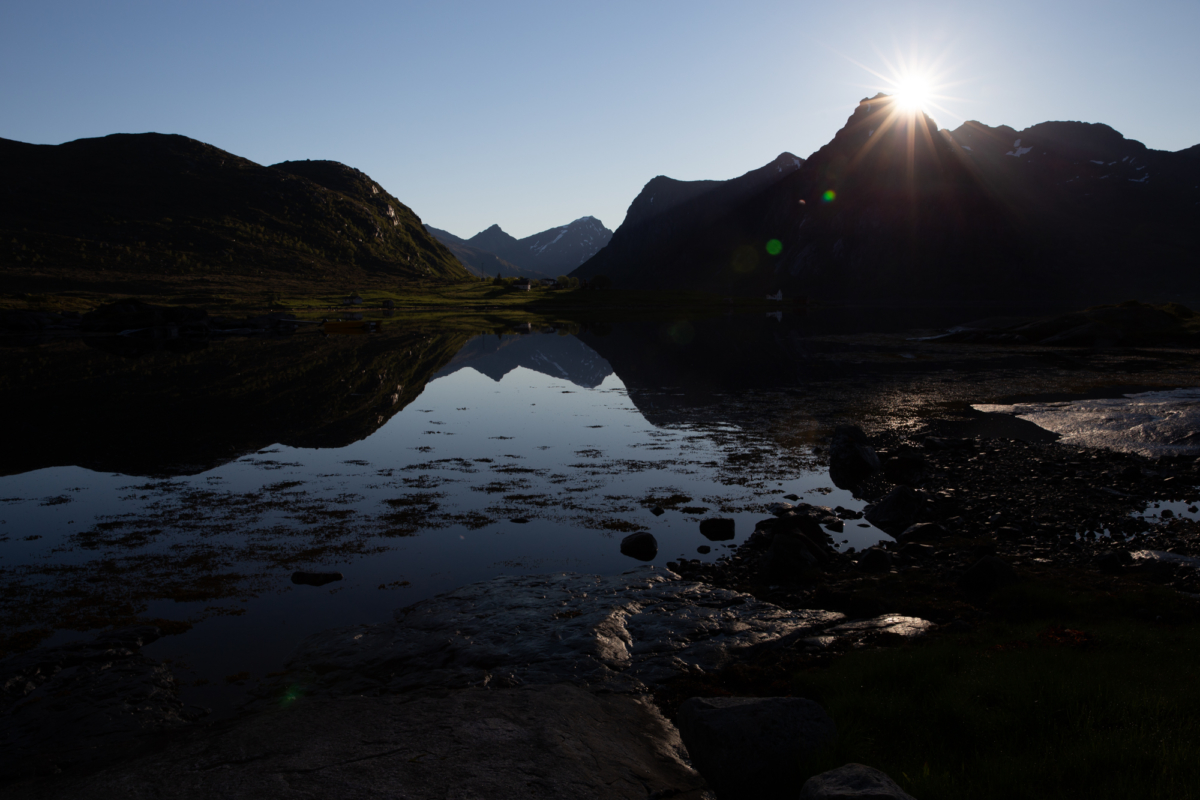
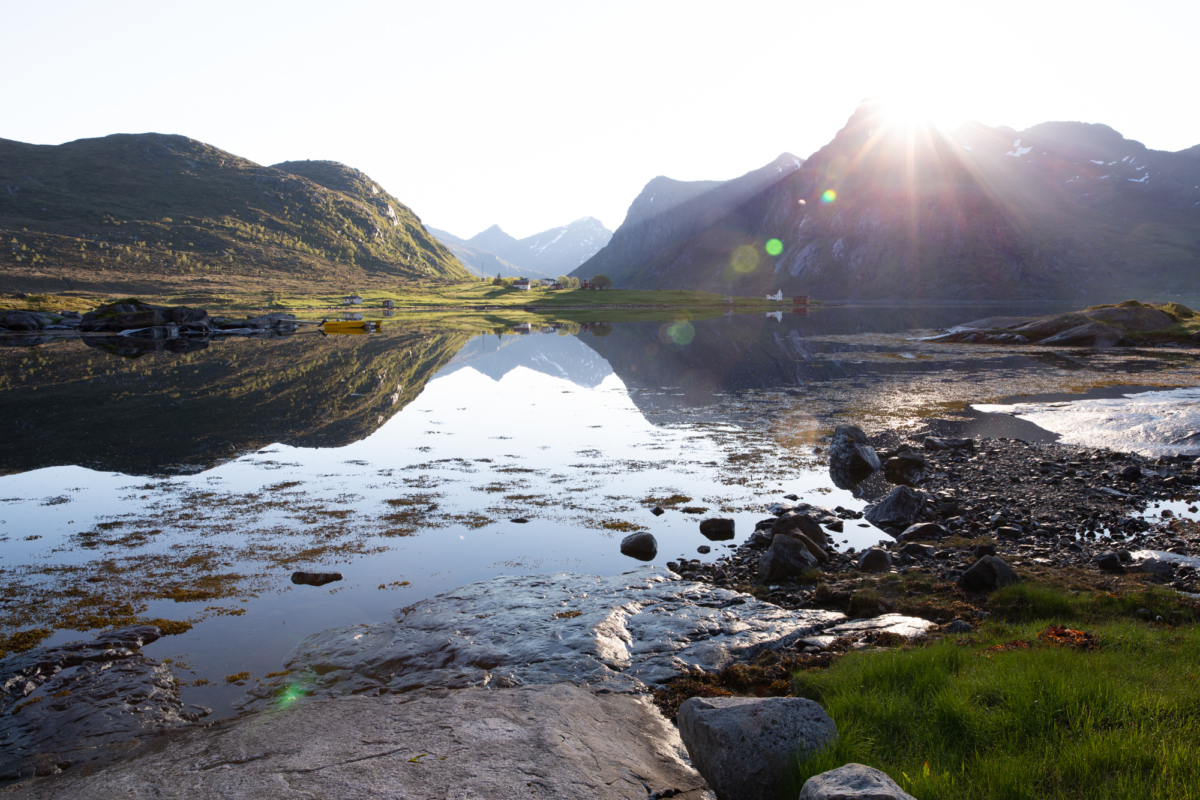
The following images show an example of a five-frame series of HDR brackets with a 1.5-exposure stop in-between each frame:


Using Lightroom to process your HDR photos
Lightroom CC Classic offers an easy way to process HDR photos, with many benefits. Here are some of the reasons I prefer using Lightroom to merge my HDR images:
- No need to edit the raw photos before merging. Lightroom creates a DNG file with your brackets with the ability to non-destructively edit the white balance and exposure. So there is no need to do any post-processing to your original raw bracketed shots before merging them, allowing you to focus your attention on the final merged photograph.
- Easy to access from within the catalog. You can do all of your HDR editings right inside the Lightroom app! There is no need to export photos first, which can be a big time saver if you are processing several HDR images at a time.
- HDR merging can happen in the background. If you have several shots that you want to merge, you can quickly go through each grouping and Lightroom will process them in the background. To access this feature, simply use the SHIFT key modifier when merging your HDR images.
- Locating your HDR brackets is easy with the “Auto-Stack by Capture Time” feature. If you have several bracketed shots in a folder, you can select those images and tell Lightroom to auto-stack the photos based on capture time. Typically, there will only be a few seconds between each exposure, and you will have a large enough gap between each series of shots so that Lightroom can group your brackets together. When you have a folder filled with bracketed exposures, it can be difficult to separate them all out, so this is a great way to stay organized.
Lightroom HDR merging: Step-by-step
Here’s how to merge your HDR-bracketed images using Lightroom CC Classic:
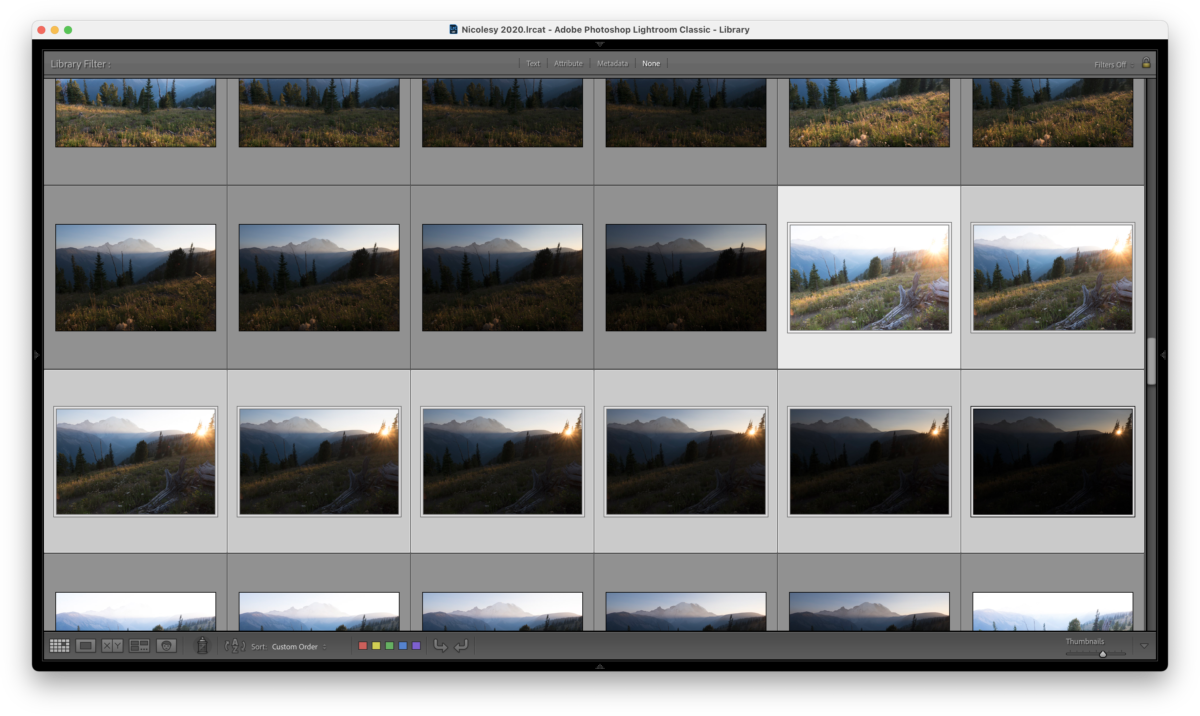
Step 1: Access your bracketed files
First, access the files you want to use in Lightroom within the grid view in the Library module. Then, select all of the raw images to highlight them. In this example, I have five images from this series.
Tip: To select multiple images in Lightroom, click the first image in the group, press and hold the SHIFT key, then click the last image.
Step 2: Merge the files
Now, go to Photo > Photo Merge > HDR.
Note: There is no need to make any edits to your photographs before merging them; the final output will be a DNG (raw) file, so you will want make your edits to the final version instead of editing the files beforehand.

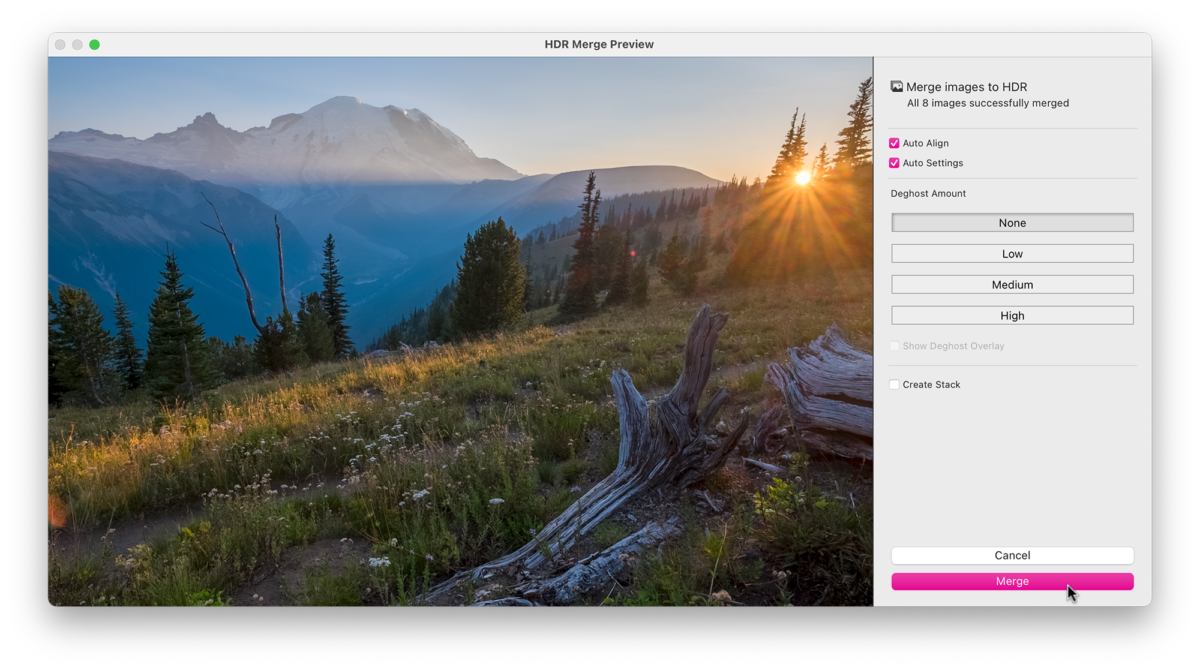
Step 3: Adjust the merge settings
In the window that pops up, you will have some options to work with. Here’s how to set these for your images:
- Auto Align: If you did not photograph from a tripod, or have any doubt about the image not being aligned, then make sure to check this box. Even though most of my HDR brackets are photographed from a tripod, I typically leave it checked, which may add to the processing time but will always give you the best merge possible.
- Auto Settings: This option will auto-apply settings from the Basic panel in Lightroom after the merge is complete. I usually leave this box checked and then fine-tune the settings after the photo merge is complete.
- Deghost Amount: When there are elements within the photo that moved (grass or trees from wind, etc.), then use the Deghost settings to compensate and remove those blurry elements. You can also preview the overlay of these areas with the “Show Deghost Overlay” box.
- Create Stack: This will stack your images together after the merge is complete.
Then, click Merge at the bottom to complete the process.

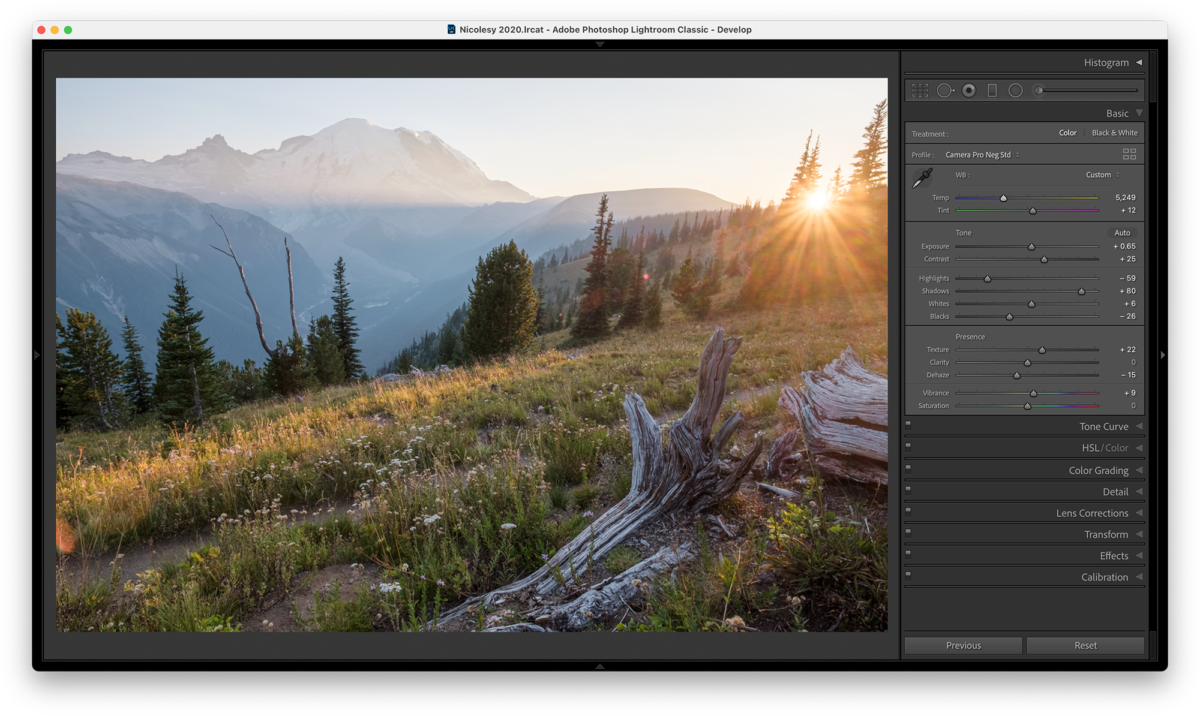
Step 4: Process the merged HDR image
After the merging process is complete, a new DNG file will appear alongside your original merged brackets. Open this file and bring it into the Develop module. Here you can see that Lightroom has already auto-applied settings, so the photo is already off to a good start. Next, I made changes to the Basic panel (to make sure the image was not overly contrasty and bring some fill-light into the shadows), HSL (to remove blue in the mountain and shadow areas), and I also I adjusted the camera profile (I selected on that would not over-saturate the photo).
Here are some tips for processing an HDR photograph to make it look natural:
- Be OK with some details that are too dark or too bright. One downfall of “bad” HDR is when every single part of the photo is perfectly exposed. Even though the point of HDR photography is to bring detail back into those areas, making every part of the scene balanced can oftentimes create that overprocessed and weird HDR look. You can do this by increasing the HIGHLIGHTS and decreasing the SHADOWS slider to remove partial detail in those regions.
- Don’t oversaturate. In fact, I tend to reduce saturation slightly, especially in shadowy areas that become too blue.
- Beware of black-and-blue clouds. Overdone landscape HDR has one tell-tale sign: black clouds with blue shadows. While it might look interesting and surrealistic, if you are going for a natural look, you’ll want to avoid this when post-processing.
- Watch out for the Dehaze slider. If you use this slider, make sure it’s not adding strange halos around the edges of your horizon areas. In fact, I tend to decrease this slider (to add haze) to help increase realism in my HDR scenes.
Step 5 (optional): Add finishing touches in Luminar AI
I enjoy using Luminar AI to add finishing touches to my photos that are edited in Lightroom CC. There are a few different ways you can edit photos from Lightroom:
- Export with Preset: To edit a photo with Luminar AI directly from Lightroom, go to File > Export with Preset > Luminar AI > Edit a Copy with Lightroom Adjustments. This will open Luminar AI so you can apply your edits, and after exiting Luminar, the newly-processed image will appear alongside the original in Lightroom.
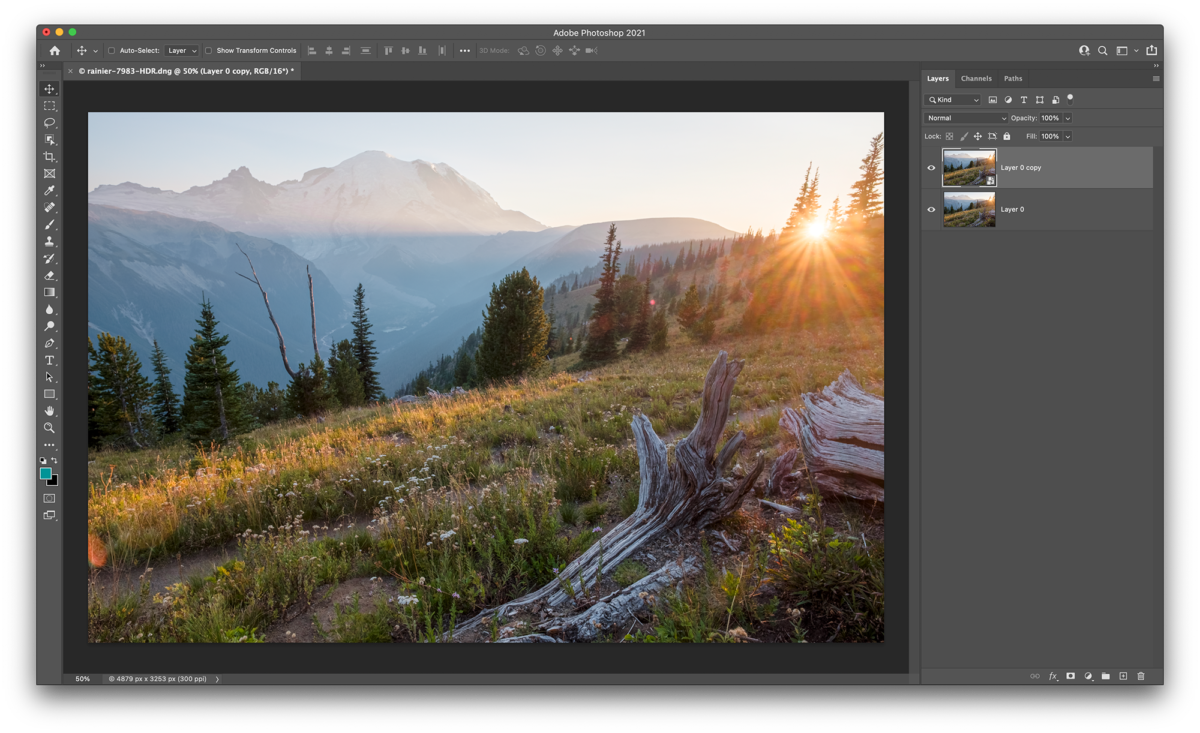
- Open in Photoshop, then edit Luminar AI: My preference when editing photos in Luminar AI as a plugin is to first open the Lightroom-edited file into Photoshop, then convert the image into a Smart Object and use the Luminar AI plugin from there. This allows me to non-destructively edit the file so that I can make additional changes afterward if I want to alter a tool or effect that I applied in Luminar.
Here’s how I set this up in Photoshop:
- From Lightroom, I made sure the image was selected. Then I went to Photo > Edit in > Photoshop.
- In Photoshop, I duplicated the image layer (click the layer and use the keyboard shortcut Cmd/Ctrl + J).
- I activated the new duplicate layer and converted it to a Smart Object. You can do this by going to Layer > Smart Objects > Convert to Smart Object, or by right-clicking the layer and selecting the Convert to Smart Object option.
- To open the image into Luminar AI, I made sure the smart object was activated and went to Filter > Skylum Software > Luminar AI.
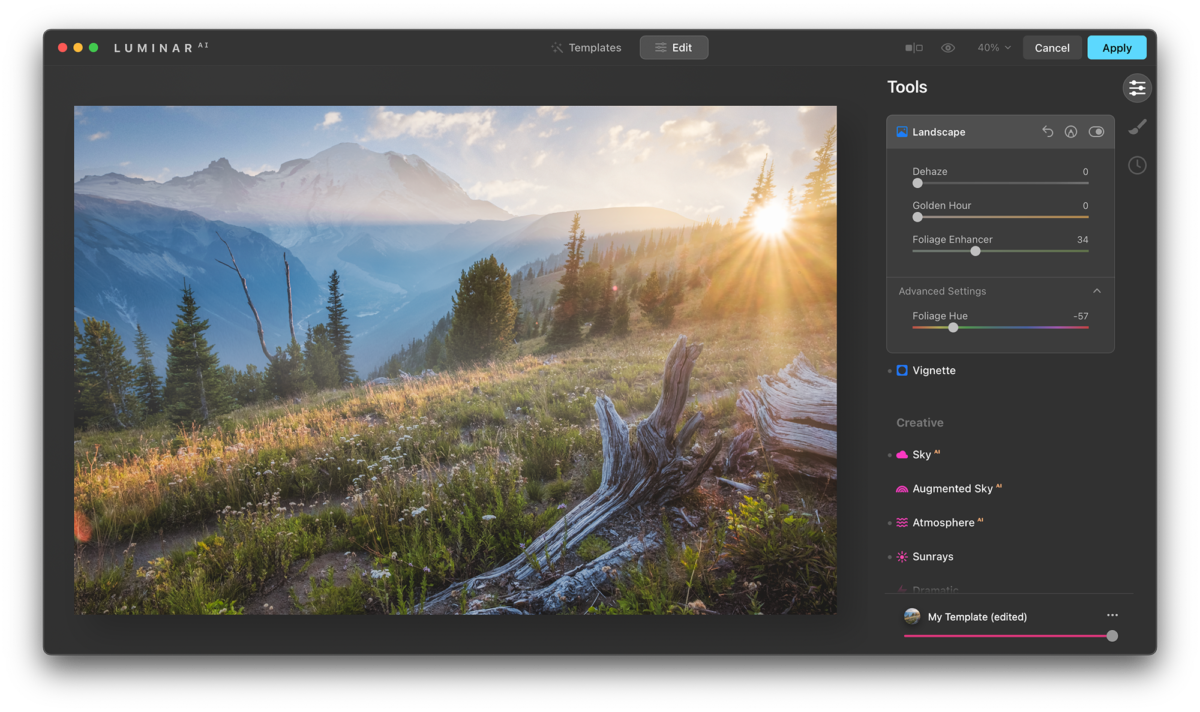
Here are some of the tools I use in Luminar AI to polish and refine my Lightroom-edited HDR photos:
- Enhance AI: This tool uses AI to add brightness and contrast to areas of the image.
- Color: The Color Cast Removal slider in the Color tool does a good job of finding and eliminating the color cast in your images.
- Landscape: The Foliage Enhancer is a good way to make the greens pop in your photos. Make sure that you also play with the Advanced Settings to ensure the green color is not too intense.
- Vignette: A subtle vignette is always a nice touch on any photograph.
- Sky AI: This photo had no clouds in the sky, so I added one of my own sky images from my Sky & Cloud II pack to give it some interest. I made sure it was not too saturated, so I added some haze and brightness in the settings.
- Sunrays: Because I already had a sun in my photo, I used the Sunrays tool to improve it.
- Atmosphere AI: Another great tool to help add realism to a landscape photograph. In this photo I added some haze to the scene.
- Matte: HDR images can oftentimes be very contrasty, so I will use the Matte tool to reduce contrast.
- Mystical: A nice polishing effect to add a touch of glow as well as contrast to the darker areas.
High dynamic range photography, also known as HDR, is a great way to create a photograph and retain as much detail in the highlights and shadows as possible. In its early years, HDR made its way into headlines when photographers created surreal, unnatural, and overly contrasty images (if you’d like to see examples of what not to do, head over to this subreddit). While I may have been slightly guilty of this in my earlier years, my preference for HDR is to create a natural-looking image without the qualities of an over-processed image. In this article, I will share my techniques to create this effect. I will also share how to process these images with Lightroom CC Classic so that you can get the most natural-looking HDR results.
Quick Links:
What is HDR?
HDR (high dynamic range) photography is when you create a photograph from a high-contrast scene that includes detail in the shadows and highlight areas. You can achieve this by photographing multiple images at once using bracketing, and then merging those images together using post-processing software (more on this later in this article). This form of photography is exclusive to digital photography, as film was able to capture more detail in one frame than we can with our current digital cameras.
What scenes work best for HDR?
Any scene that has a lot of contrast between the dark areas and bright areas is typically a good candidate for HDR scenes. A good example is a landscape scene where the foreground is much darker than the sky; using HDR will help you get the entire scene with a more balanced exposure overall. Some examples of subjects that work well with HDR include:
- Landscapes
- Cityscapes
- Architecture
- Real-estate photography
Here are some general tips to set you in the right direction:
- Avoid HDR with people, it usually makes them look weird.
- Remember that you still want to photograph in good light. Bad light will almost always equal a subpar photograph, and even though you can bring back detail in the shadows on a sunny day at noon, this doesn’t mean that the photo will transform into a beautiful image. Good light, in this example, would be at sunrise or sunset, or anytime when your subject is casting a long shadow.
- Using a small aperture (where there are a lot of out-of-focus areas in the background or foreground) can sometimes lead to unusual results. Try using your aperture at a smaller setting—such as ƒ/11 or ƒ/16—so that the majority of your scene is in focus.
Photographing for HDR
To create an HDR, you first need to have a series of exposure-bracketed images. This means that you photograph several frames of the same scene (I usually photograph 5 or 7 frames) at different exposures. Most cameras will have some type of bracketing feature, allowing you to configure your settings and press the shutter once to create each frame. You typically will be able to select how many frames you want to photograph, along with the exposure interval between each frame.
For example, with a five-frame bracket and a 1-stop exposure, you would have:
- Two underexposed images
- One “properly” exposed image
- Two overexposed images
Here are some tips on how to accomplish this:
- Use the shutter speed to bracket your photos. Keep both the ISO and APERTURE consistent throughout each frame, so that the SHUTTER SPEED is the only thing changing between each shot.
- Use a tripod. It’s good practice to set your camera on a tripod to ensure the photos will match up properly in post-processing.
- Don’t use too wide of an aperture. You will want to photograph scenes that look best with a narrow depth of field, where most everything is in focus. Adding blur or bokeh to the scene can do funny things when you merge them for HDR.
- Set it to run automatically in your camera. In my Fujifilm X-T3, I have a “BKT” setting on the top-left dial, which is the setting for bracketing my shots. Because I have multiple options for bracketing (focus, ISO, etc.), I need to go into the “Drive Settings” and specify that I want to use “AE bracket”, and then I can choose how many frames, the exposure steps (1 stop, 1.5 stops, etc.), along with a few other settings specific to my camera. Please consult your user manual for information on setting this up with your specific camera brand and model.
The following images show an example of a five-frame series of HDR brackets with a 1.5-exposure stop in-between each frame:
Using Lightroom to process your HDR photos
Lightroom CC Classic offers an easy way to process HDR photos, with many benefits. Here are some of the reasons I prefer using Lightroom to merge my HDR images:
- No need to edit the raw photos before merging. Lightroom creates a DNG file with your brackets with the ability to non-destructively edit the white balance and exposure. So there is no need to do any post-processing to your original raw bracketed shots before merging them, allowing you to focus your attention on the final merged photograph.
- Easy to access from within the catalog. You can do all of your HDR editings right inside the Lightroom app! There is no need to export photos first, which can be a big time saver if you are processing several HDR images at a time.
- HDR merging can happen in the background. If you have several shots that you want to merge, you can quickly go through each grouping and Lightroom will process them in the background. To access this feature, simply use the SHIFT key modifier when merging your HDR images.
- Locating your HDR brackets is easy with the “Auto-Stack by Capture Time” feature. If you have several bracketed shots in a folder, you can select those images and tell Lightroom to auto-stack the photos based on capture time. Typically, there will only be a few seconds between each exposure, and you will have a large enough gap between each series of shots so that Lightroom can group your brackets together. When you have a folder filled with bracketed exposures, it can be difficult to separate them all out, so this is a great way to stay organized.
Lightroom HDR merging: Step-by-step
Here’s how to merge your HDR-bracketed images using Lightroom CC Classic:
Step 1: Access your bracketed files
First, access the files you want to use in Lightroom within the grid view in the Library module. Then, select all of the raw images to highlight them. In this example, I have five images from this series.
Tip: To select multiple images in Lightroom, click the first image in the group, press and hold the SHIFT key, then click the last image.
Step 2: Merge the files
Now, go to Photo > Photo Merge > HDR.
Note: There is no need to make any edits to your photographs before merging them; the final output will be a DNG (raw) file, so you will want make your edits to the final version instead of editing the files beforehand.
Step 3: Adjust the merge settings
In the window that pops up, you will have some options to work with. Here’s how to set these for your images:
- Auto Align: If you did not photograph from a tripod, or have any doubt about the image not being aligned, then make sure to check this box. Even though most of my HDR brackets are photographed from a tripod, I typically leave it checked, which may add to the processing time but will always give you the best merge possible.
- Auto Settings: This option will auto-apply settings from the Basic panel in Lightroom after the merge is complete. I usually leave this box checked and then fine-tune the settings after the photo merge is complete.
- Deghost Amount: When there are elements within the photo that moved (grass or trees from wind, etc.), then use the Deghost settings to compensate and remove those blurry elements. You can also preview the overlay of these areas with the “Show Deghost Overlay” box.
- Create Stack: This will stack your images together after the merge is complete.
Then, click Merge at the bottom to complete the process.
Step 4: Process the merged HDR image
After the merging process is complete, a new DNG file will appear alongside your original merged brackets. Open this file and bring it into the Develop module. Here you can see that Lightroom has already auto-applied settings, so the photo is already off to a good start. Next, I made changes to the Basic panel (to make sure the image was not overly contrasty and bring some fill-light into the shadows), HSL (to remove blue in the mountain and shadow areas), and I also I adjusted the camera profile (I selected on that would not over-saturate the photo).
Here are some tips for processing an HDR photograph to make it look natural:
- Be OK with some details that are too dark or too bright. One downfall of “bad” HDR is when every single part of the photo is perfectly exposed. Even though the point of HDR photography is to bring detail back into those areas, making every part of the scene balanced can oftentimes create that overprocessed and weird HDR look. You can do this by increasing the HIGHLIGHTS and decreasing the SHADOWS slider to remove partial detail in those regions.
- Don’t oversaturate. In fact, I tend to reduce saturation slightly, especially in shadowy areas that become too blue.
- Beware of black-and-blue clouds. Overdone landscape HDR has one tell-tale sign: black clouds with blue shadows. While it might look interesting and surrealistic, if you are going for a natural look, you’ll want to avoid this when post-processing.
- Watch out for the Dehaze slider. If you use this slider, make sure it’s not adding strange halos around the edges of your horizon areas. In fact, I tend to decrease this slider (to add haze) to help increase realism in my HDR scenes.
Step 5 (optional): Add finishing touches in Luminar AI
I enjoy using Luminar AI to add finishing touches to my photos that are edited in Lightroom CC. There are a few different ways you can edit photos from Lightroom:
- Export with Preset: To edit a photo with Luminar AI directly from Lightroom, go to File > Export with Preset > Luminar AI > Edit a Copy with Lightroom Adjustments. This will open Luminar AI so you can apply your edits, and after exiting Luminar, the newly-processed image will appear alongside the original in Lightroom.
- Open in Photoshop, then edit Luminar AI: My preference when editing photos in Luminar AI as a plugin is to first open the Lightroom-edited file into Photoshop, then convert the image into a Smart Object and use the Luminar AI plugin from there. This allows me to non-destructively edit the file so that I can make additional changes afterward if I want to alter a tool or effect that I applied in Luminar.
Here’s how I set this up in Photoshop:
- From Lightroom, I made sure the image was selected. Then I went to Photo > Edit in > Photoshop.
- In Photoshop, I duplicated the image layer (click the layer and use the keyboard shortcut Cmd/Ctrl + J).
- I activated the new duplicate layer and converted it to a Smart Object. You can do this by going to Layer > Smart Objects > Convert to Smart Object, or by right-clicking the layer and selecting the Convert to Smart Object option.
- To open the image into Luminar AI, I made sure the smart object was activated and went to Filter > Skylum Software > Luminar AI.
Here are some of the tools I use in Luminar AI to polish and refine my Lightroom-edited HDR photos:
- Enhance AI: This tool uses AI to add brightness and contrast to areas of the image.
- Color: The Color Cast Removal slider in the Color tool does a good job of finding and eliminating the color cast in your images.
- Landscape: The Foliage Enhancer is a good way to make the greens pop in your photos. Make sure that you also play with the Advanced Settings to ensure the green color is not too intense.
- Vignette: A subtle vignette is always a nice touch on any photograph.
- Sky AI: This photo had no clouds in the sky, so I added one of my own sky images from my Sky & Cloud II pack to give it some interest. I made sure it was not too saturated, so I added some haze and brightness in the settings.
- Sunrays: Because I already had a sun in my photo, I used the Sunrays tool to improve it.
- Atmosphere AI: Another great tool to help add realism to a landscape photograph. In this photo I added some haze to the scene.
- Matte: HDR images can oftentimes be very contrasty, so I will use the Matte tool to reduce contrast.
- Mystical: A nice polishing effect to add a touch of glow as well as contrast to the darker areas.

Nicole is a photographer, published author, and educator specializing in Lightroom, Photoshop, and photography. She is best known for her books on food photography but is widely versed in various photographic genres, including landscape, nature, stock, travel, and experimental imagery.


