
Luminar AI works as a standalone program, but it also works well as a plugin, and I will oftentimes use it after editing photos from Lightroom or Photoshop. In this article, I will be sharing the different ways you can edit your photos as a plugin from Lightroom CC Classic.
Within Lightroom, there are several ways that you can bring a photo into Luminar AI. I have four of them listed below to help you determine which one works best with your workflow, and it might also shed some light on why things are not happening the way you might expect them to if you run into a snag along the way.
Export with Preset
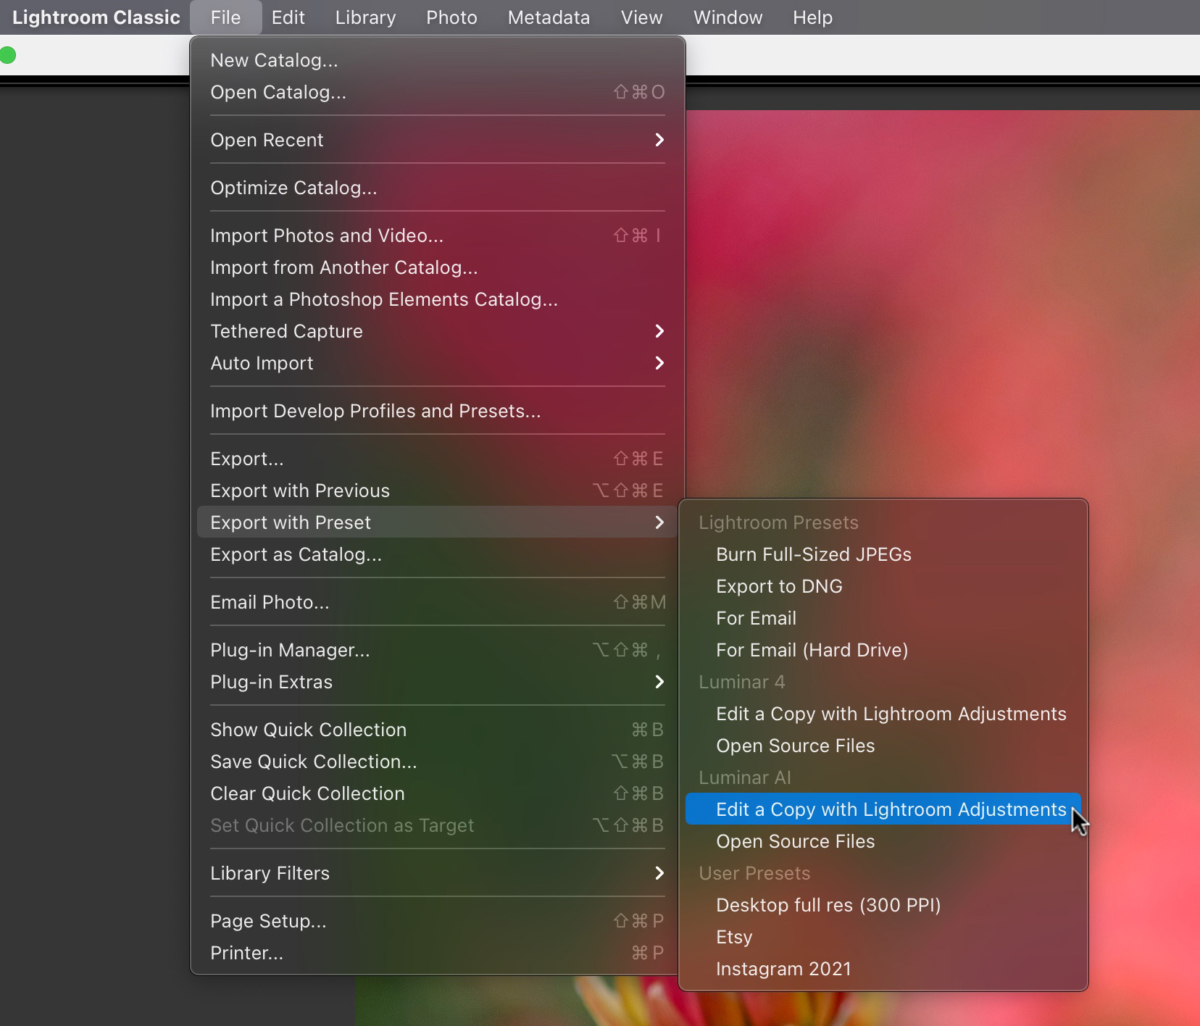
File > Export with Preset > Luminar AI > Edit a Copy with Lightroom Adjustments
- A good choice if you first want to first apply raw edits to your images in Lightroom
- Opens the file into Luminar as a flattened TIFF file with your Lightroom edits applied
- The file is brought back into Lightroom alongside your original image after making your edits in Luminar
- Adds “LuminarAI-edit” to the end of the filename (for example, after editing a file named photo.raf, the file would be called photo_LuminarAI-edit.tiff once the image is brought back into Lightroom)
This is my preferred method and is the method I will regularly teach. Lightroom is the “home base” for my entire photography catalog. It’s where I store and organize my images, and I prefer to use it when editing my raw files as well. The reason I prefer this method is that it allows me to first apply my raw image edits in Lightroom, then I can easily open a photo into Luminar AI to add some finishing touches. Then, when finished, the file is automatically brought back into Lightroom as a flattened TIFF file with all Luminar AI edits visible.
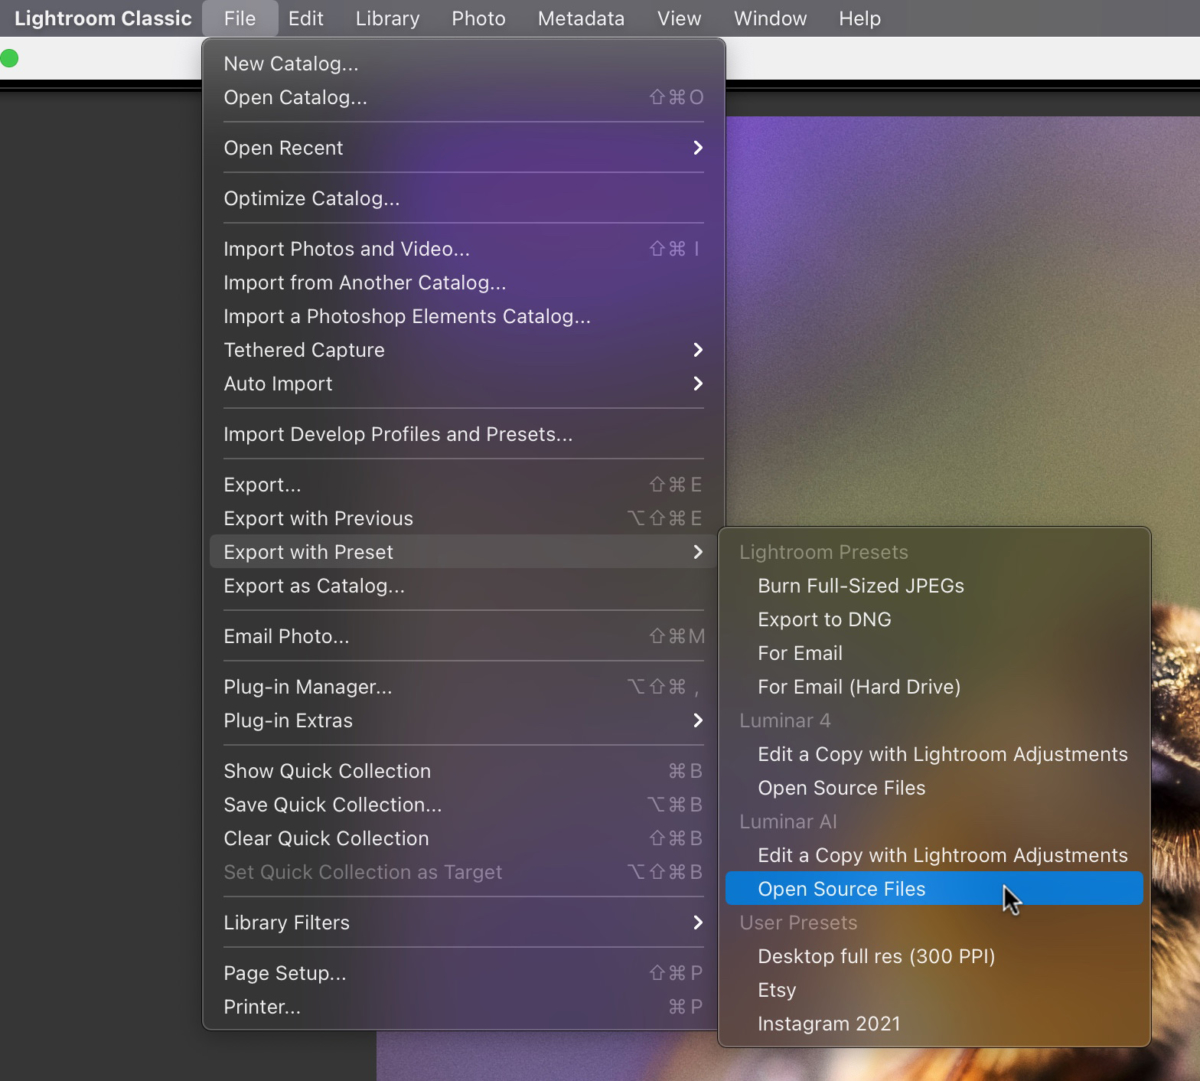
File > Export with Preset > Luminar AI > Open Source Files
- Works well if you want to edit the original file in Luminar AI with no edits from Lightroom applied to the image
- Opens the file into Luminar as the original file (raw, etc.)
- The file is brought back into Lightroom as a flattened TIFF file alongside your original image after making your edits in Luminar
- Adds “LuminarAI-edit” to the end of the filename (for example, after editing a file named photo.raf, the file would be called photo_LuminarAI-edit.tiff once the image is brought back into Lightroom)
This method is a good option if you want to use Lightroom as your catalog of images, but would prefer to edit a photo from start to finish within Luminar AI. For example, if you are editing a raw file, the original raw file will open into Luminar, regardless if there were any edits applied to the file in Lightroom. This allows you to use the full potential of Luminar AI while still working from Lightroom.
Transfer to Luminar AI
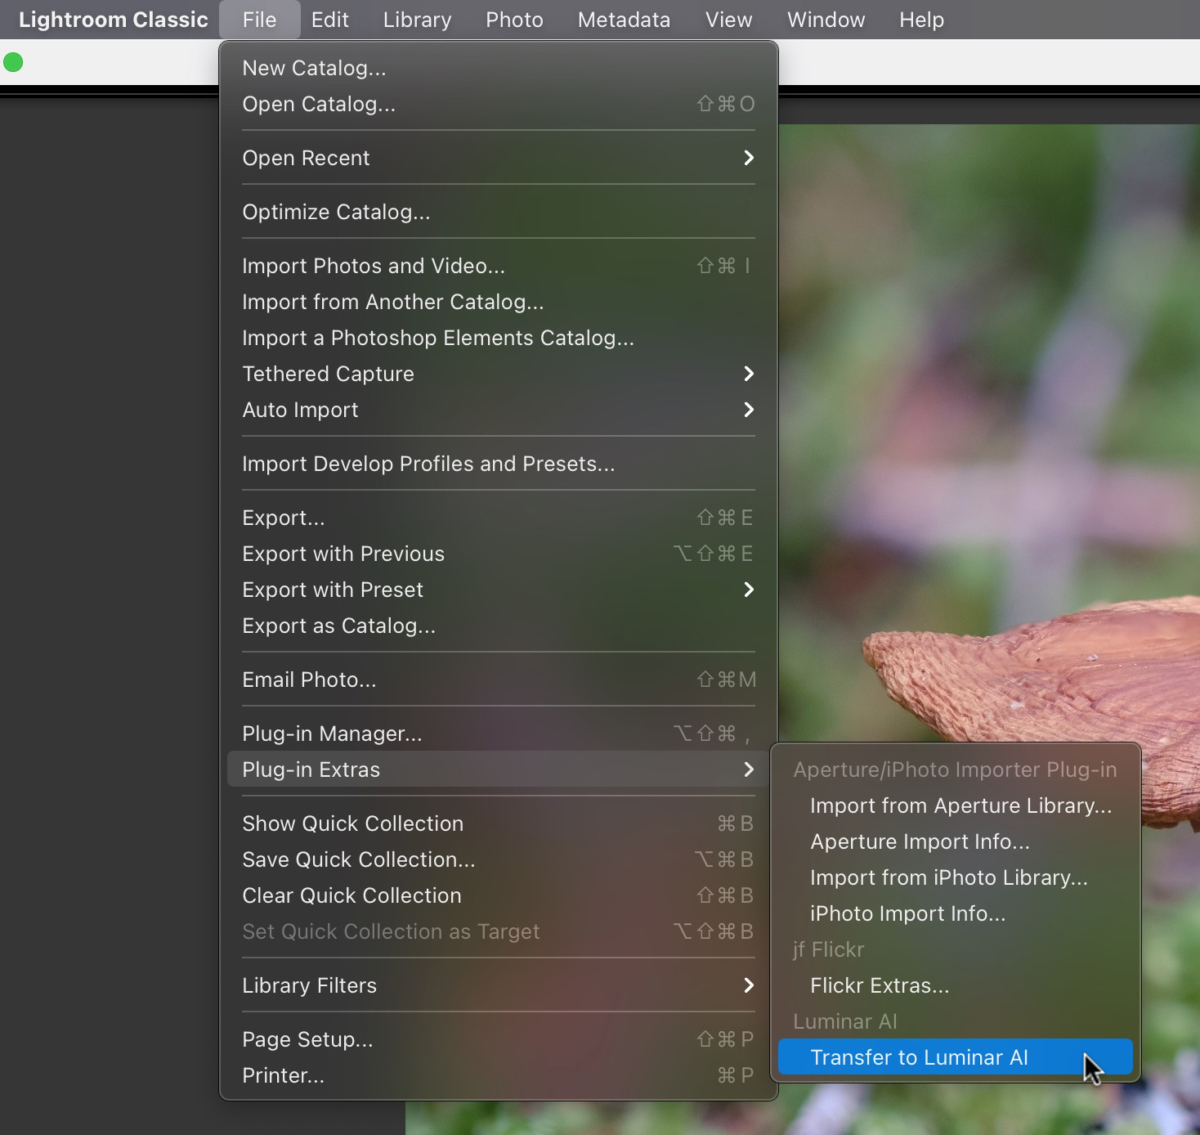
File > Plugin Extras > Transfer to Luminar AI
- Nearly identical to the previous method, “Open Source Files”
- The filename is not changed when the image is brought back to Lightroom
- Saves as a TIFF file once back in Lightroom
This method works nearly identically to the method above (File > Export with Preset > Luminar AI > Open Source Files). The only difference is that when you bring the photo back into Lightroom, the filename does not have “LuminarAI-edit.tiff” added after the filename. It is simply changed to a TIFF file. So a file named flower.raf would then be flower.tiff once brought back into Lightroom.
Using the “Edit in” menu item
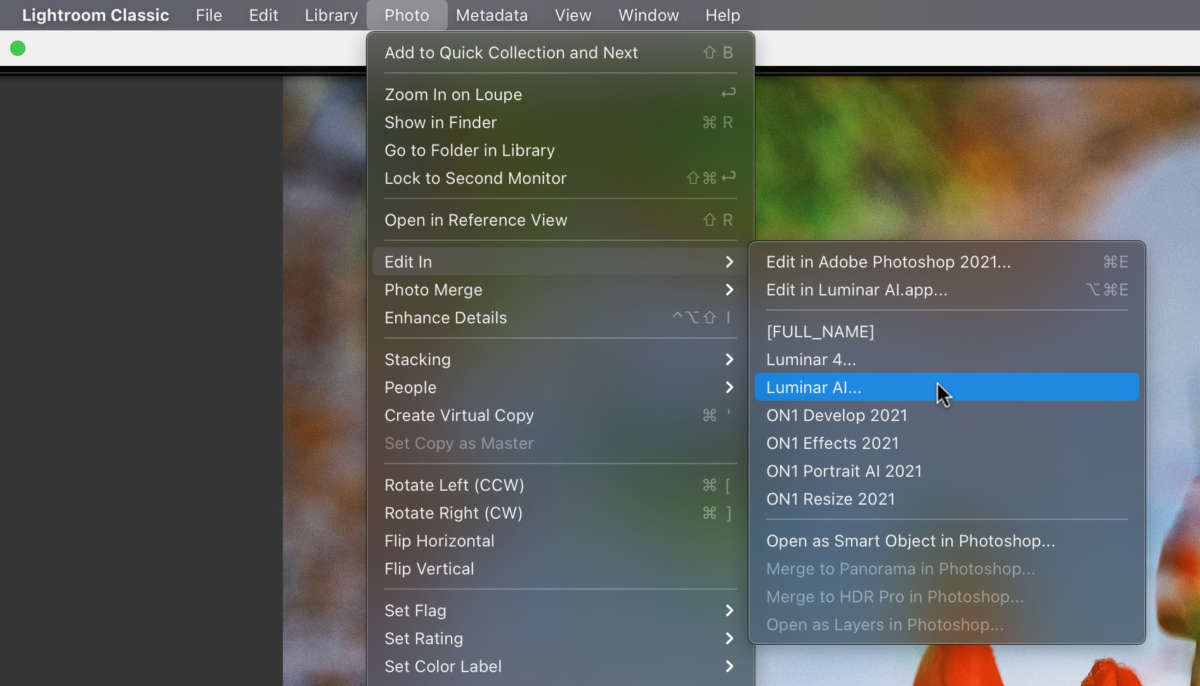
Photo > Edit in > Luminar AI
- Creates a new TIFF file and places it alongside your original file in Lightroom
- Opens this new TIFF file into Luminar AI
- The photo is added as a “Single File Edit” in Luminar AI and is opened in its original folder location
- Does not bring the photo back into Lightroom
Most of the time, when editing your photo externally, you’ll go to the Photo > Edit In menu option. After all, this is how you bring your photos into Photoshop to do further editing.
However, with Luminar AI, I do not recommend this method, primarily because it does not work as intuitively as we would expect it to. When you use this menu command, by default Lightroom creates a TIFF file and places it alongside your original file. Then, Luminar AI will open up so you can edit the file. However, after doing so, there is no way to bring the image back into Lightroom after you’ve completed your edits. This is because the newly-created TIFF file has essentially been imported into the Luminar AI catalog as a “Single image edit”, so any edits you make within Luminar cannot be saved and brought back into Lightroom so you would need to complete your edits in Luminar and export it to save a finished file.
Also, another issue with this method is that it is not editing the original format of your image. So, if you prefer to edit the raw file in Luminar, you are not able to do that with this method. I suggest using the other methods listed above when you want to edit a photo in Luminar AI from Lightroom.
Luminar AI works as a standalone program, but it also works well as a plugin, and I will oftentimes use it after editing photos from Lightroom or Photoshop. In this article, I will be sharing the different ways you can edit your photos as a plugin from Lightroom CC Classic.
Within Lightroom, there are several ways that you can bring a photo into Luminar AI. I have four of them listed below to help you determine which one works best with your workflow, and it might also shed some light on why things are not happening the way you might expect them to if you run into a snag along the way.
Export with Preset
File > Export with Preset > Luminar AI > Edit a Copy with Lightroom Adjustments
- A good choice if you first want to first apply raw edits to your images in Lightroom
- Opens the file into Luminar as a flattened TIFF file with your Lightroom edits applied
- The file is brought back into Lightroom alongside your original image after making your edits in Luminar
- Adds “LuminarAI-edit” to the end of the filename (for example, after editing a file named photo.raf, the file would be called photo_LuminarAI-edit.tiff once the image is brought back into Lightroom)
This is my preferred method and is the method I will regularly teach. Lightroom is the “home base” for my entire photography catalog. It’s where I store and organize my images, and I prefer to use it when editing my raw files as well. The reason I prefer this method is that it allows me to first apply my raw image edits in Lightroom, then I can easily open a photo into Luminar AI to add some finishing touches. Then, when finished, the file is automatically brought back into Lightroom as a flattened TIFF file with all Luminar AI edits visible.
File > Export with Preset > Luminar AI > Open Source Files
- Works well if you want to edit the original file in Luminar AI with no edits from Lightroom applied to the image
- Opens the file into Luminar as the original file (raw, etc.)
- The file is brought back into Lightroom as a flattened TIFF file alongside your original image after making your edits in Luminar
- Adds “LuminarAI-edit” to the end of the filename (for example, after editing a file named photo.raf, the file would be called photo_LuminarAI-edit.tiff once the image is brought back into Lightroom)
This method is a good option if you want to use Lightroom as your catalog of images, but would prefer to edit a photo from start to finish within Luminar AI. For example, if you are editing a raw file, the original raw file will open into Luminar, regardless if there were any edits applied to the file in Lightroom. This allows you to use the full potential of Luminar AI while still working from Lightroom.
Transfer to Luminar AI
File > Plugin Extras > Transfer to Luminar AI
- Nearly identical to the previous method, “Open Source Files”
- The filename is not changed when the image is brought back to Lightroom
- Saves as a TIFF file once back in Lightroom
This method works nearly identically to the method above (File > Export with Preset > Luminar AI > Open Source Files). The only difference is that when you bring the photo back into Lightroom, the filename does not have “LuminarAI-edit.tiff” added after the filename. It is simply changed to a TIFF file. So a file named flower.raf would then be flower.tiff once brought back into Lightroom.
Using the “Edit in” menu item
Photo > Edit in > Luminar AI
- Creates a new TIFF file and places it alongside your original file in Lightroom
- Opens this new TIFF file into Luminar AI
- The photo is added as a “Single File Edit” in Luminar AI and is opened in its original folder location
- Does not bring the photo back into Lightroom
Most of the time, when editing your photo externally, you’ll go to the Photo > Edit In menu option. After all, this is how you bring your photos into Photoshop to do further editing.
However, with Luminar AI, I do not recommend this method, primarily because it does not work as intuitively as we would expect it to. When you use this menu command, by default Lightroom creates a TIFF file and places it alongside your original file. Then, Luminar AI will open up so you can edit the file. However, after doing so, there is no way to bring the image back into Lightroom after you’ve completed your edits. This is because the newly-created TIFF file has essentially been imported into the Luminar AI catalog as a “Single image edit”, so any edits you make within Luminar cannot be saved and brought back into Lightroom so you would need to complete your edits in Luminar and export it to save a finished file.
Also, another issue with this method is that it is not editing the original format of your image. So, if you prefer to edit the raw file in Luminar, you are not able to do that with this method. I suggest using the other methods listed above when you want to edit a photo in Luminar AI from Lightroom.

Nicole is a photographer, published author, and educator specializing in Lightroom, Photoshop, and photography. She is best known for her books on food photography but is widely versed in various photographic genres, including landscape, nature, stock, travel, and experimental imagery.


Thanks, Nicole. I found this very informative and cleared up some previous confusion.
Hi Nicole
I wouldn’t bother with Luminar AI or any other version. Thousands like me have complained since the beginning of the total basic instability of Luminar and Skylum have never fixed the fundamental problems saying it’s always the users PC and build a new catalog………………never ever addressed just more and more totally non-professional gimmicks.
It’s sad but true……look at the thousands of unhappy users on all the forums
Len Jones
I have seen some people complain, however, I’ve never experienced any ongoing issues. No software application is immune from bugs, and typically the loudest people tend to be those who are most unhappy. I’m certain that there are many other users who enjoy the program with no issues who don’t post in those forums, mostly because they are not having issues.
I recommend to users who are having trouble with the software reach out directly to Skylum support.
Nicole….we (1,000’s) have reached out to Skylum for years, stability has never been addressed I’m afraid
Thanks Nicky, I loved interacting with you at the VSC event and am glad to see this. I’ve been using option 4 and wondering why I wasn’t satisfied. Now I’m off to try your other suggested ways of working.
Keep up the good work!
Fran
I never knew the difference of the different ways to open a file in other apps from Lightroom Classic. Now I do. Thanks.
Useful info
Hi Nicole,
Thanks for sharing this trick ! i always use “edit in”. I will try export with presets; always tedious to find a tif and add to catalog near the original one.
What is “the instagram 2021” preset ?
I am still struggling with landscape images 16:9 (instead of 4:5) to upload from LR classic to instagram with sync collection,useing embedded dng, …
marc
Thank you so very much. I have been so frustrated and confused because I use LRClassic for my photo catalog and all organization.
All other plugins work by the “edit in” method so I was mystified by Luminar AI not working the same way.
This has cleared it all up for me and I so appreciate your time.
Can’t wait to get started with one of your suggestion methods:)))))
Teresa
Thank you for the clarification on the methods to interface with LuminarAI. I am just starting to use Lightroom Classic since I need to upgrade my macOS thus killing my Photoshop CS6. So much new to learn, your tips are a big help.
Hal
Thank you SO much, Nicole! Like many others, I was confused by finding my photo in Luminar AI (which I use as a plug-in) without any of the work I had done in Lightroom.
I love the way your tutorials and blogs break things down into small bites that even I can follow. I purchased your Video Guide to Luminar AI and am looking forward to getting more comfortable with the recent changes.
Thanks again,
Bonnie