
If you have ever wanted to give your photo a painted feel, this tutorial is for you! Below I have instructions on how to apply a hand-painted texture and stylize the photo using Photoshop, Luminar AI, and ON1 Photo RAW.
If you would like to follow along with these tutorials, go here to access two free Artist’s Surface textures. And, if you’d like to play with even more of these textures, please take a look at the full Artist’s Surface texture pack in the Nicolesy Store.
Jump to a tutorial on this page:


Photoshop
Use Photoshop CC to apply an oil-paint effect and add a texture.
Step 1: Open a photo into Photoshop CC
Open a photo into Photoshop by going to File > Open and then navigate to the photo you want to edit.
Step 2: Create a Smart Object
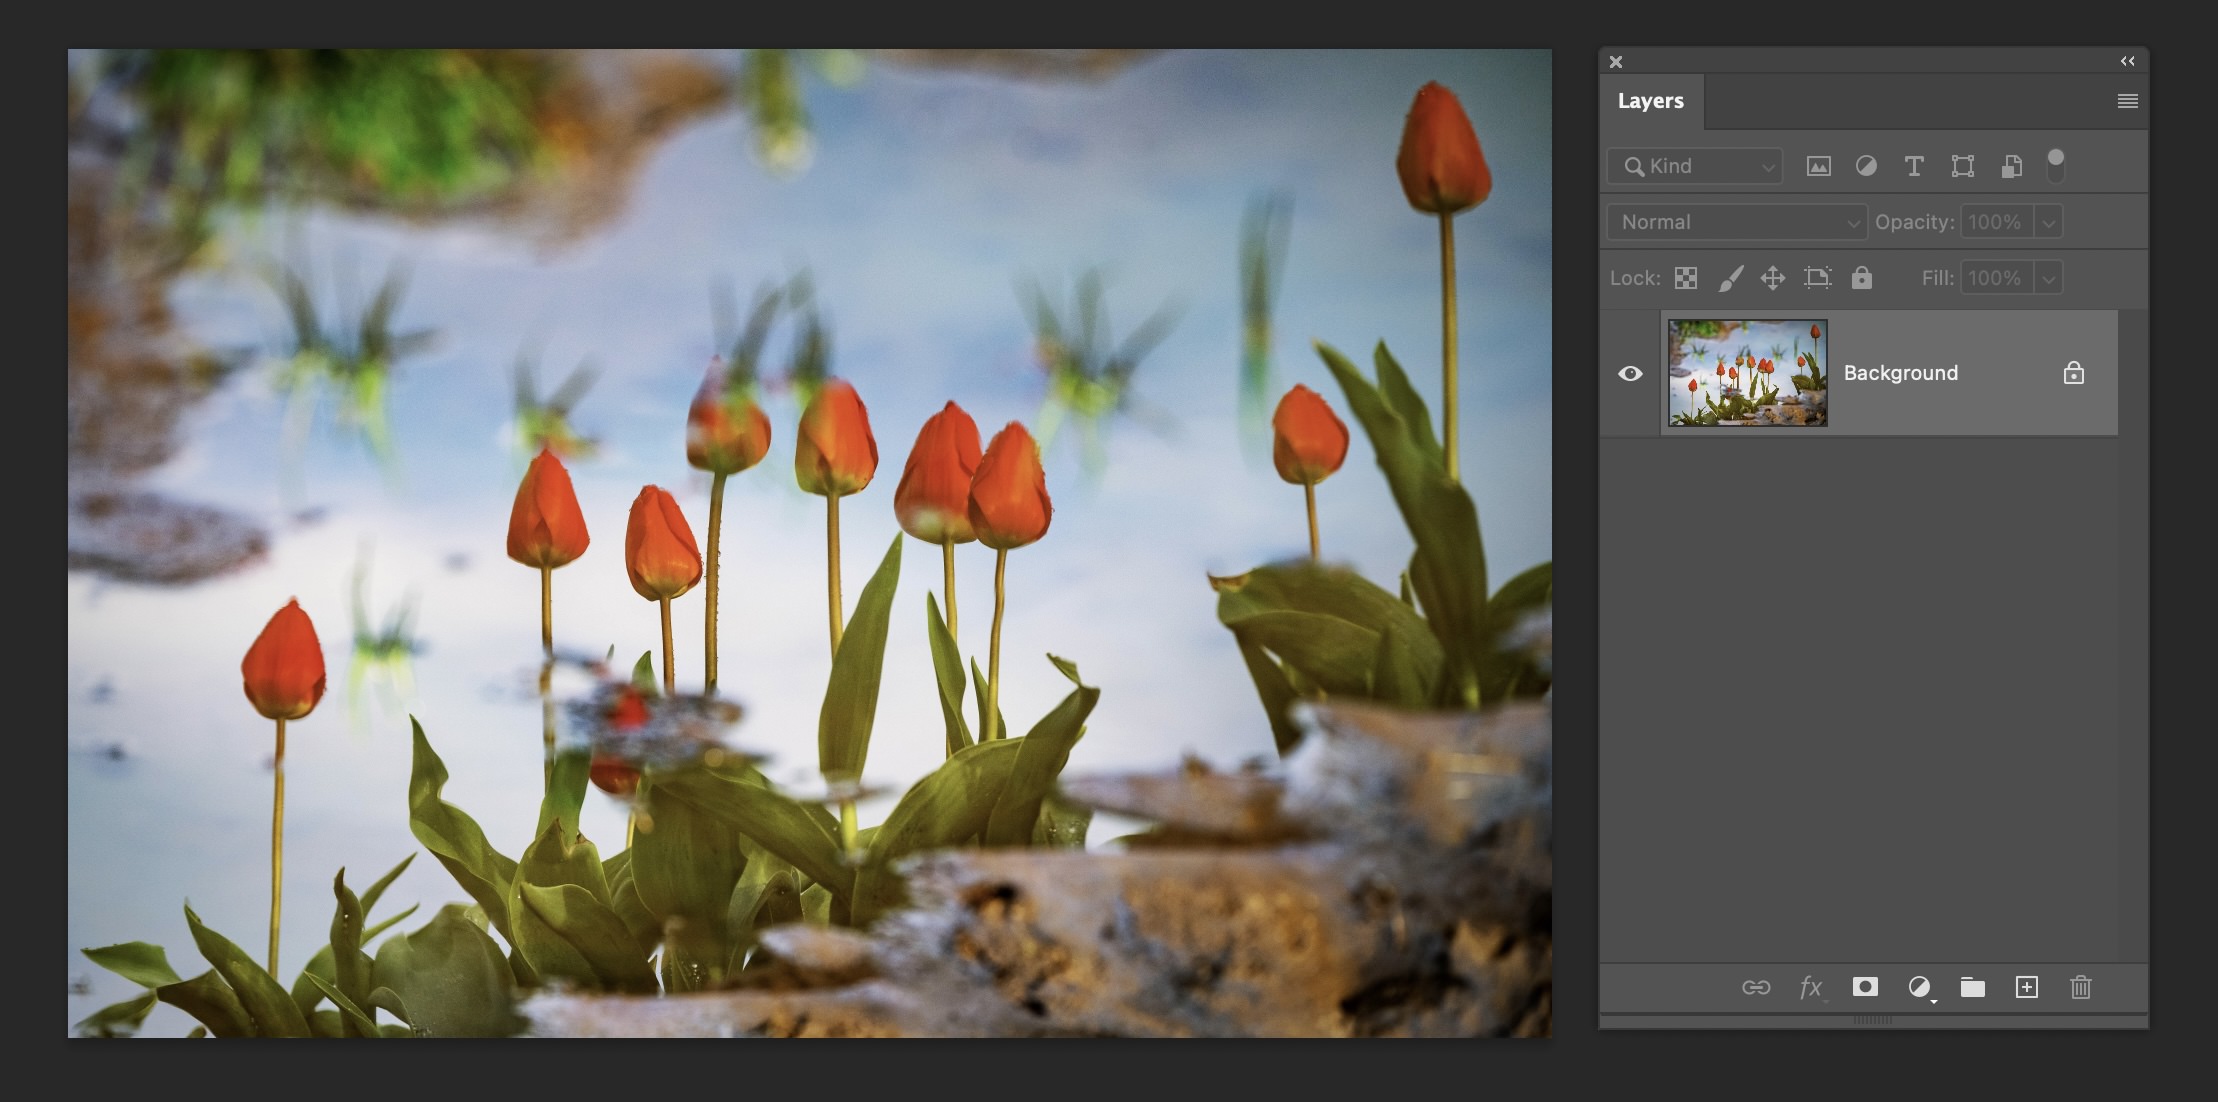
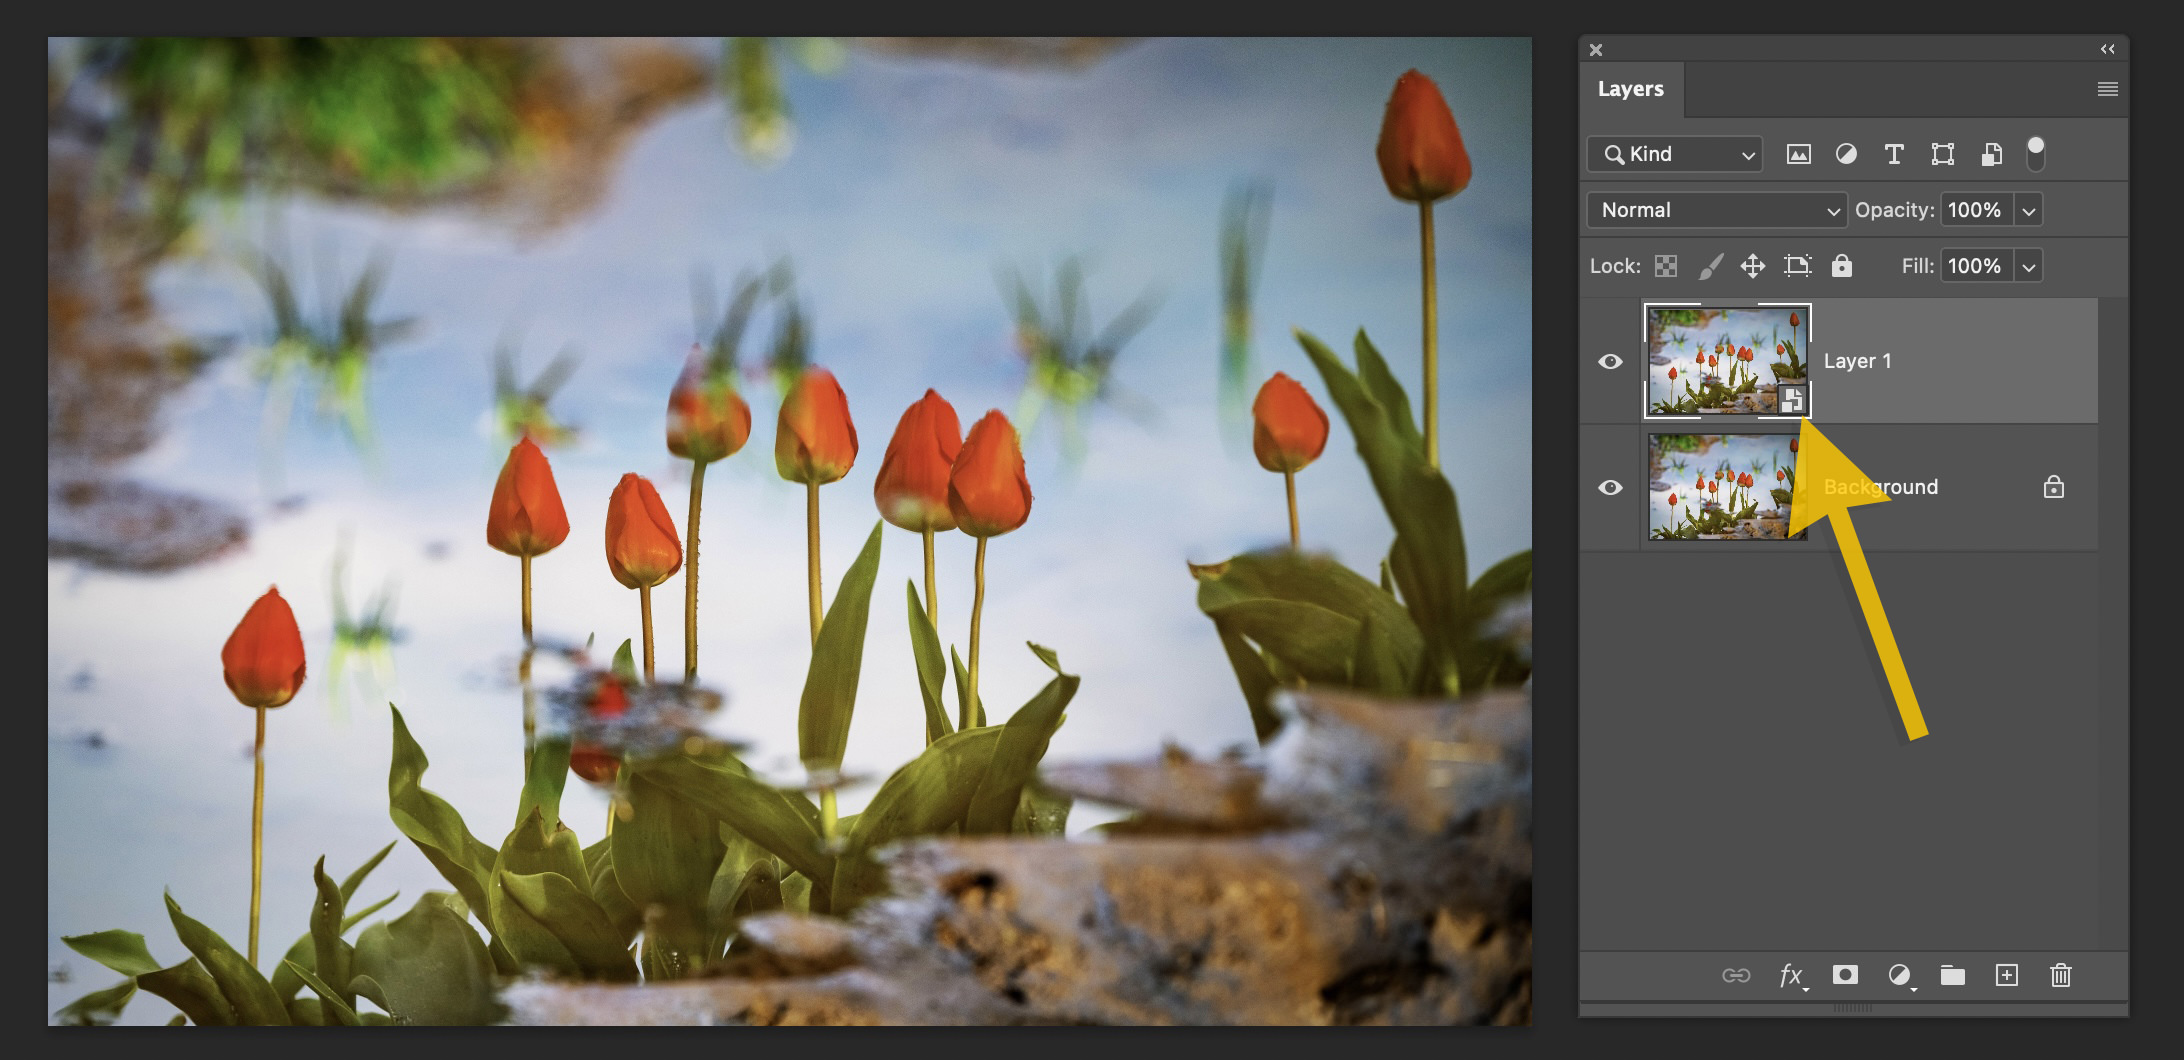
Duplicate the background (main) layer with the keyboard shortcut Cmd + J (Mac) or Ctrl + J (Win). Then, go to Layer > Smart Objects > Convert to Smart Objects in the menu. You will know your layer is a Smart Object if it has a small icon in the lower-right portion of the thumbnail in the Layers panel.
Converting the layer to a Smart Object allows you to non-destructively add filters that can easily be re-edited if you desire.
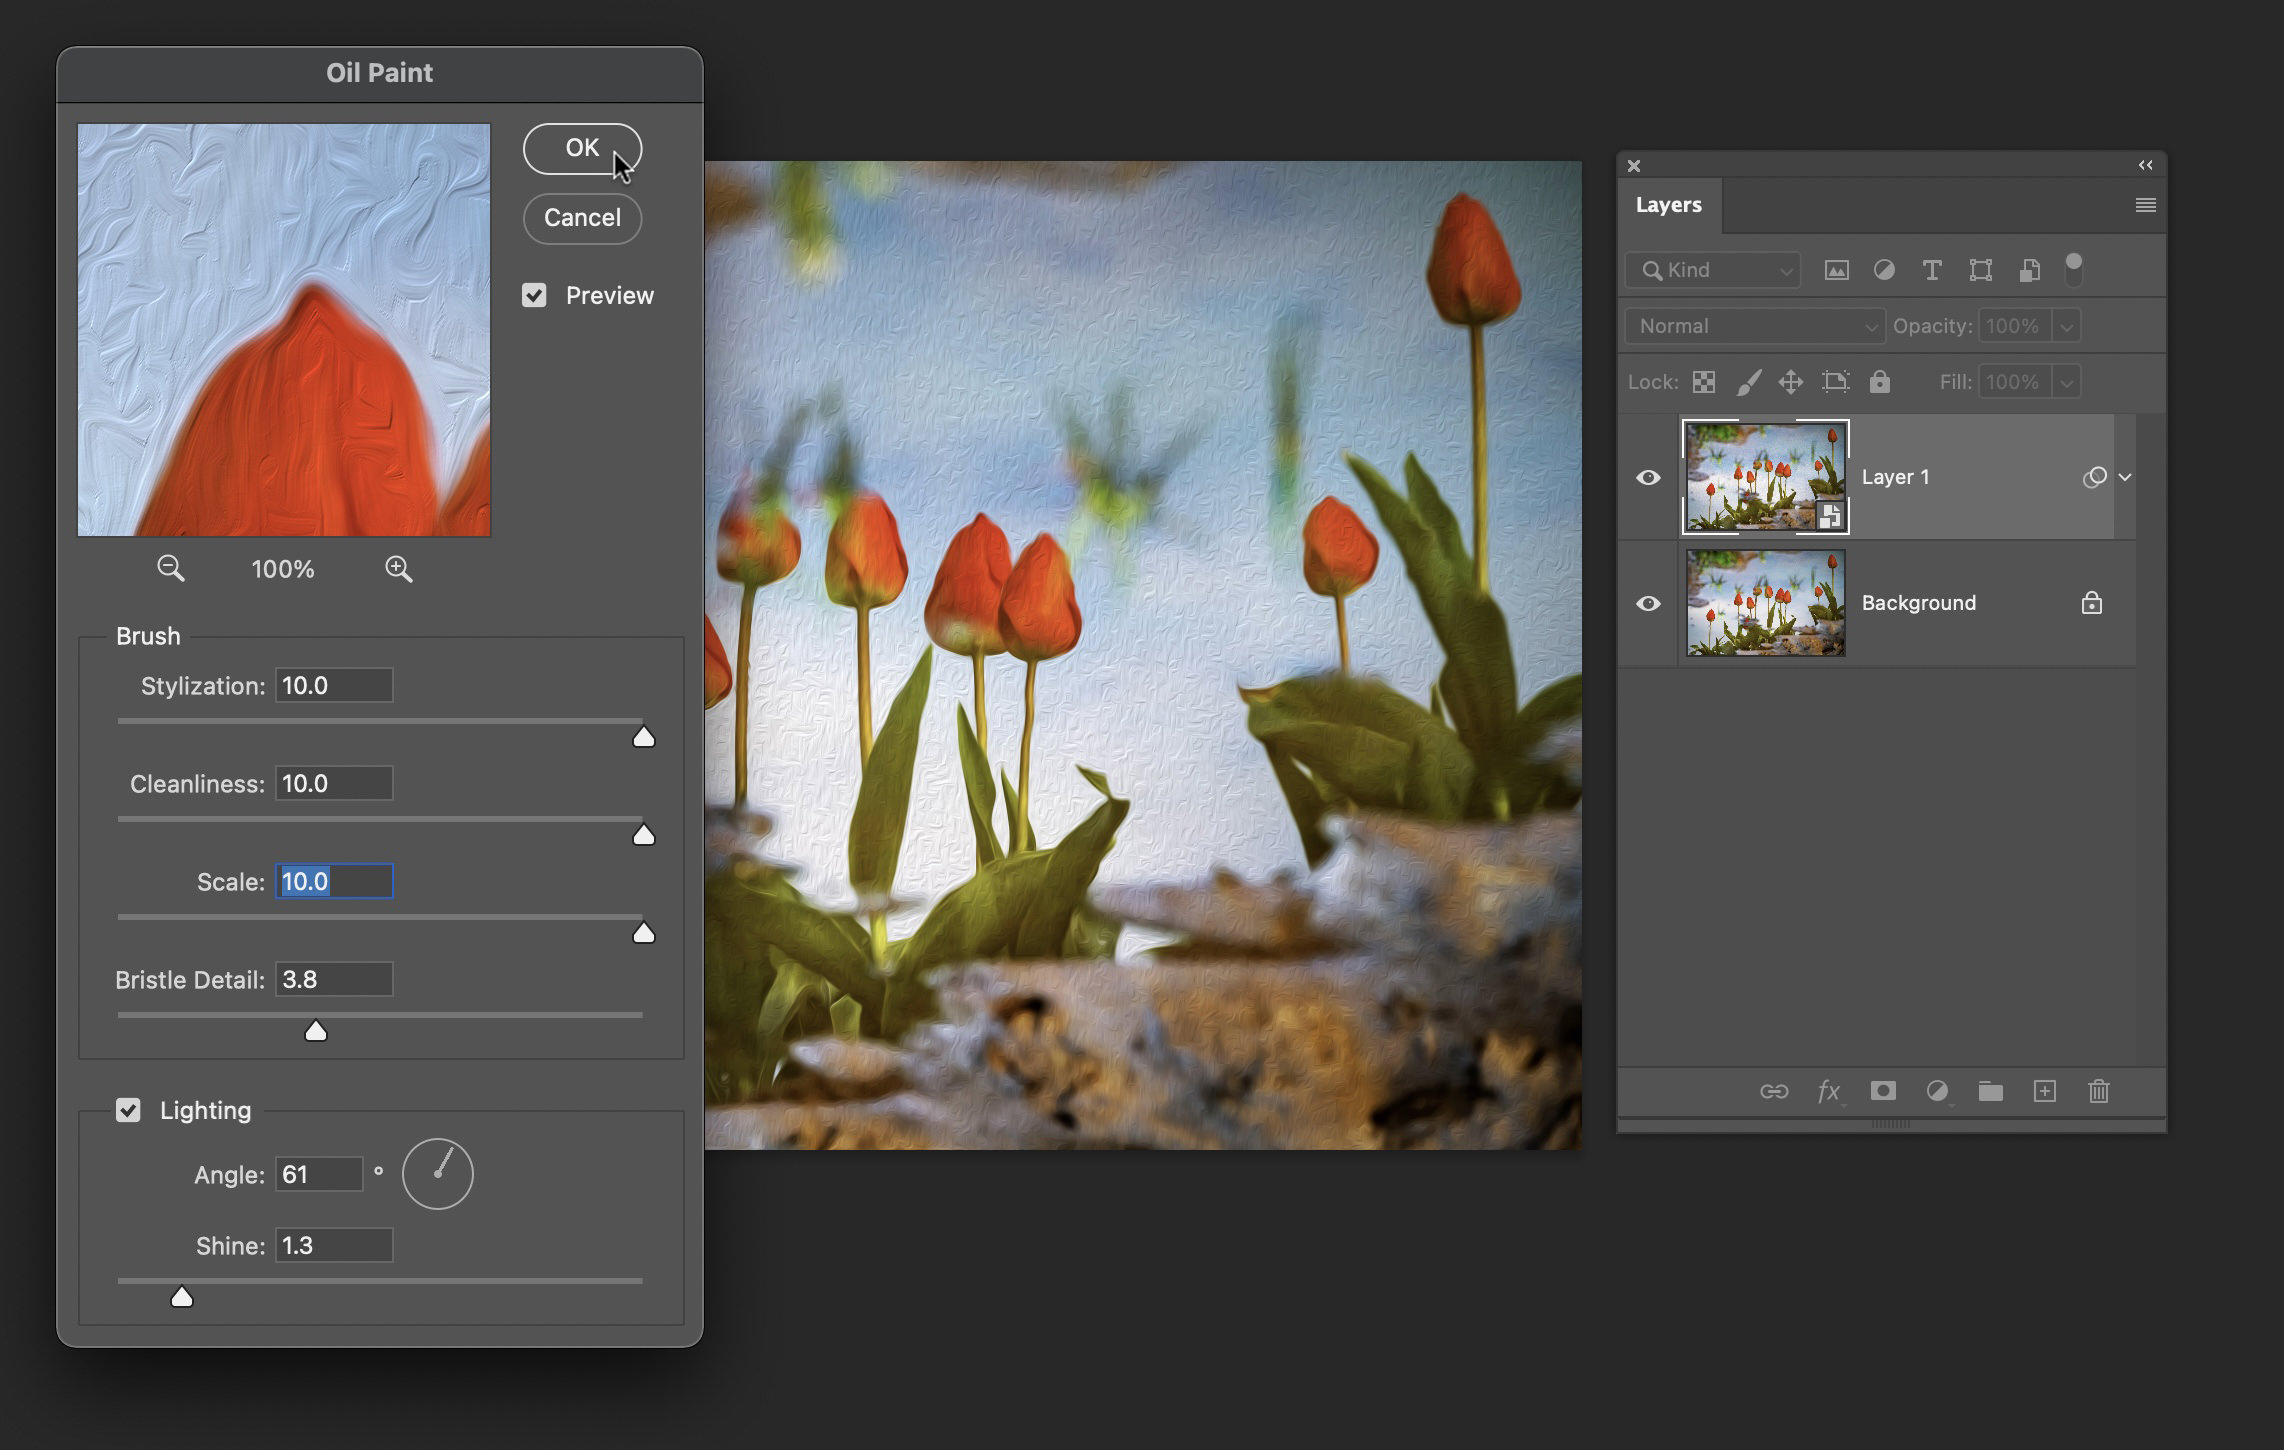
Step 3: Add an Oil Paint filter
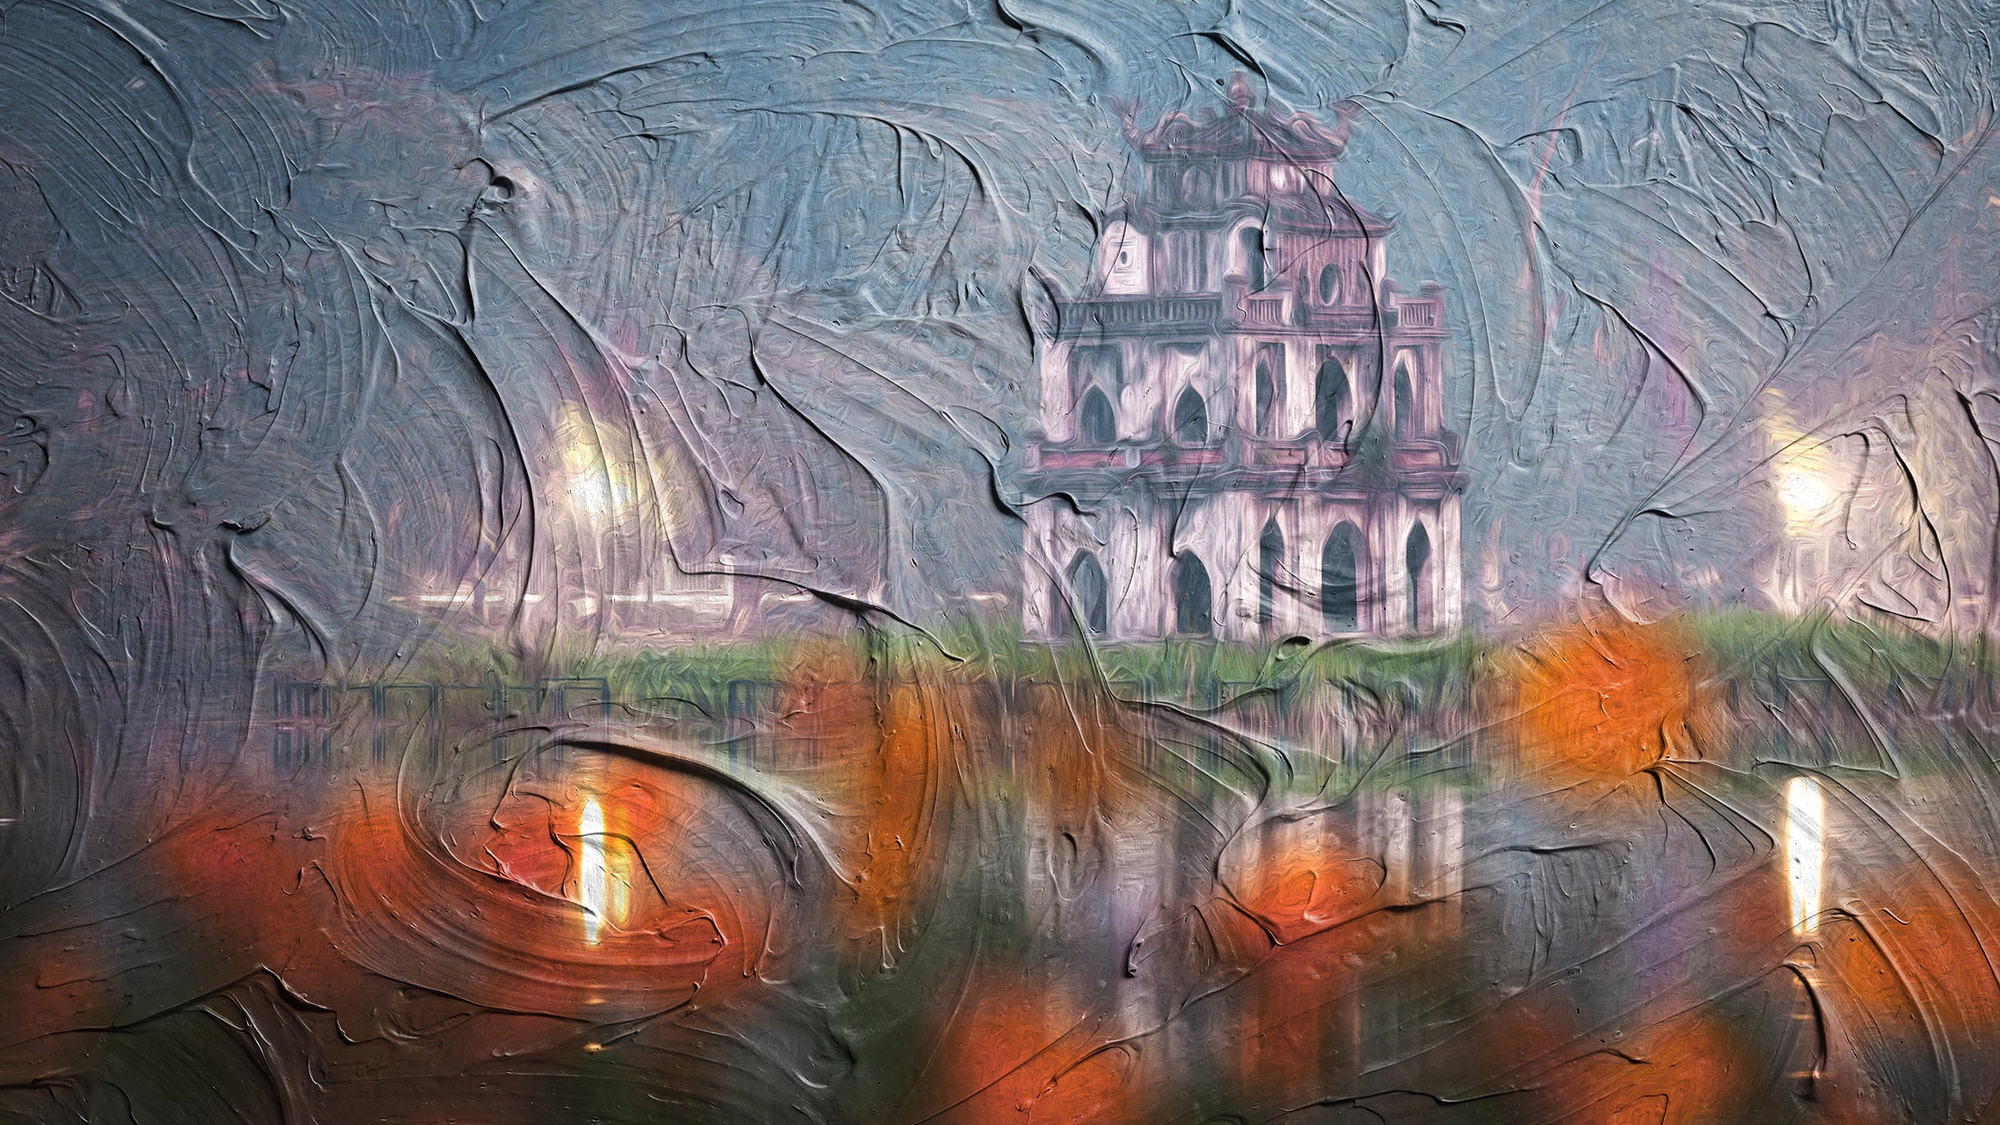
Now, go to Filter > Stylize > Oil Paint. Play with your settings until you get it stylized where you like.
Step 4: Add the Artist’s Surface texture
Now, go to File > Place Embedded and locate the Artist’s Surface texture on your computer or hard-drive. If the image is too small when it is placed, resize and/or rotate it so it covers the entire photo. When you are finished with the texture placement, press the Return (Mac) or Enter (PC) key.
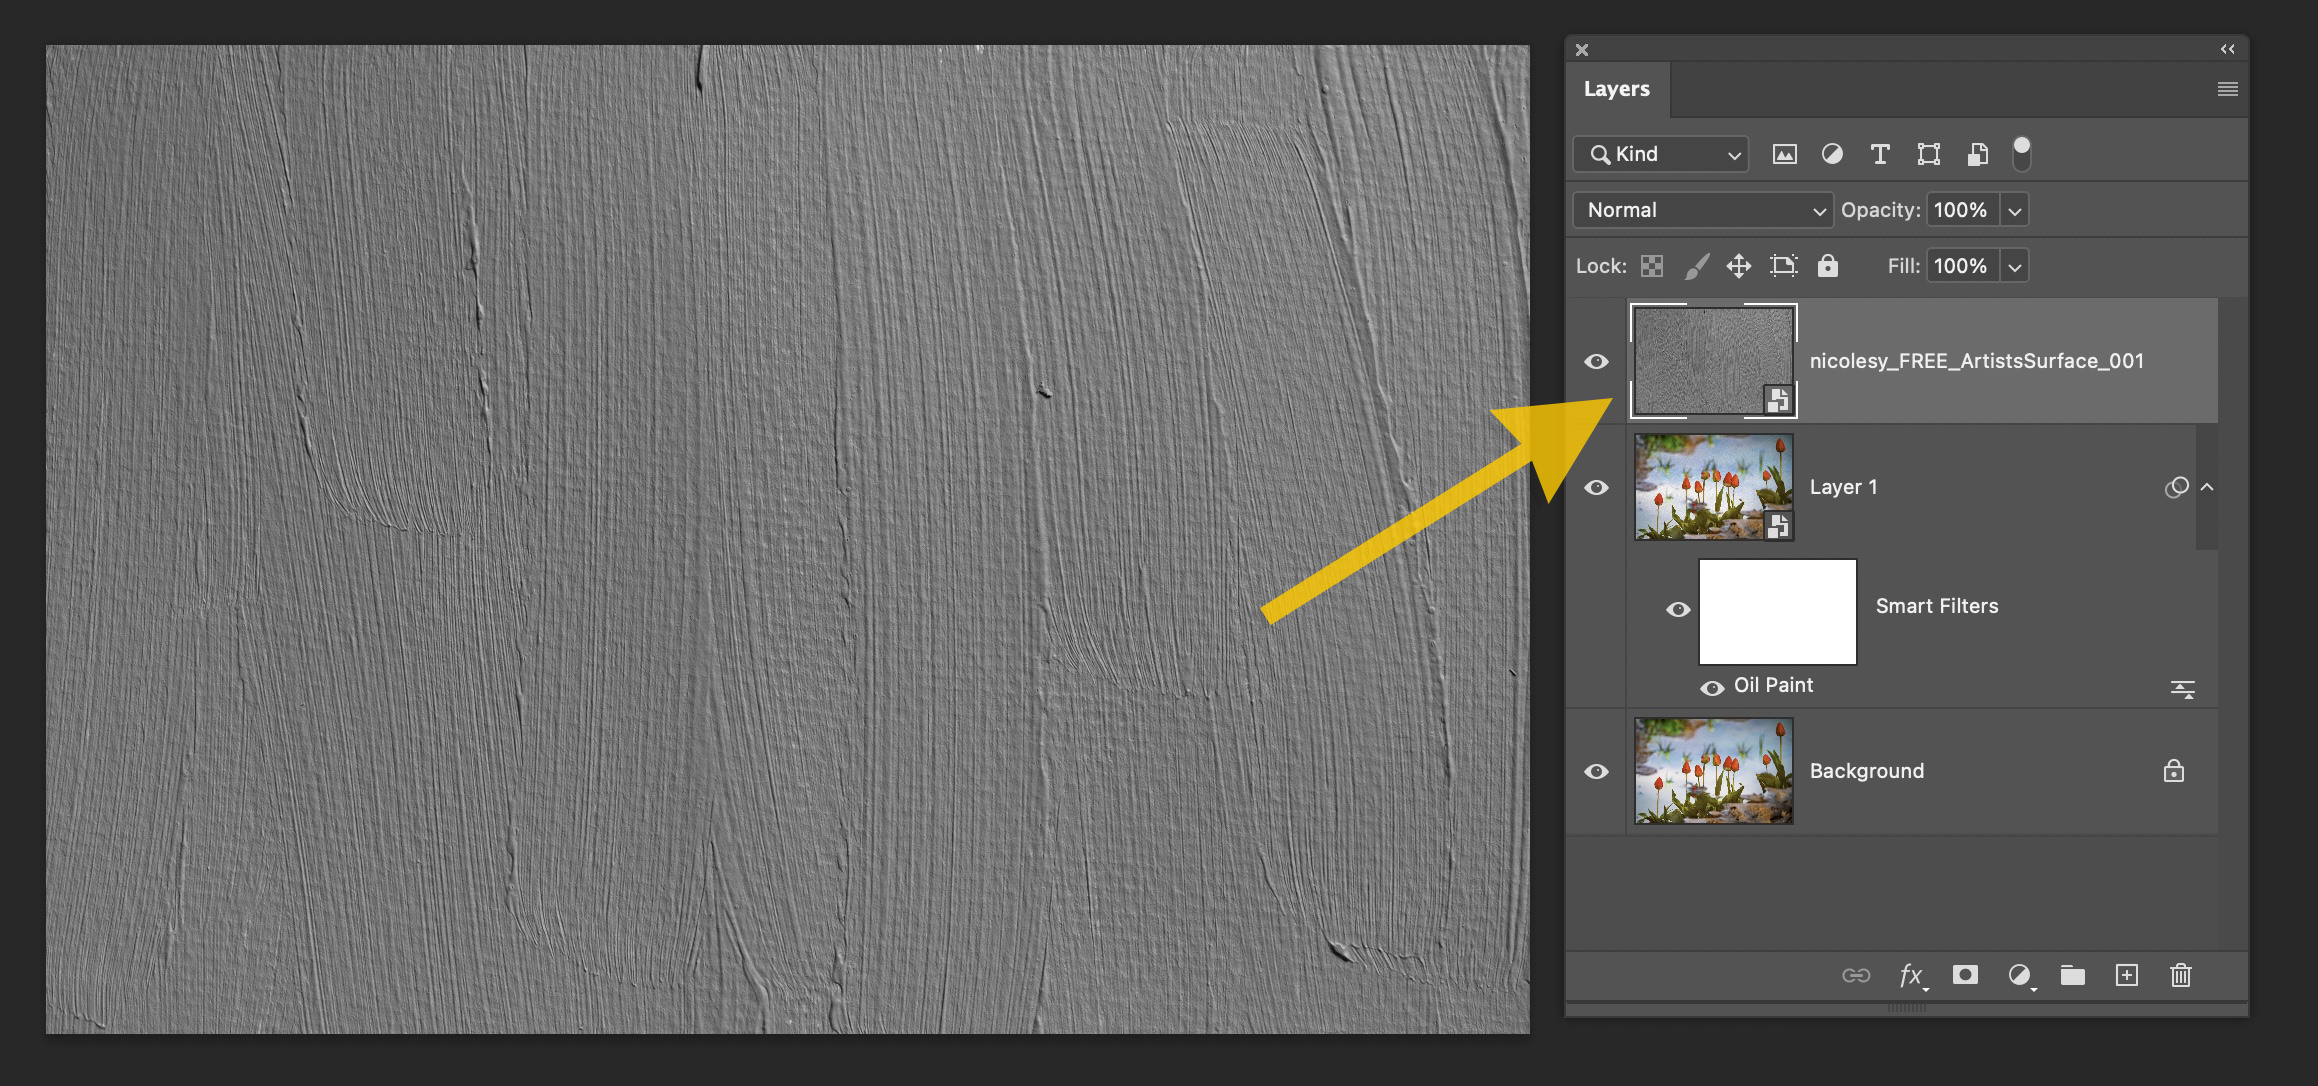
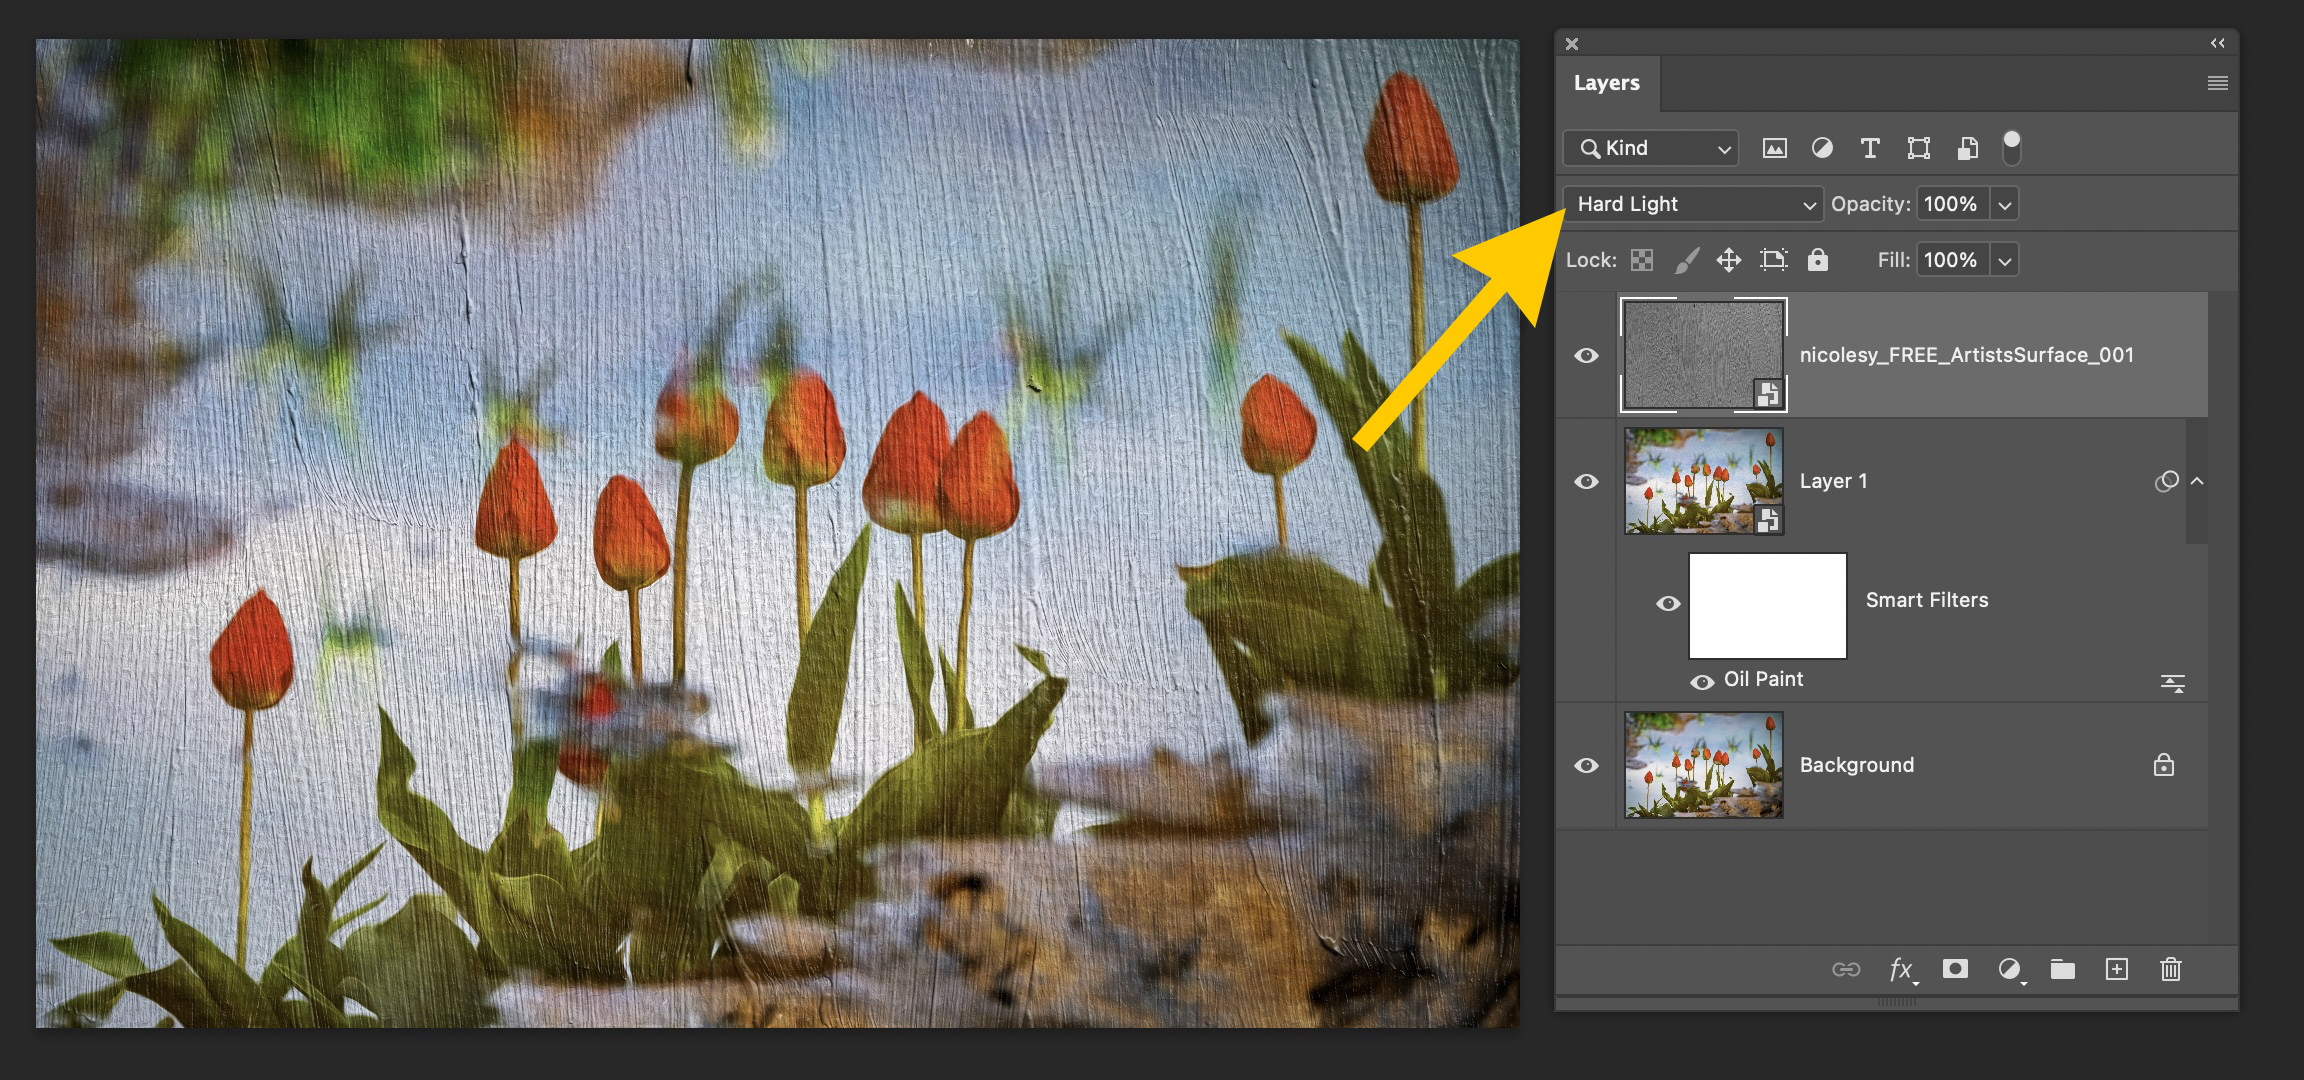
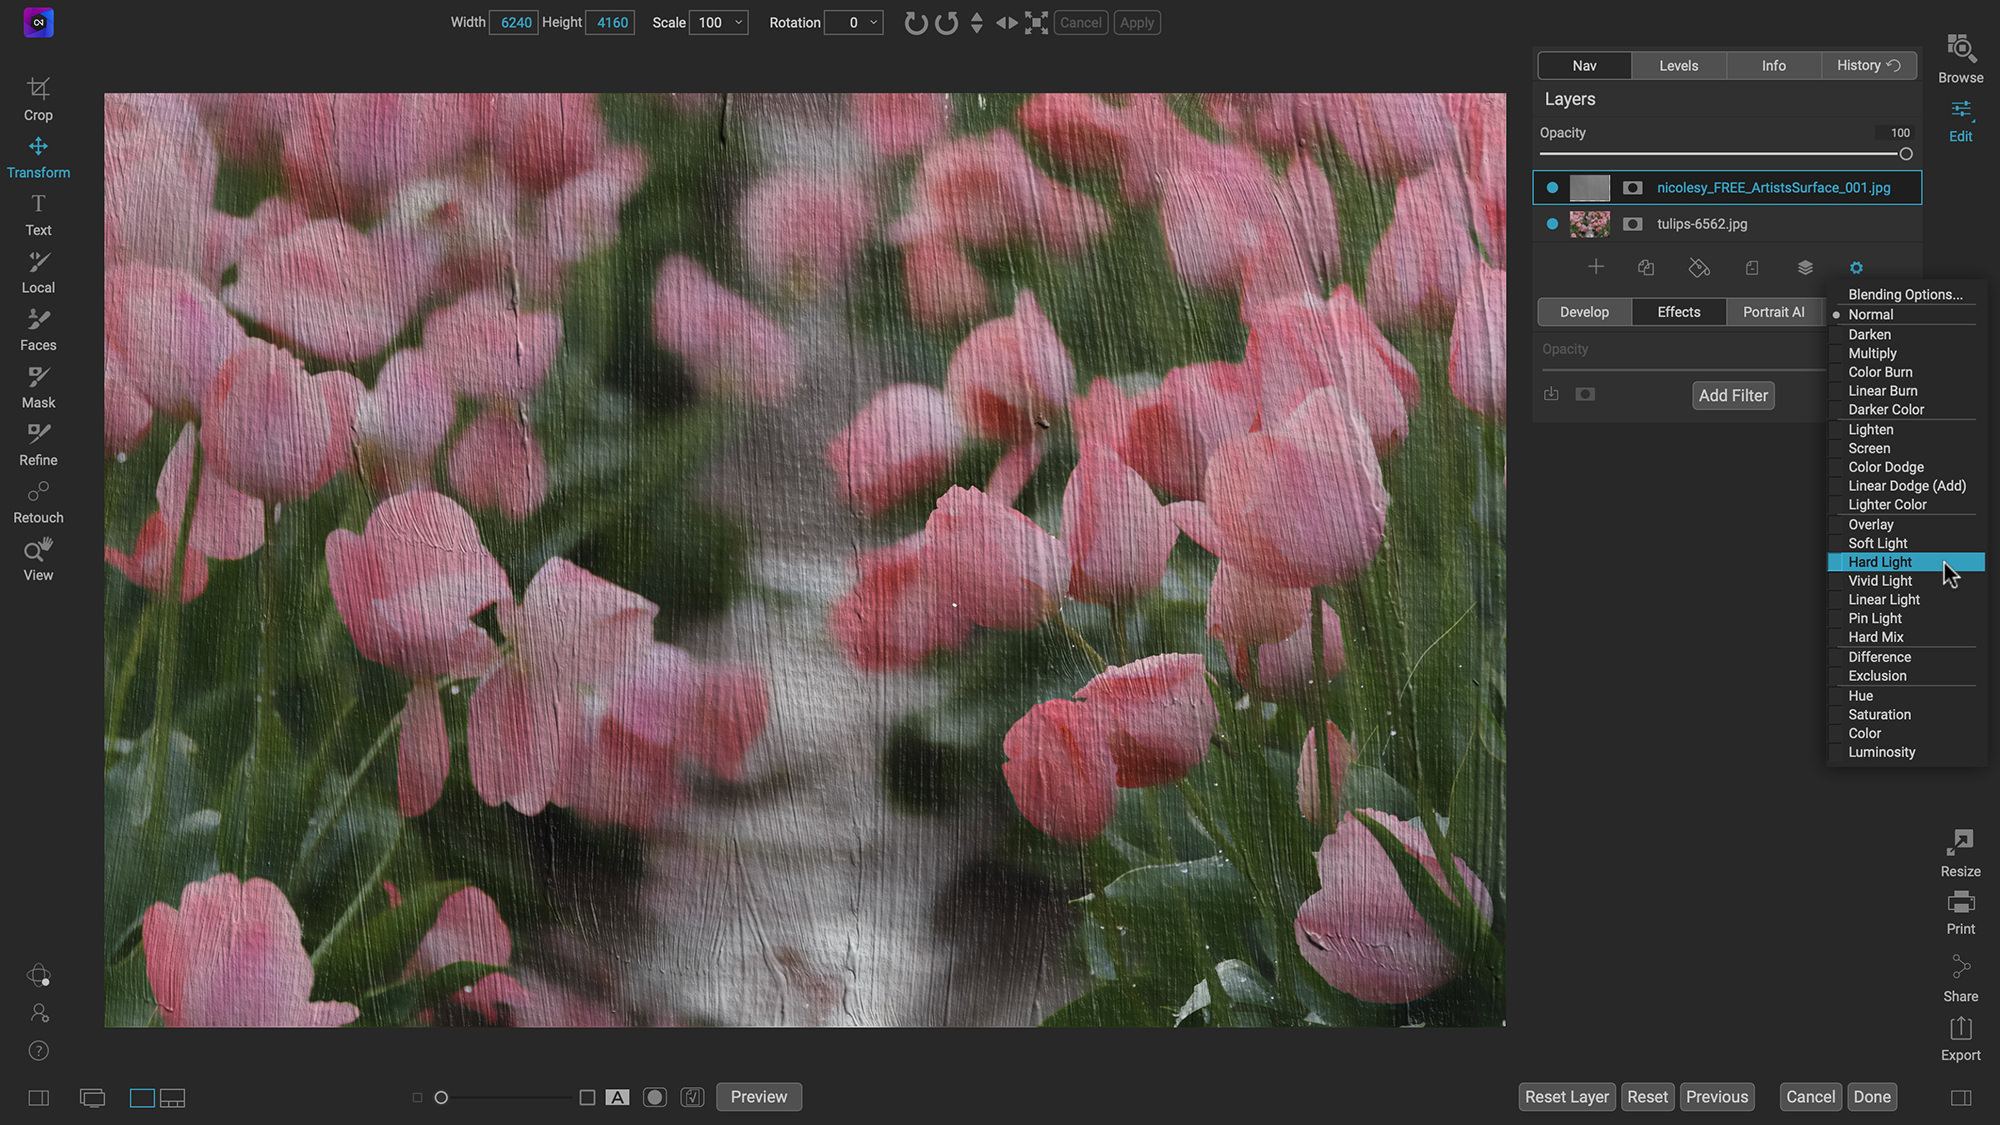
Step 5: Blend the texture layer
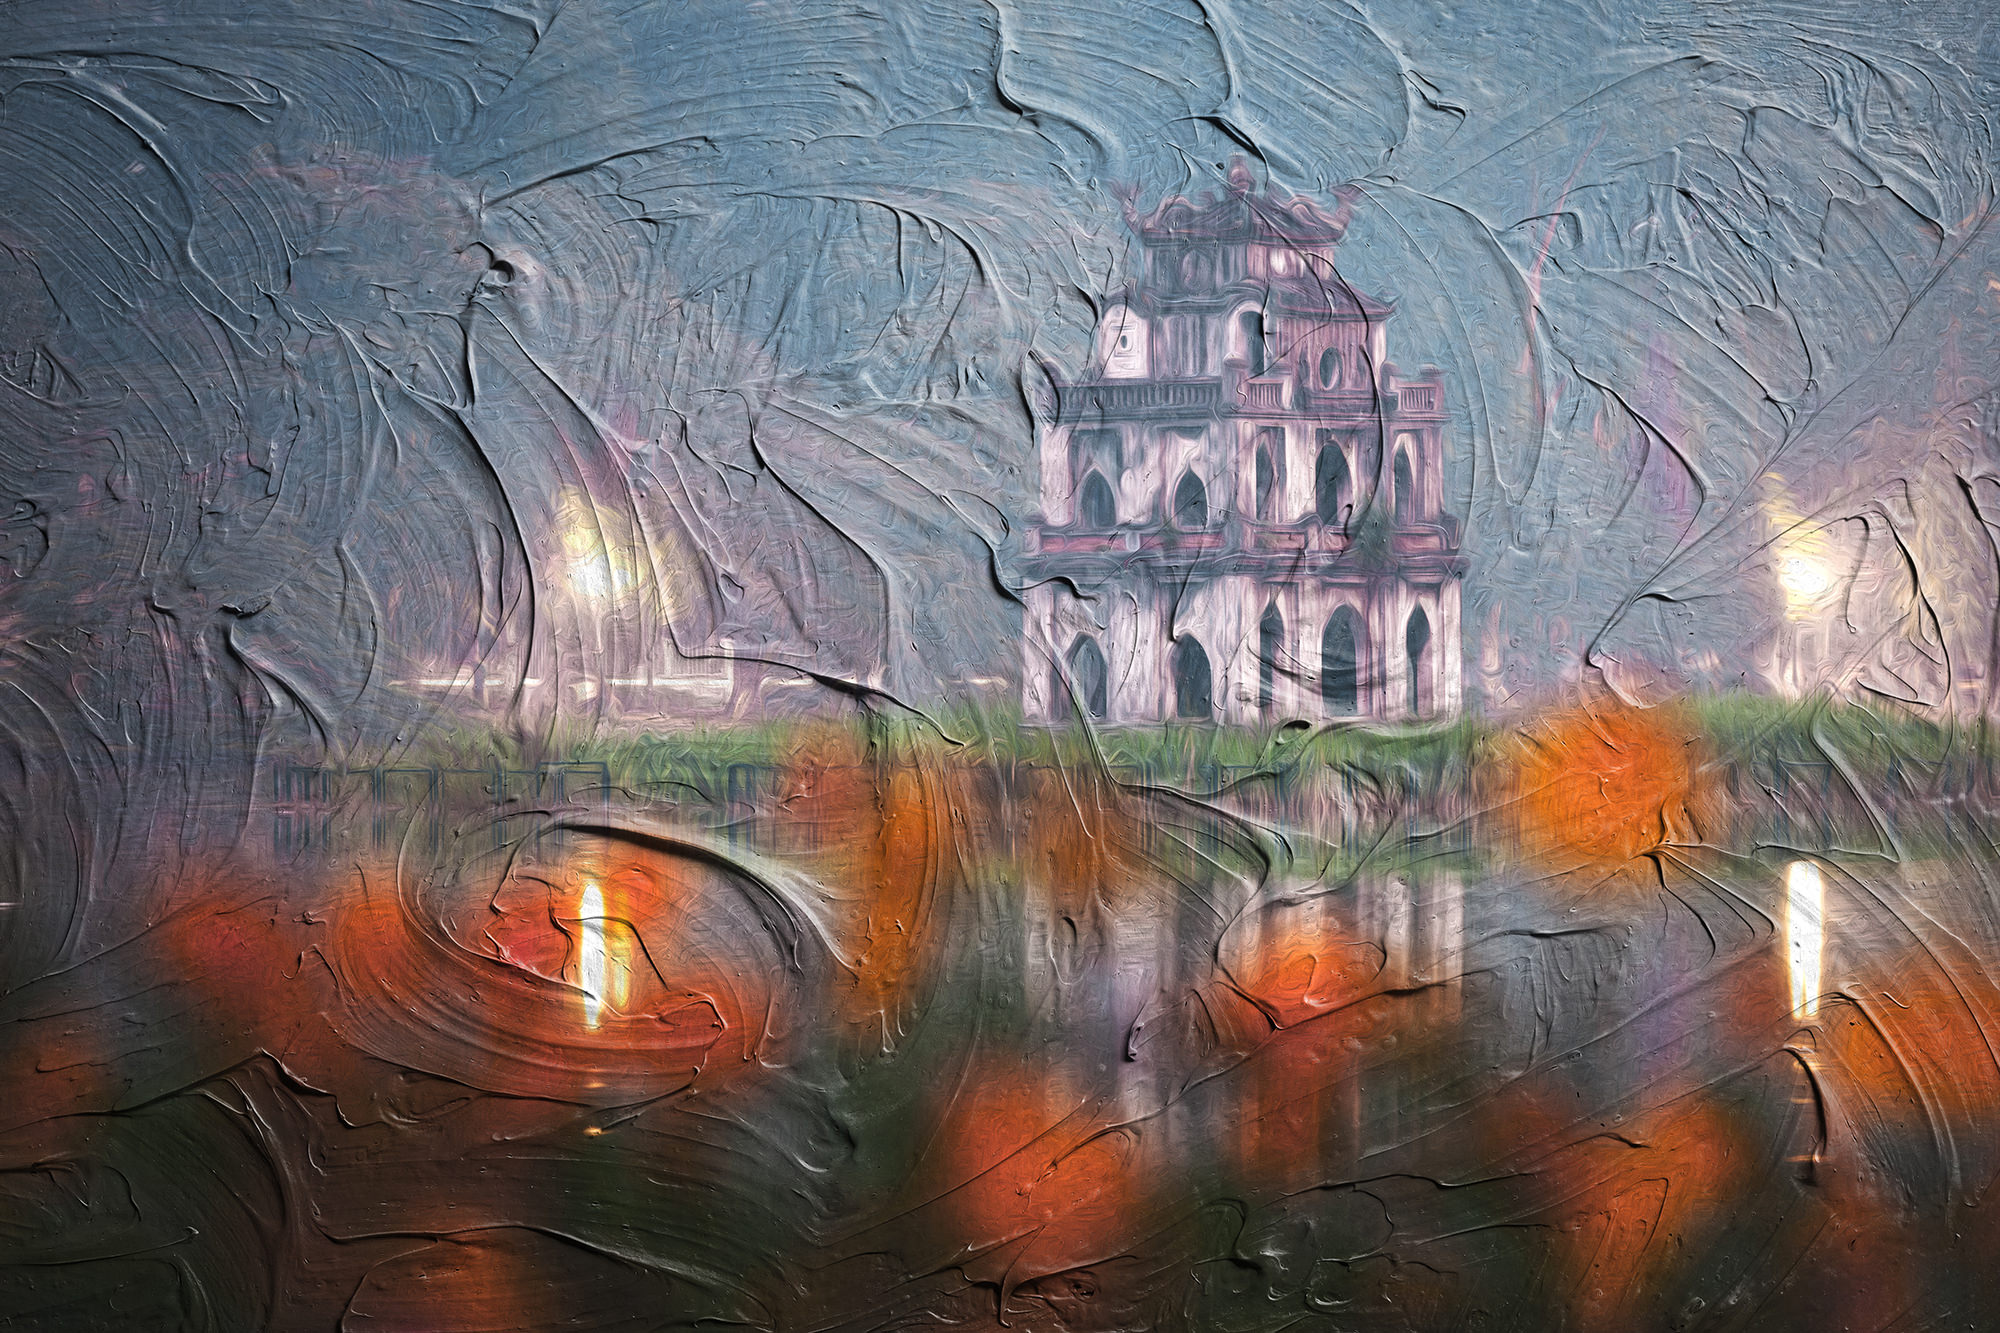
Now, in the Layers panel, make sure the texture you just added is selected. Then change the blending mode to Hard Light. Now you have a photo with an oil-paint effect and a textured surface.


Luminar AI
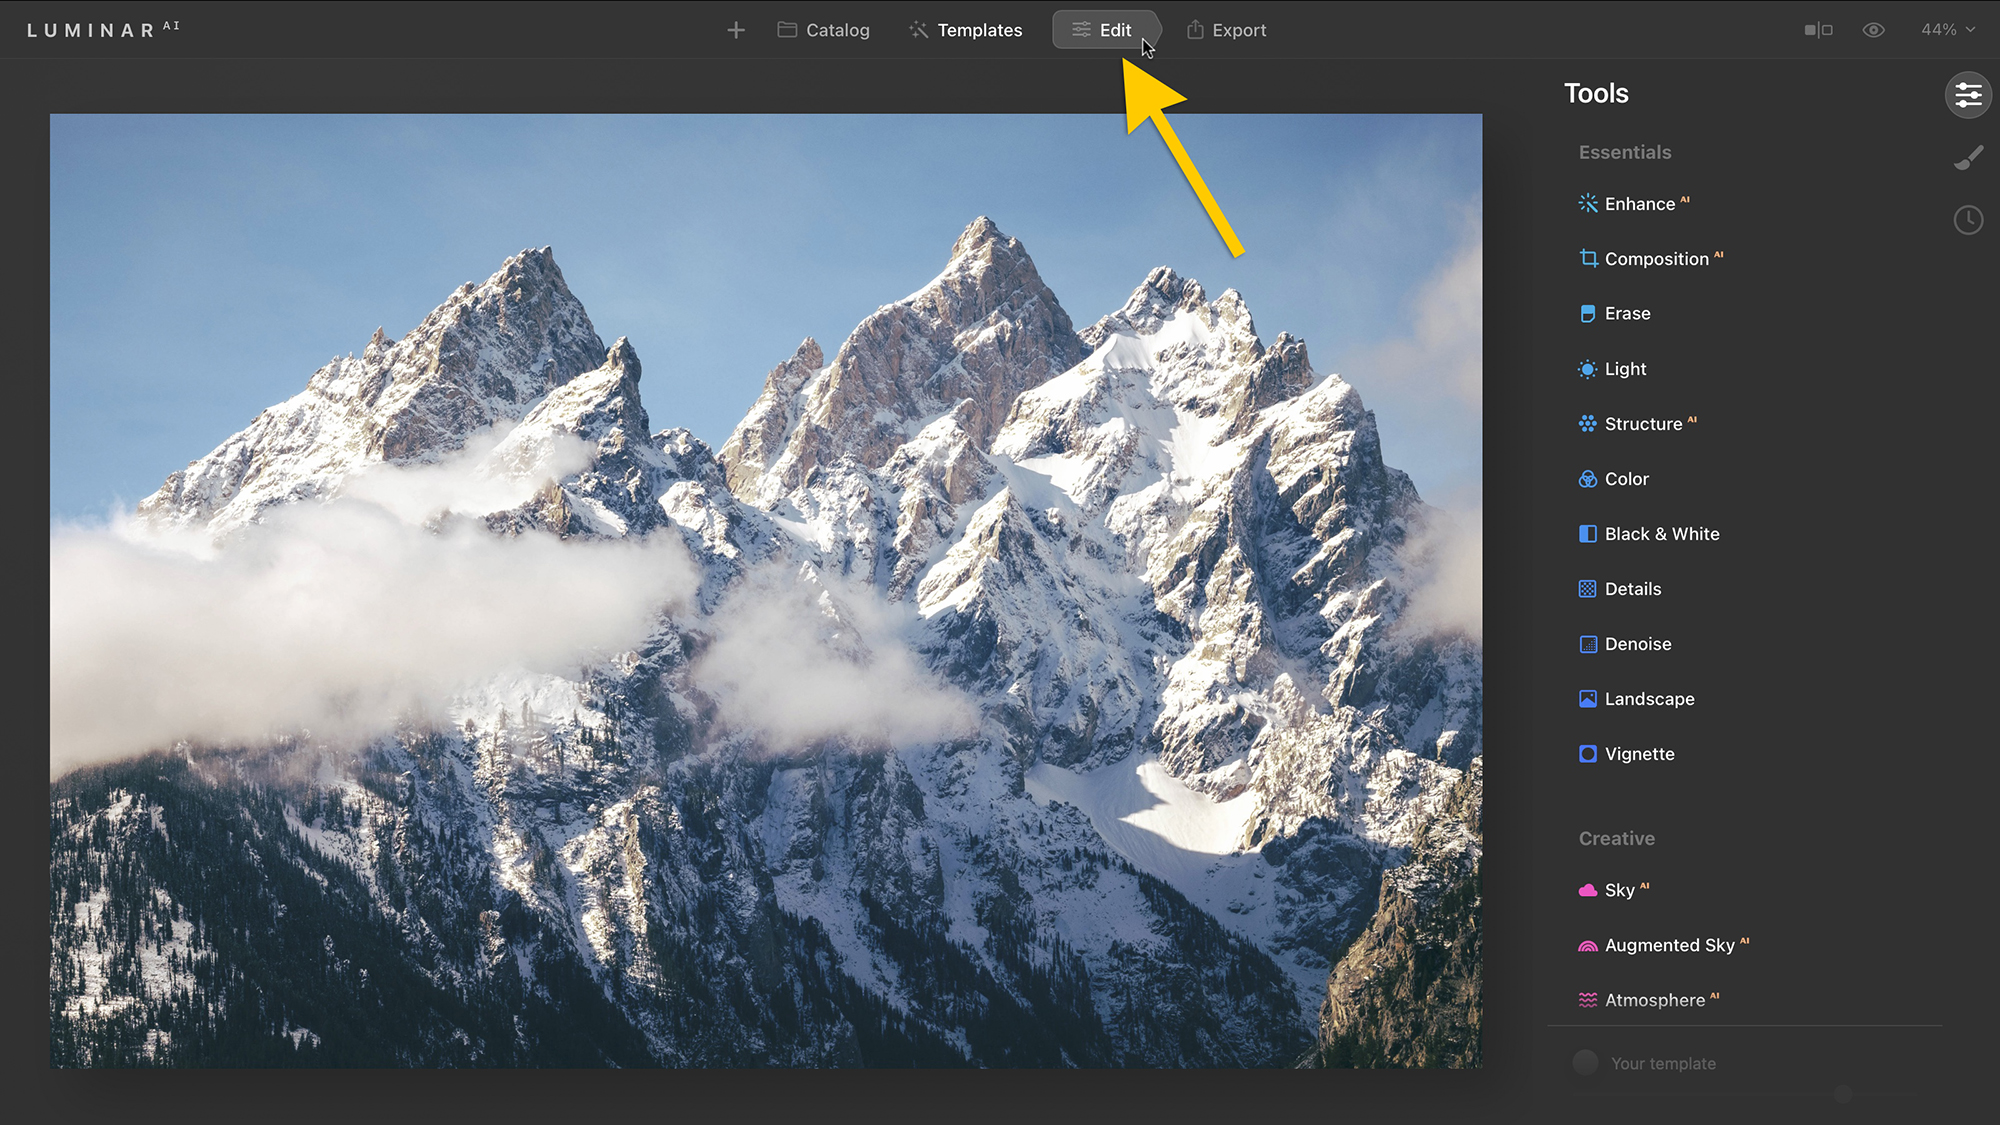
Step 1: Open a photo into Luminar AI
The first step is to open the photo you want to use in Luminar AI. You can do this either by using a photo from the catalog, or you can click the plus icon at the topand choose to edit a single image. When you have the photo open in Luminar, click Edit at the top.
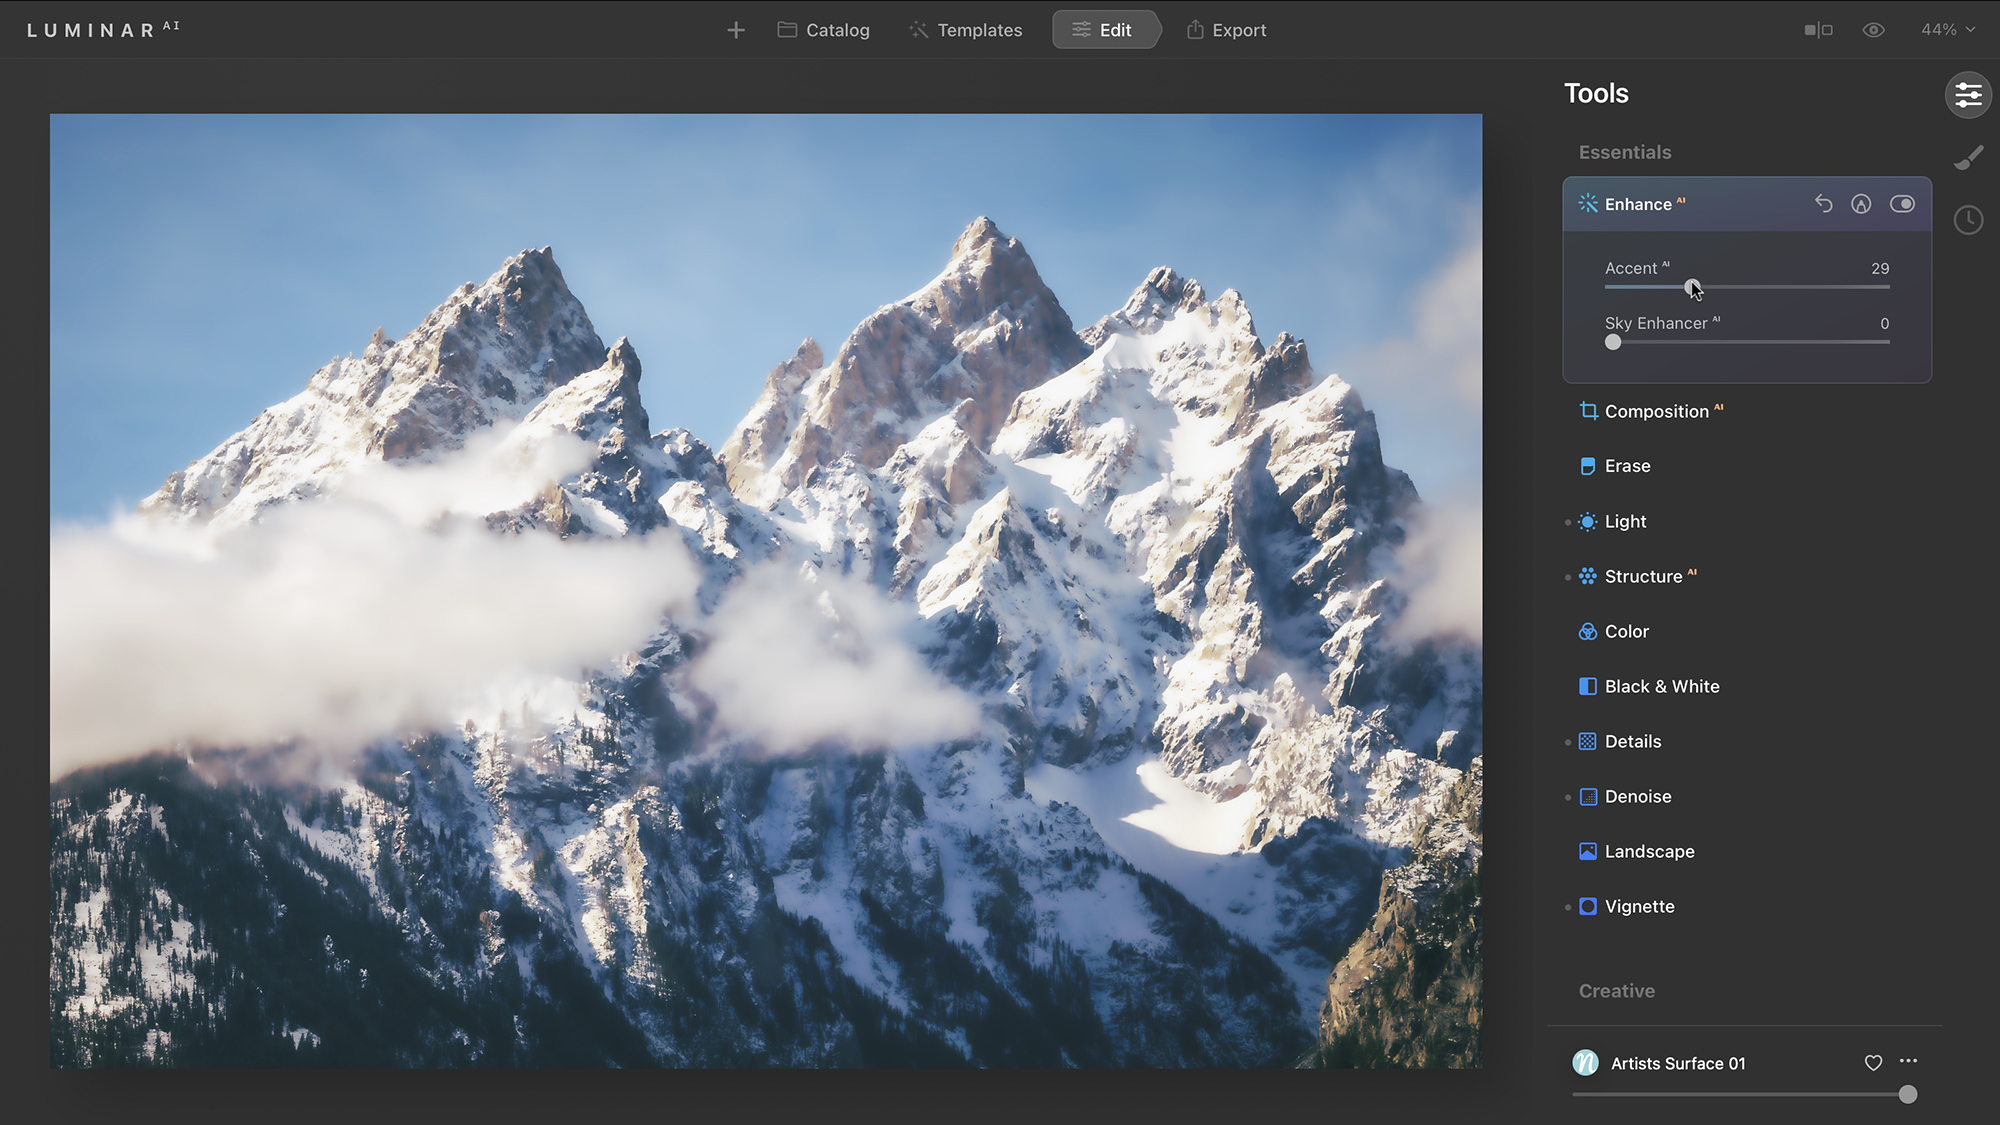
Step 2: Use the Luminar AI tools to slightly blur the image
Next, use the tools in Luminar AI to add a subtle blur to the photo. This helps give the photo a smudgy painted feel. There’s no “blur” tool inside of Luminar, so you’ll have to get creative. Some of the tools I used to create this effect include:
- Structure AI: Reduce the Amount setting to remove clarity from the image.
- Details: Reduce all Details sliders (I set mine to –70) to remove fine details from the photo.
- Denoise: Increase both Denoise sliders to remove grain and noise from the photo.
You can also add some stylizing tools to the photo, which will help with the overall look to make it seem more vibrant:
- Enhance AI: I use the Accent AI slider with all photos edited in Luminar to automatically adjust the contrast and tones.
- Mystical: Increase the Amount slider to add contrast and glow to the image.
- Vignette: Add a subtle dark vignette by reducing the Amount slider.
Step 3: Add the Artist’s Surface texture
Click on the Local Masking tab on the right, then click the Add button at the top and choose Texture from the drop-down menu.
Then, click the Load Texture… button in the tool and navigate to your Artist’s Surface texture. Then, click Advanced Settings and change the Blend to Hard Light. I also like to set the Opacity to a higher number, somewhere between 80 and 100, to intensify the texture blend effect. Now you have a beautiful painterly photo created in Luminar AI.


ON1 Photo RAW
Step 2: Open a photo in ON1 Photo RAW
Open a photo using the catalog or by going to File > Edit Single Photo. Then, click the Edit tab on the right to access the Edit module and click on the Effects panel.
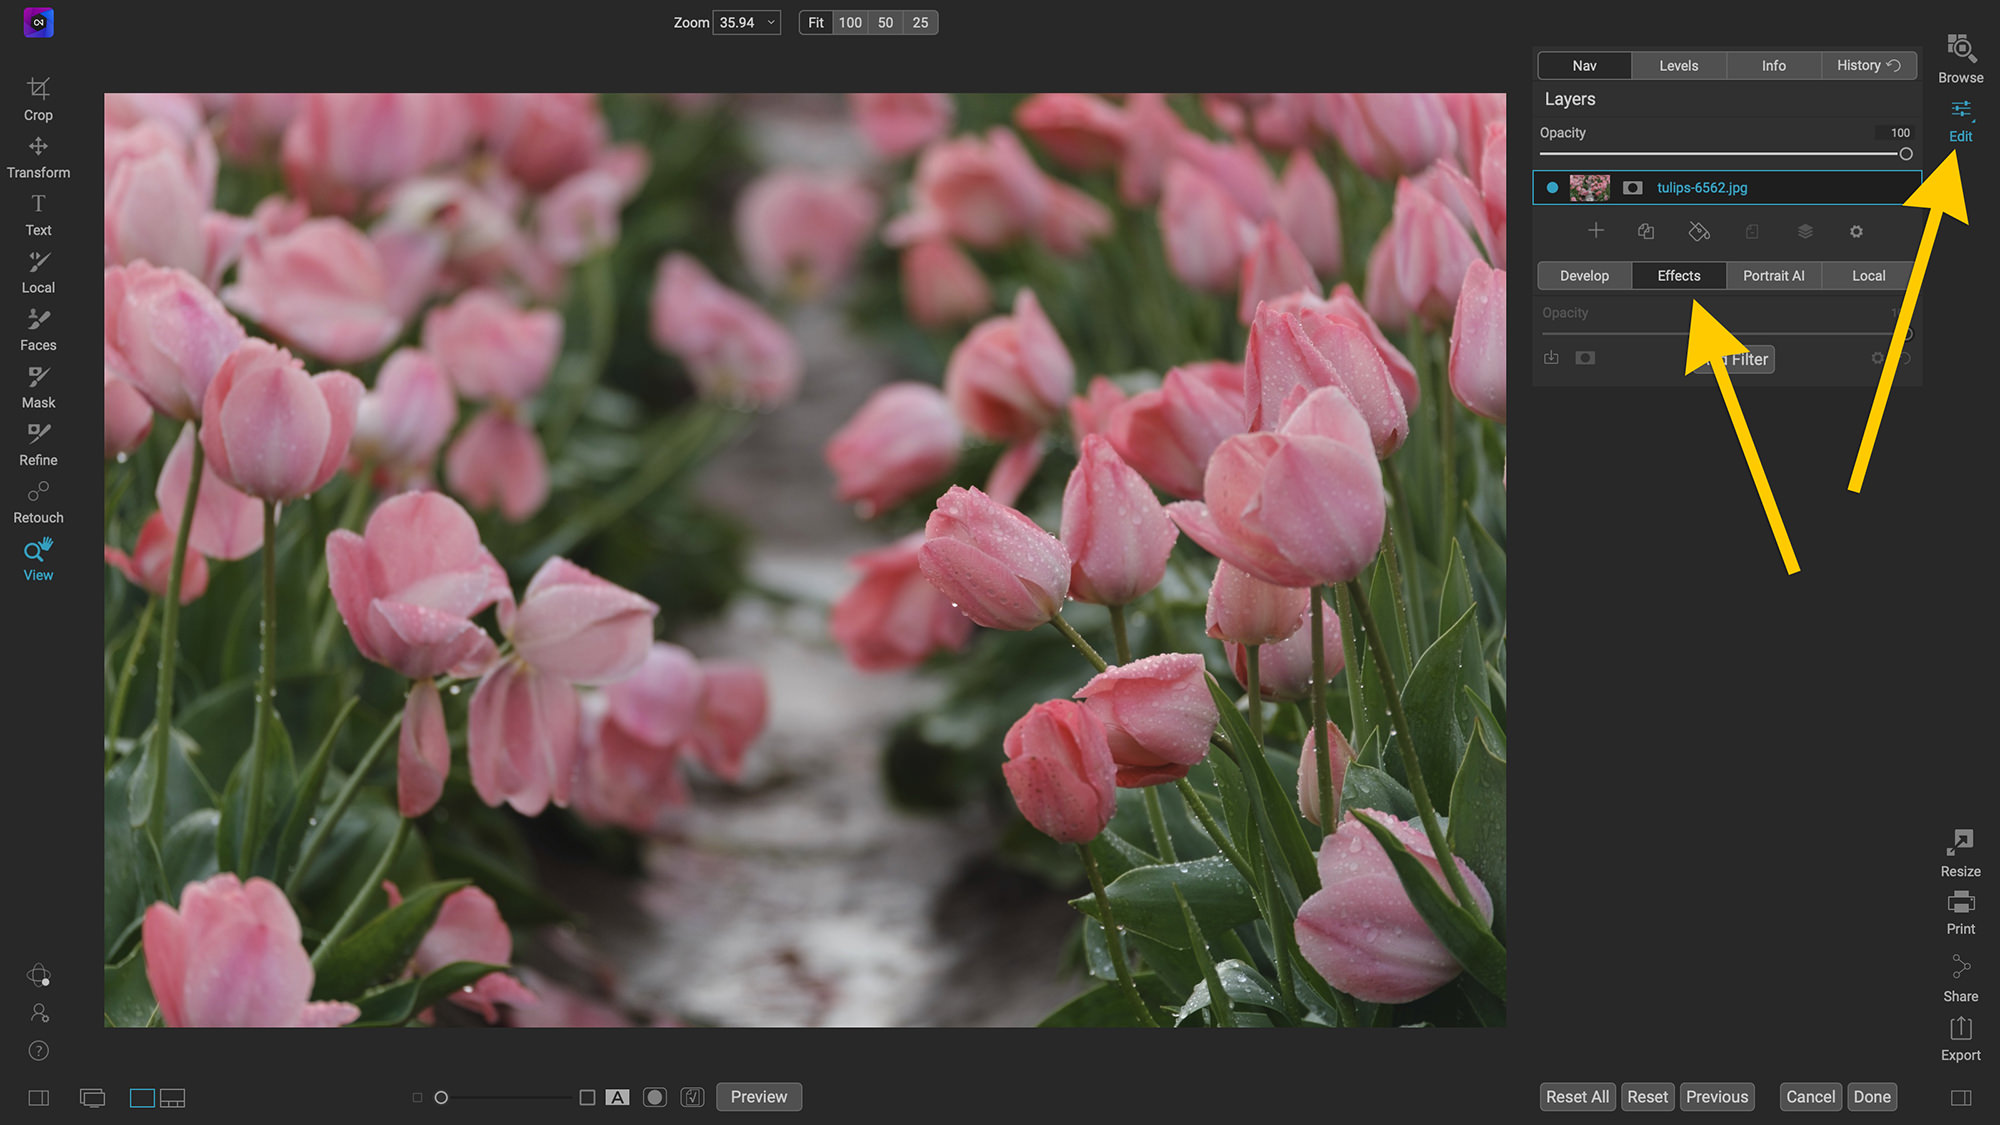
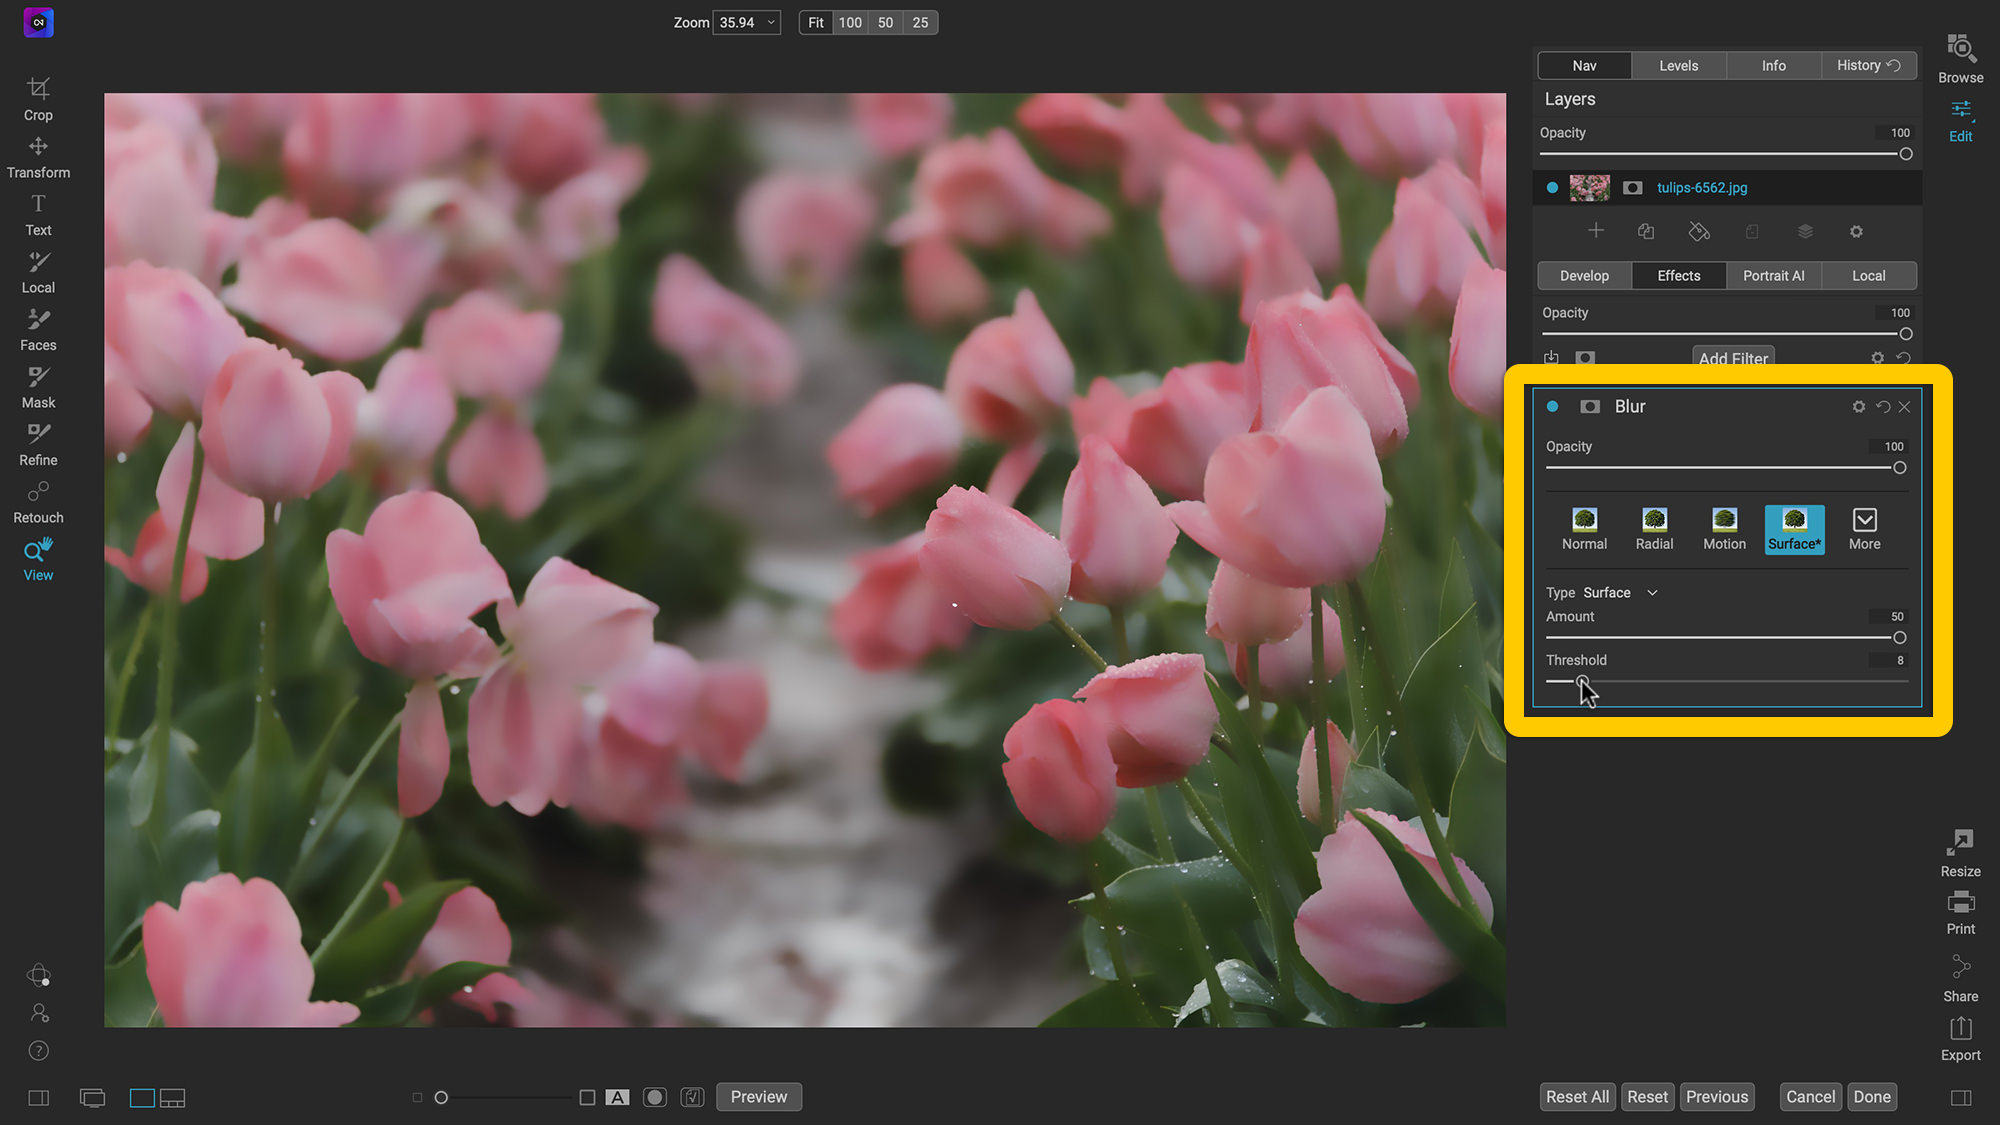
Step 2: Add a Surface Blur
Click the Add Filter button and select Blur. Then, click the Surface preset and make the following adjustments:
- Amount: +50
- Threshold: +8
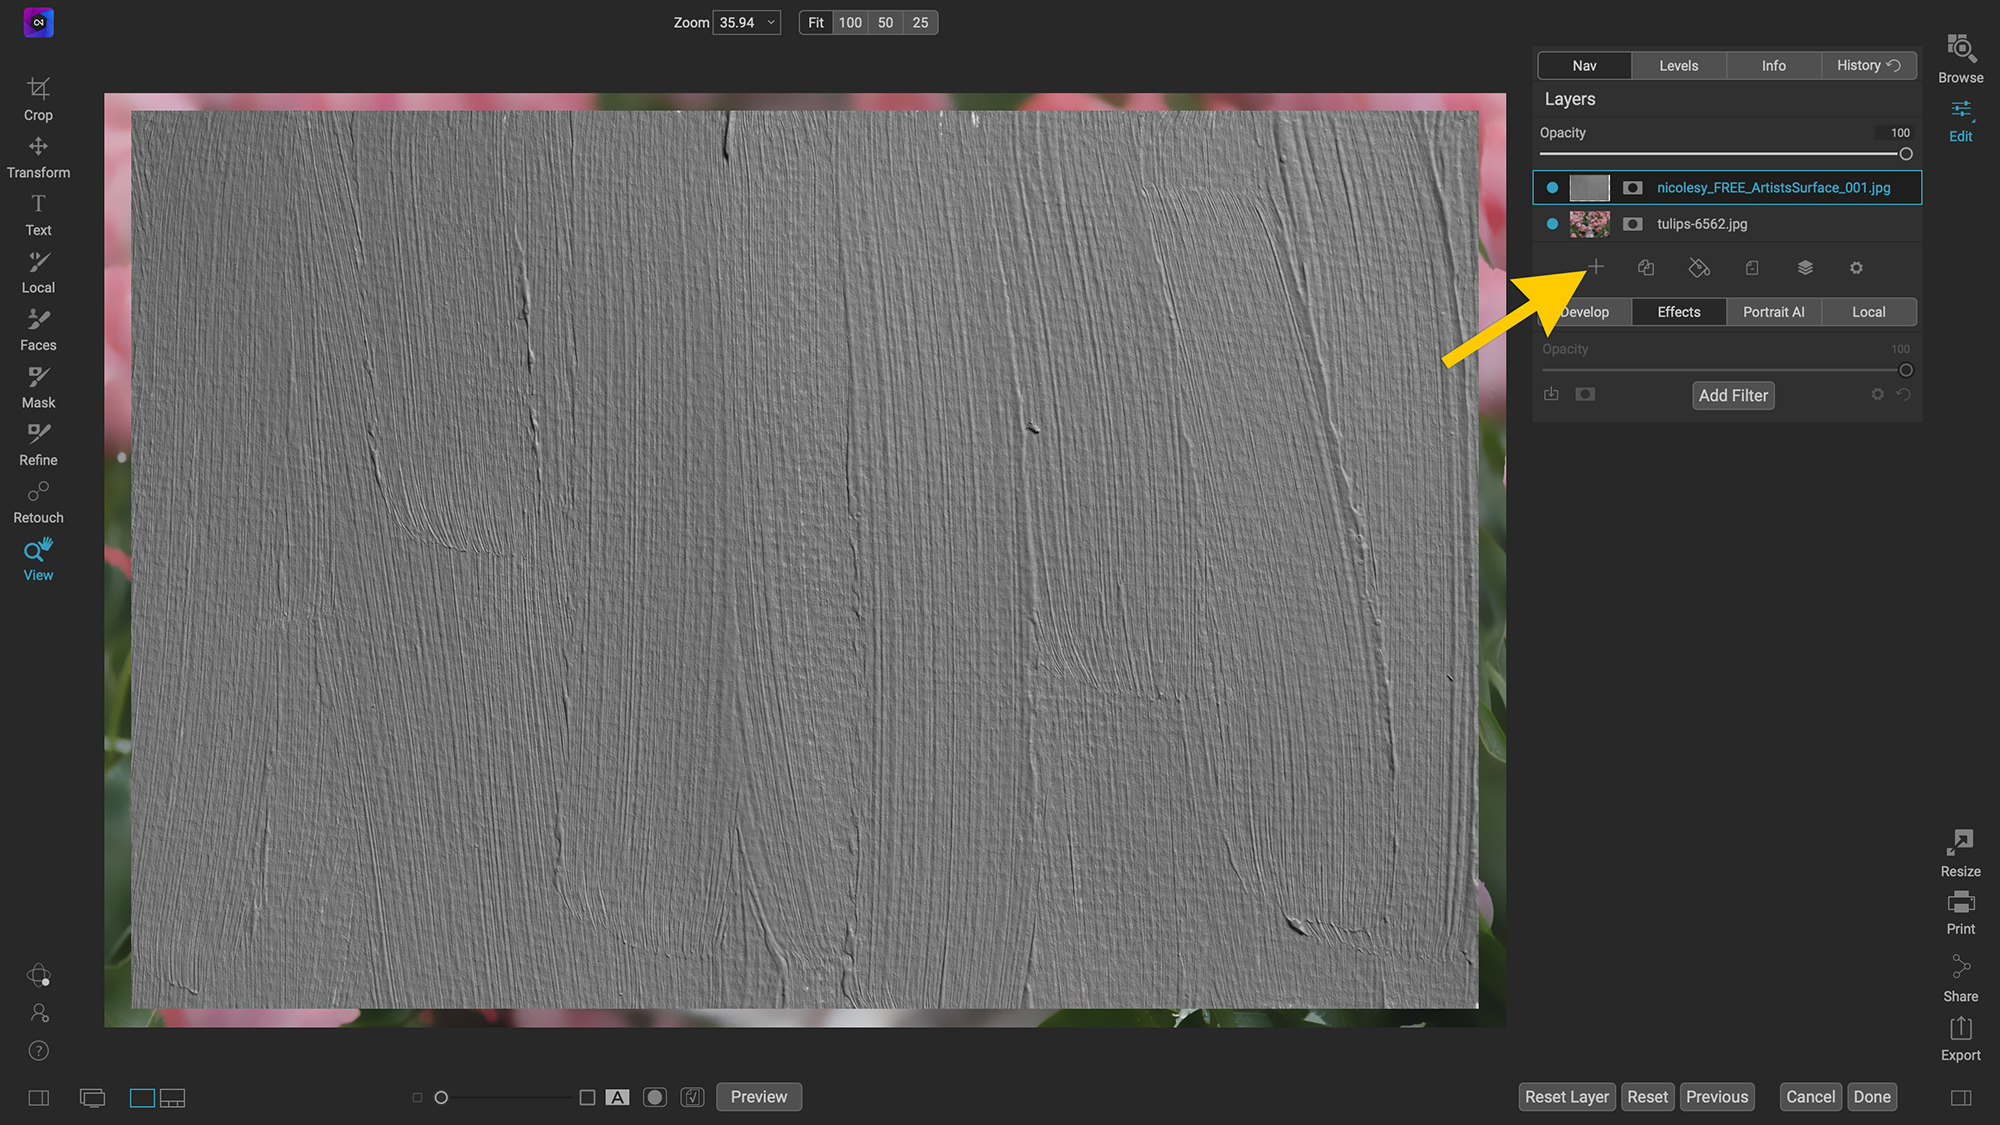
Step 3: Add the Artist’s Surface texture as a layer
In the Layers section near the top, click the plus icon and browse your computer or hard-drive for an Artist’s Surface texture.
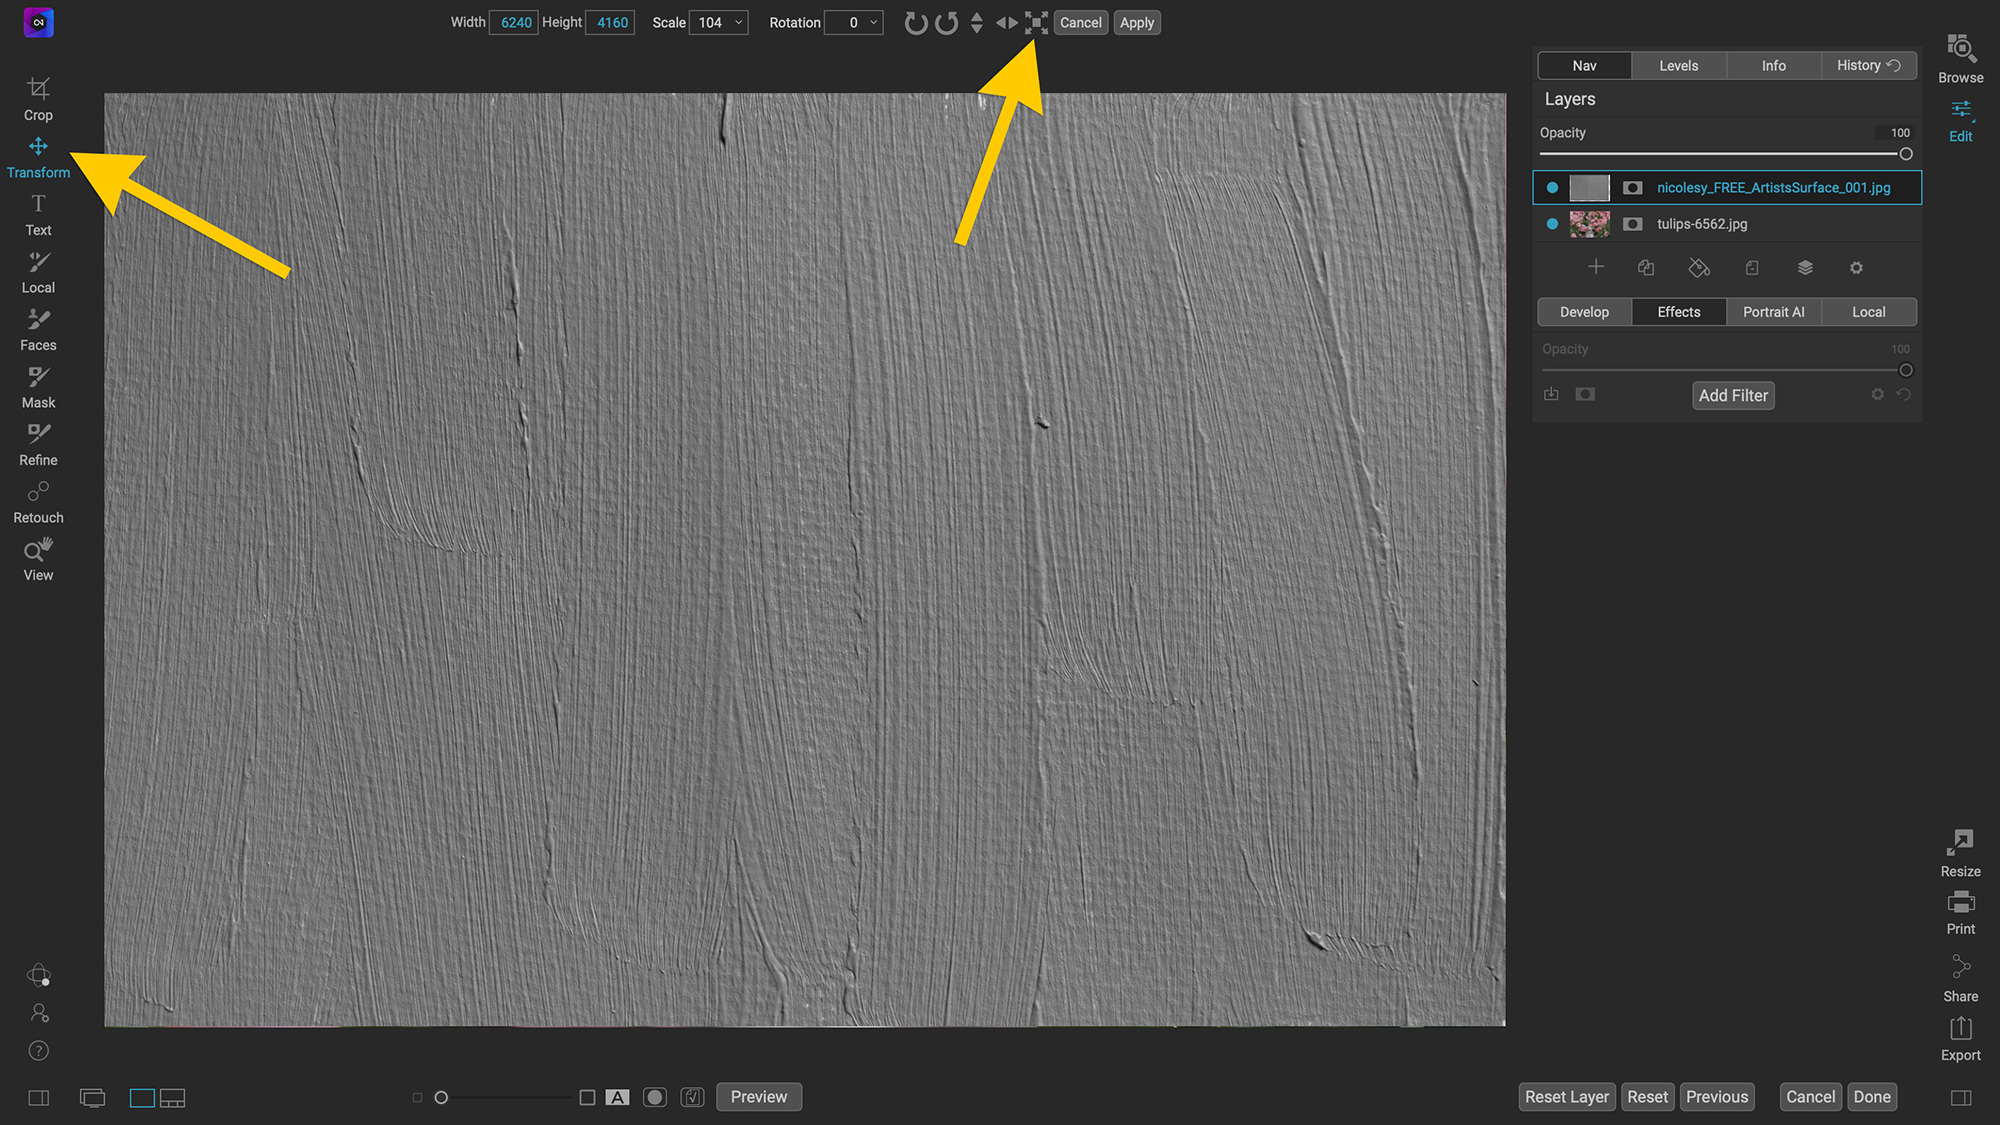
Step 4: Resize and position the texture layer
Click the Transform tool on the left, and in the options at the top, click the xxx button to fill the canvas with the texture layer. When finished, click Apply at the top.
Step 5: Blend the texture layer
In the Layers panel, click the Gear icon to reveal the blending drop-down menu, and choose Hard Light. You now have a painterly-effect plus texture added to your photo in ON1 Photo RAW.
GET THE FULL ARTIST’S SURFACE SET

Artist’s Surface Textures
This set of 40 hand-made painted textures will give your photos the look of paint on a canvas. This pack includes the following items:
- 40 JPEG file textures (6000px wide)
- 40 ON1 Photo RAW Presets (.ONPreset file)
- 40 Luminar 4 and Luminar AI Presets (.mplumpack file)
- Photoshop actions (Oil paint effect plus texture application)


If you have ever wanted to give your photo a painted feel, this tutorial is for you! Below I have instructions on how to apply a hand-painted texture and stylize the photo using Photoshop, Luminar AI, and ON1 Photo RAW.
If you would like to follow along with these tutorials, go here to access two free Artist’s Surface textures. And, if you’d like to play with even more of these textures, please take a look at the full Artist’s Surface texture pack in the Nicolesy Store.
Jump to a tutorial on this page:
Photoshop
Use Photoshop CC to apply an oil-paint effect and add a texture.
Step 1: Open a photo into Photoshop CC
Open a photo into Photoshop by going to File > Open and then navigate to the photo you want to edit.
Step 2: Create a Smart Object
Duplicate the background (main) layer with the keyboard shortcut Cmd + J (Mac) or Ctrl + J (Win). Then, go to Layer > Smart Objects > Convert to Smart Objects in the menu. You will know your layer is a Smart Object if it has a small icon in the lower-right portion of the thumbnail in the Layers panel.
Converting the layer to a Smart Object allows you to non-destructively add filters that can easily be re-edited if you desire.
Step 3: Add an Oil Paint filter
Now, go to Filter > Stylize > Oil Paint. Play with your settings until you get it stylized where you like.
Step 4: Add the Artist’s Surface texture
Now, go to File > Place Embedded and locate the Artist’s Surface texture on your computer or hard-drive. If the image is too small when it is placed, resize and/or rotate it so it covers the entire photo. When you are finished with the texture placement, press the Return (Mac) or Enter (PC) key.
Step 5: Blend the texture layer
Now, in the Layers panel, make sure the texture you just added is selected. Then change the blending mode to Hard Light. Now you have a photo with an oil-paint effect and a textured surface.
Luminar AI
Step 1: Open a photo into Luminar AI
The first step is to open the photo you want to use in Luminar AI. You can do this either by using a photo from the catalog, or you can click the plus icon at the topand choose to edit a single image. When you have the photo open in Luminar, click Edit at the top.
Step 2: Use the Luminar AI tools to slightly blur the image
Next, use the tools in Luminar AI to add a subtle blur to the photo. This helps give the photo a smudgy painted feel. There’s no “blur” tool inside of Luminar, so you’ll have to get creative. Some of the tools I used to create this effect include:
- Structure AI: Reduce the Amount setting to remove clarity from the image.
- Details: Reduce all Details sliders (I set mine to –70) to remove fine details from the photo.
- Denoise: Increase both Denoise sliders to remove grain and noise from the photo.
You can also add some stylizing tools to the photo, which will help with the overall look to make it seem more vibrant:
- Enhance AI: I use the Accent AI slider with all photos edited in Luminar to automatically adjust the contrast and tones.
- Mystical: Increase the Amount slider to add contrast and glow to the image.
- Vignette: Add a subtle dark vignette by reducing the Amount slider.
Step 3: Add the Artist’s Surface texture
Click on the Local Masking tab on the right, then click the Add button at the top and choose Texture from the drop-down menu.
Then, click the Load Texture… button in the tool and navigate to your Artist’s Surface texture. Then, click Advanced Settings and change the Blend to Hard Light. I also like to set the Opacity to a higher number, somewhere between 80 and 100, to intensify the texture blend effect. Now you have a beautiful painterly photo created in Luminar AI.
ON1 Photo RAW
Step 2: Open a photo in ON1 Photo RAW
Open a photo using the catalog or by going to File > Edit Single Photo. Then, click the Edit tab on the right to access the Edit module and click on the Effects panel.
Step 2: Add a Surface Blur
Click the Add Filter button and select Blur. Then, click the Surface preset and make the following adjustments:
- Amount: +50
- Threshold: +8
Step 3: Add the Artist’s Surface texture as a layer
In the Layers section near the top, click the plus icon and browse your computer or hard-drive for an Artist’s Surface texture.
Step 4: Resize and position the texture layer
Click the Transform tool on the left, and in the options at the top, click the xxx button to fill the canvas with the texture layer. When finished, click Apply at the top.
Step 5: Blend the texture layer
In the Layers panel, click the Gear icon to reveal the blending drop-down menu, and choose Hard Light. You now have a painterly-effect plus texture added to your photo in ON1 Photo RAW.
GET THE FULL ARTIST’S SURFACE SET
Artist’s Surface Textures
This set of 40 hand-made painted textures will give your photos the look of paint on a canvas. This pack includes the following items:
- 40 JPEG file textures (6000px wide)
- 40 ON1 Photo RAW Presets (.ONPreset file)
- 40 Luminar 4 and Luminar AI Presets (.mplumpack file)
- Photoshop actions (Oil paint effect plus texture application)

Nicole is a photographer, published author, and educator specializing in Lightroom, Photoshop, and photography. She is best known for her books on food photography but is widely versed in various photographic genres, including landscape, nature, stock, travel, and experimental imagery.


Nicole.
Watched your Video on Book making in Lightroom on the Lightroom Virtual Summit. Great info.
However you kept pronouncing a word incorrectly throughout the video,
Leading for spacing lines apart is pronounced Led-ing as in lead material used in early typesetting. Not pronounced Leading as in leading a parade.
Just sayin’
Joe
BTW: FYI, Upper/lower case type, Capital letters vs small letters are called upper case and lower case because back in the day when “Type Setters” at a newspaper used to hand set the lead type pieces for the page layout, kept the Capital Letters for Titles in the top drawer of a case.
They kept the small type also in that same case but in the lower draws. Thus they had an Upper Case for capital type and the Lower case for small letters.
Hello Nicole,
My most recent purchase from your store was the Artist’s Surface Add-on Pack for many famous art programs. I am very pleased with this product and how easy it is to apply it to Photoshop on Luminar AI and others. Value for money purchase. I recommend it to everyone who wants to experiment with their photos and get interesting results. I would like to send the original photo and the photo after processing with your add-on and for the sake of comparison I would also like to attach the same photo that I processed in Photoshop with the Real Paint Fx add-on for Photoshop. I don’t know how to send an example of photos.
i tried tp subscribe several times yesterday but nothing happened … no confirmation email no anything
Sometimes they end up in a spam or junk folder. If you still have trouble please use my contact form to get in touch with me directly.
I got an email from you that “ben” sent you. I am not the addressee of this comment. Something’s wrong with the post office.
If you subscribed to comments, you will see my replies to other people. That might be what happened here.
Great course in Photoshop Virtual Summit 3, excellent presentation, no waffle, just crisp and clear. So good I will be purchasing courses and download in future, thanks for taking part, you’re a great find for me!
Hi, no captcha recognition… unable to download and try your surface textures etc.
You might want to try on a different browser if the CAPTCHA is not showing up.
I’m sorry, but I don’t see anywhere to download the texture. Can you point me to the right place? Thanks
Hi Terri, after filling out the form you’ll get an email to confirm your subscription, then you’ll be redirected in that email to access your download. If you are already subscribed, it will auto-redirect you to the download page once you fill out the form.