
In the 2021.1 update of ON1 Photo RAW, they added the ability to import custom Adobe Photoshop brushes to your files. One use for this is to add clouds to an image! I have a premium set of real cloud brushes in my online store, the Nicolesy Cloud Nine brush pack, which you can now use in ON1 Photo RAW 2021. And, if you’d like to test out a few brushes to see how it works, please use the form below to access this freebie:
Below I have instructions on how to import brush presets into ON1 Photo RAW 2021 and how to apply cloud brushes to your files easily.
Importing .abr brush files into ON1 Photo RAW 2021
Here’s how to import your .abr brush files to use in ON1 Photo RAW:
Step 1: Make sure you have an .abr file ready to import. You can find some online for free or purchase premium brushes, like my Cloud Nine cloud brush pack.
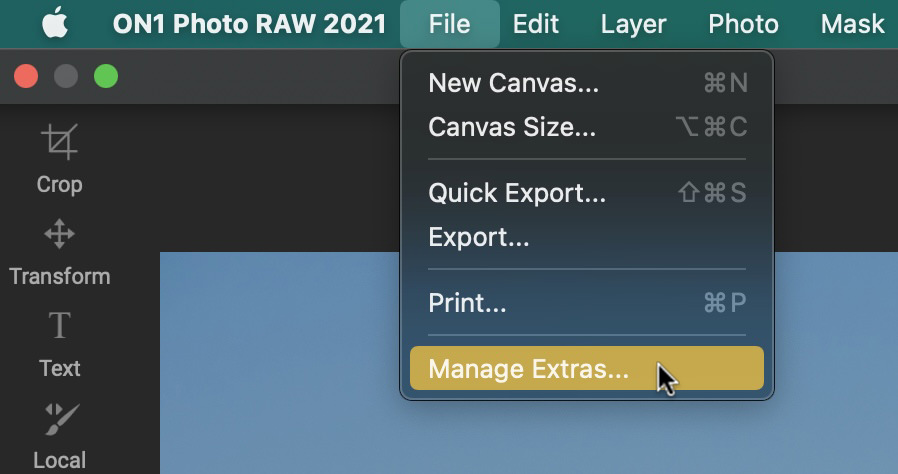
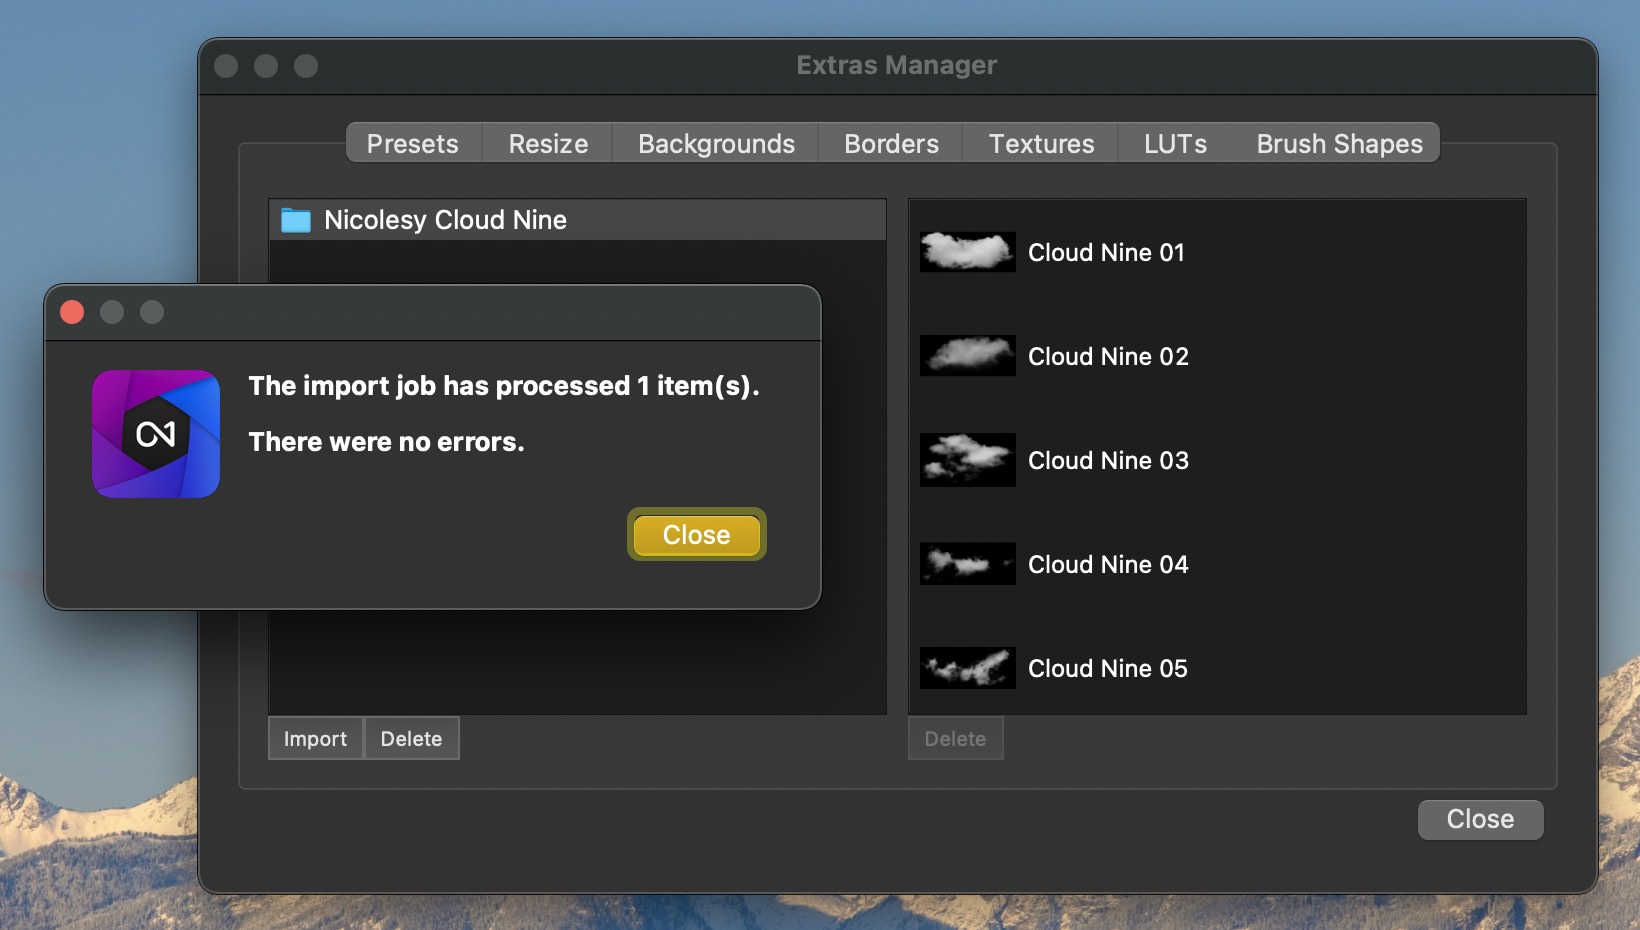
Step 2: In ON1 Photo RAW, go to File > Manage Extras.
Step 3: In the Extras Manager, click Brush Shapes at the top, then click Import on the bottom.

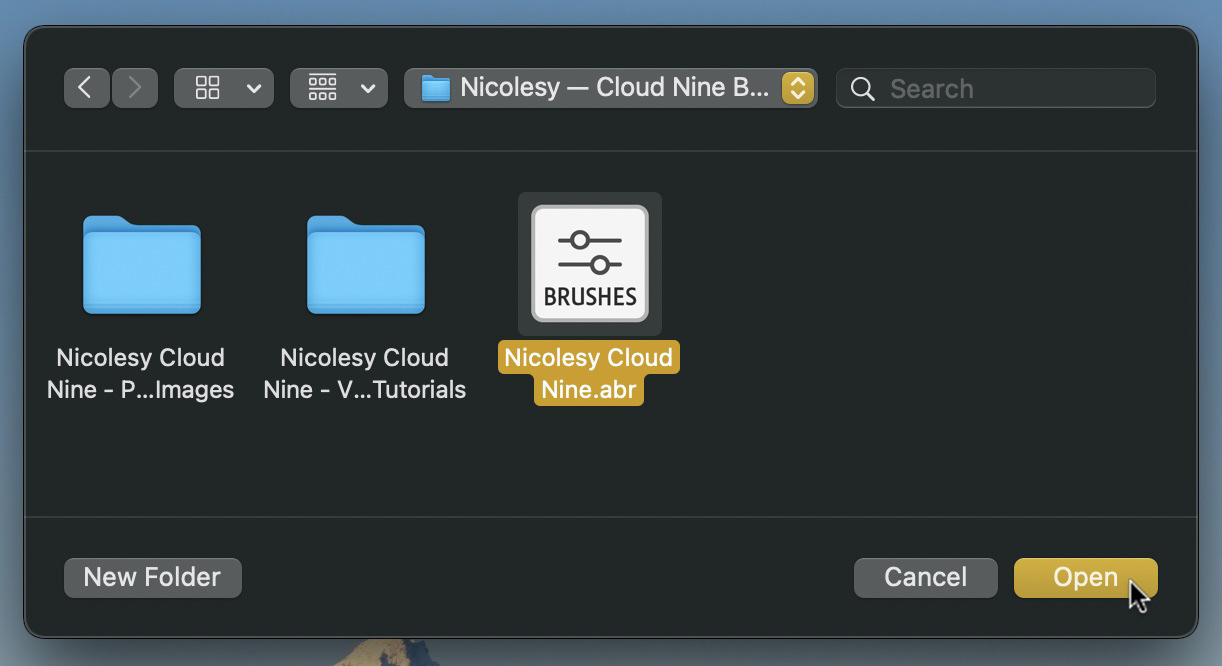
Step 4: Navigate to an .abr file and click Open.
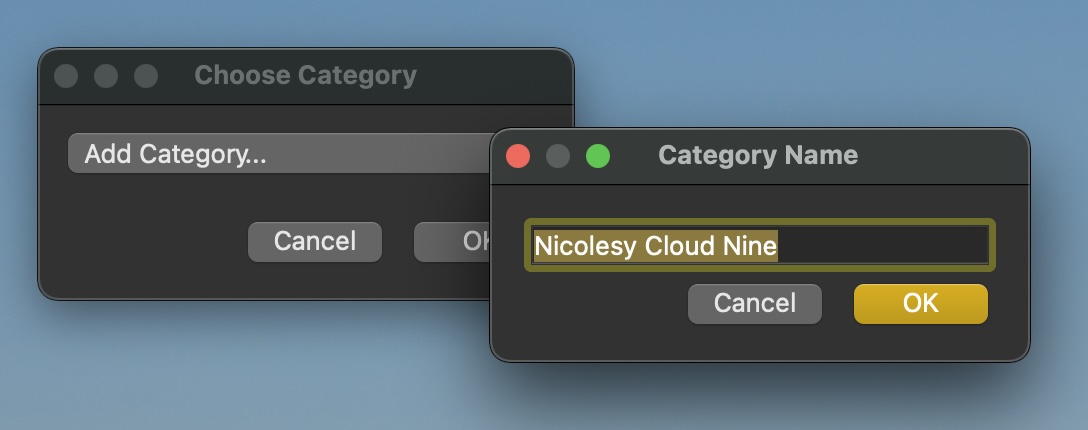
Step 5: A Choose Category window will pop up. Click the drop-down and choose “Add Category”. Give it a name and click OK. Click OK again (in the Choose Category window) and your brush files will be imported.
Applying cloud brushes to your photos in ON1 Photo RAW
Now that the .abr file is imported into ON1 Photo RAW, below you can learn how to use them in your images. In this example, I’ll be demonstrating how to use the Nicolesy Cloud Nine brush pack.
Note: This feature only works in ON1 Photo RAW versions 2021.1 and later.


Step 1: Open a photo into ON1 Photo RAW
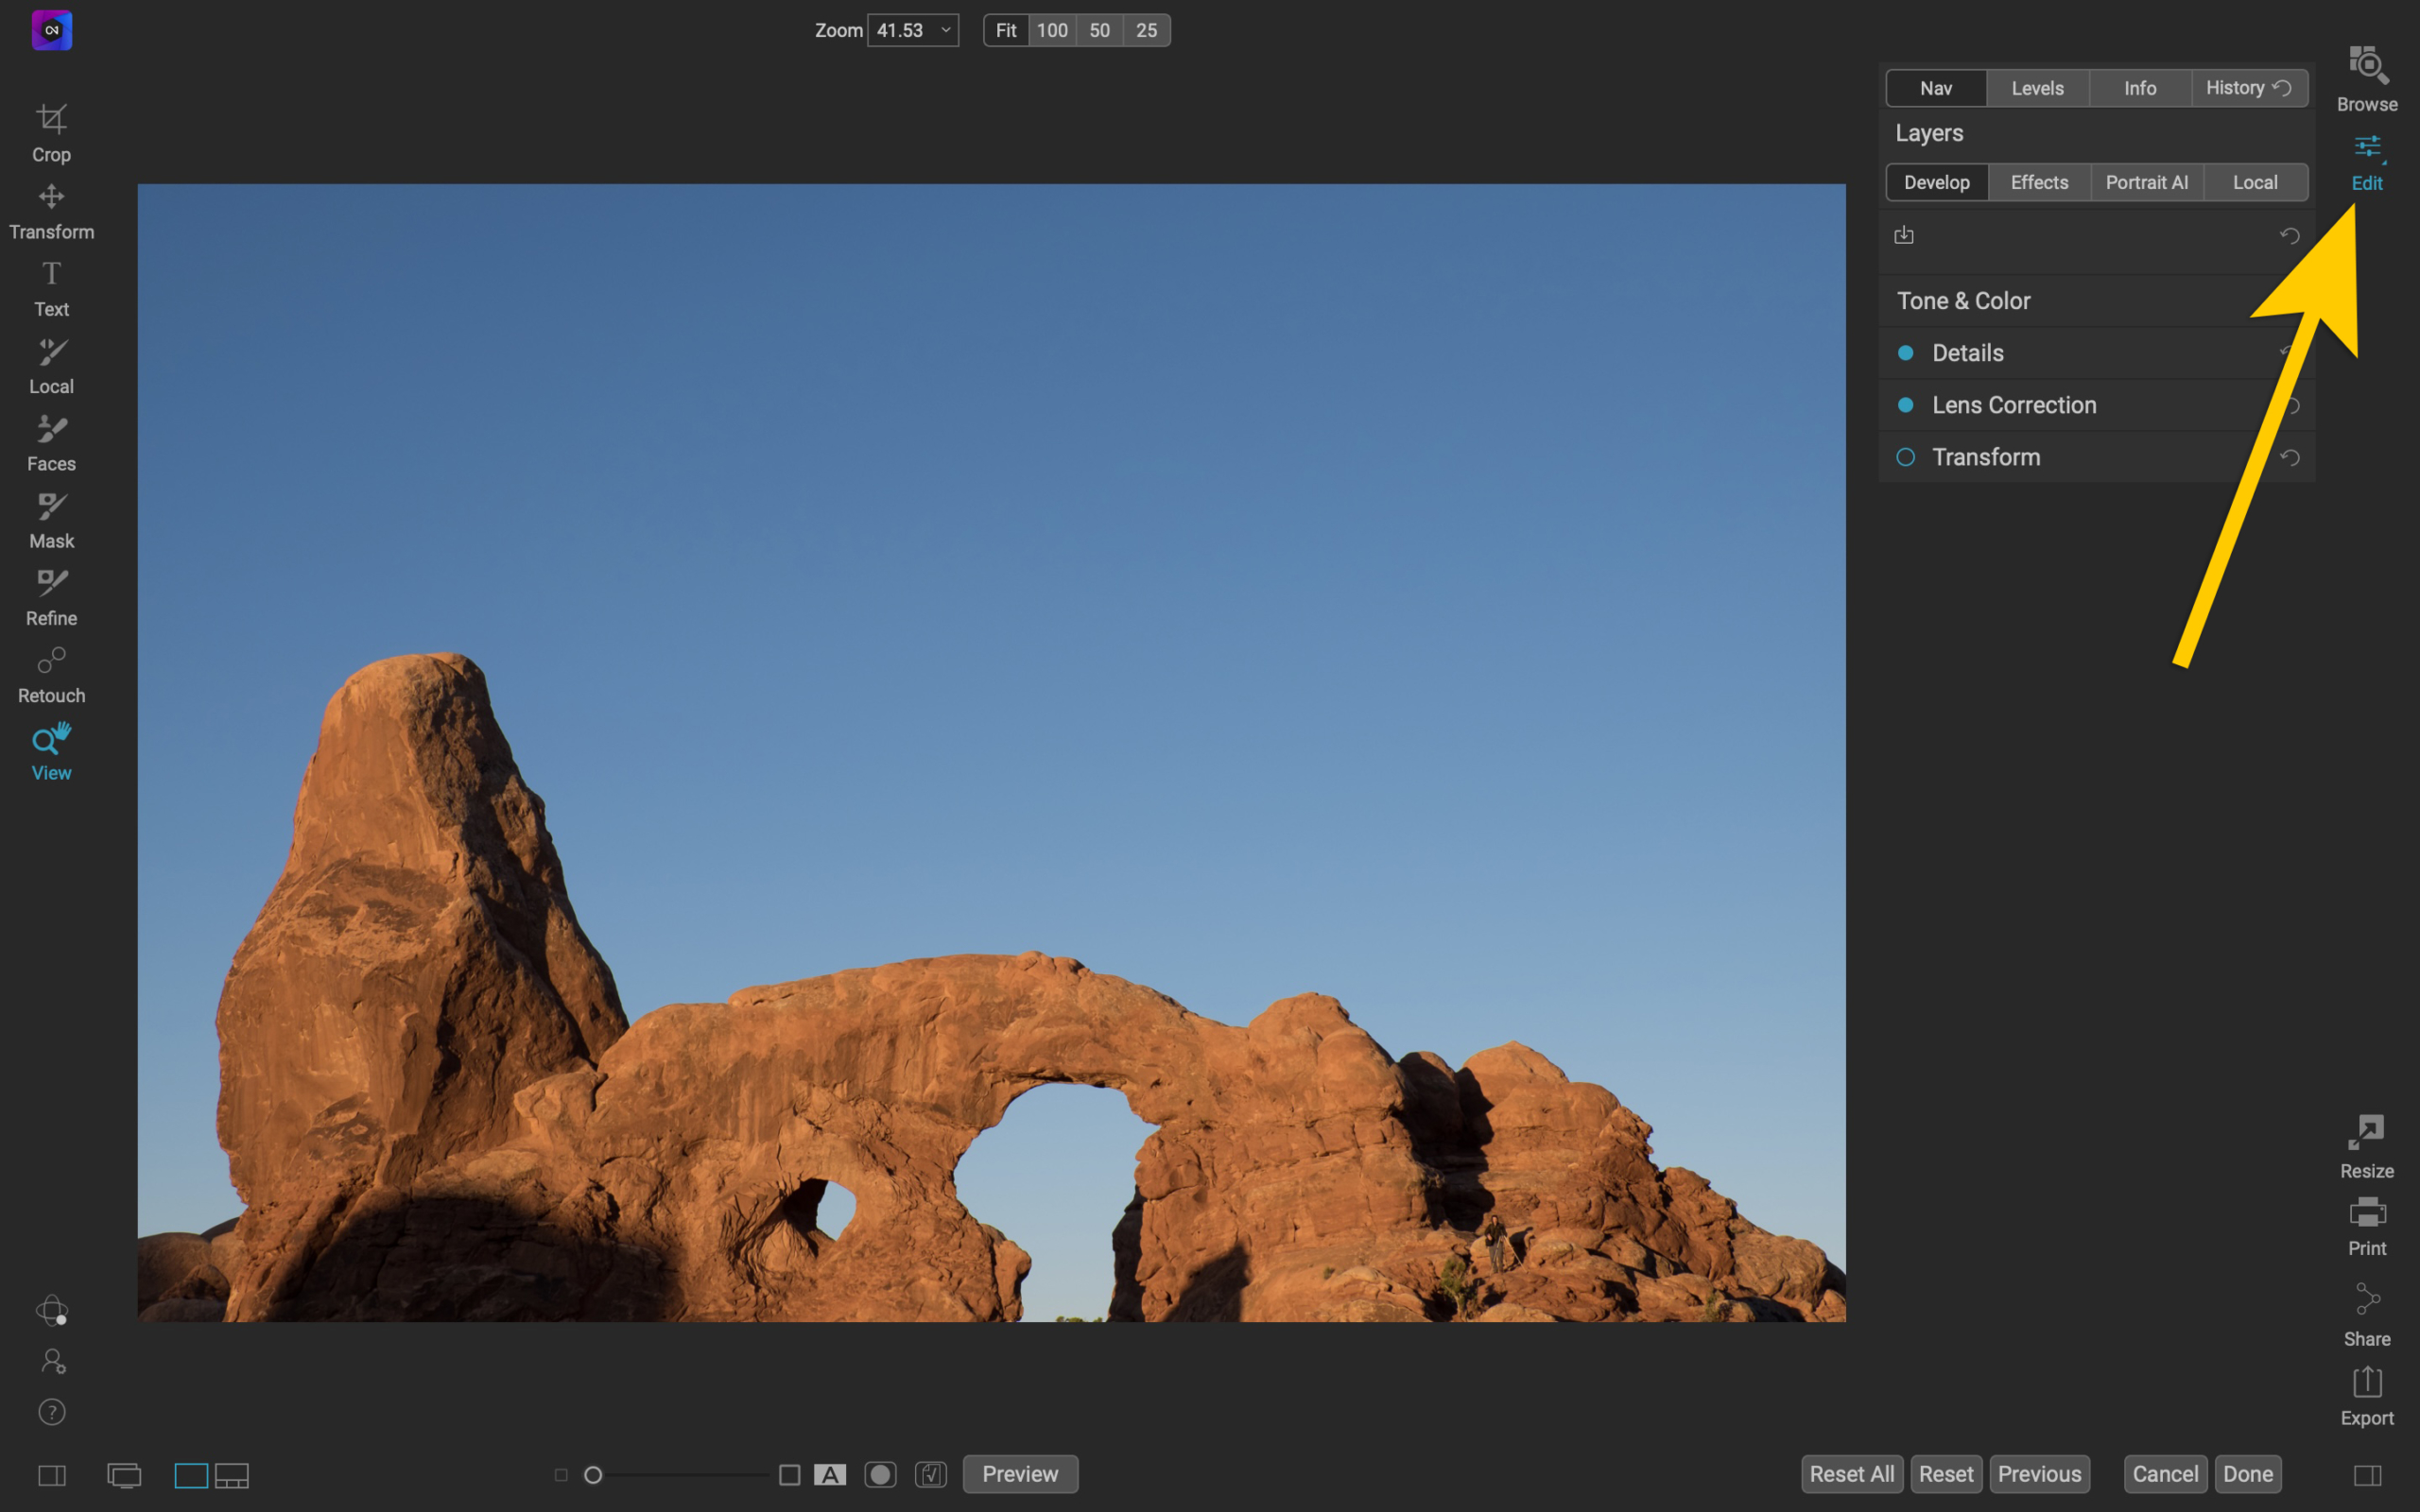
Open a photo into ON1 Photo RAW and access the Edit module.
Step 2: Access the Local adjustments
Next, click on the Local tool on the left (this can also be accessed using the Local tab within the Edit module).

Step 3: Select a custom brush
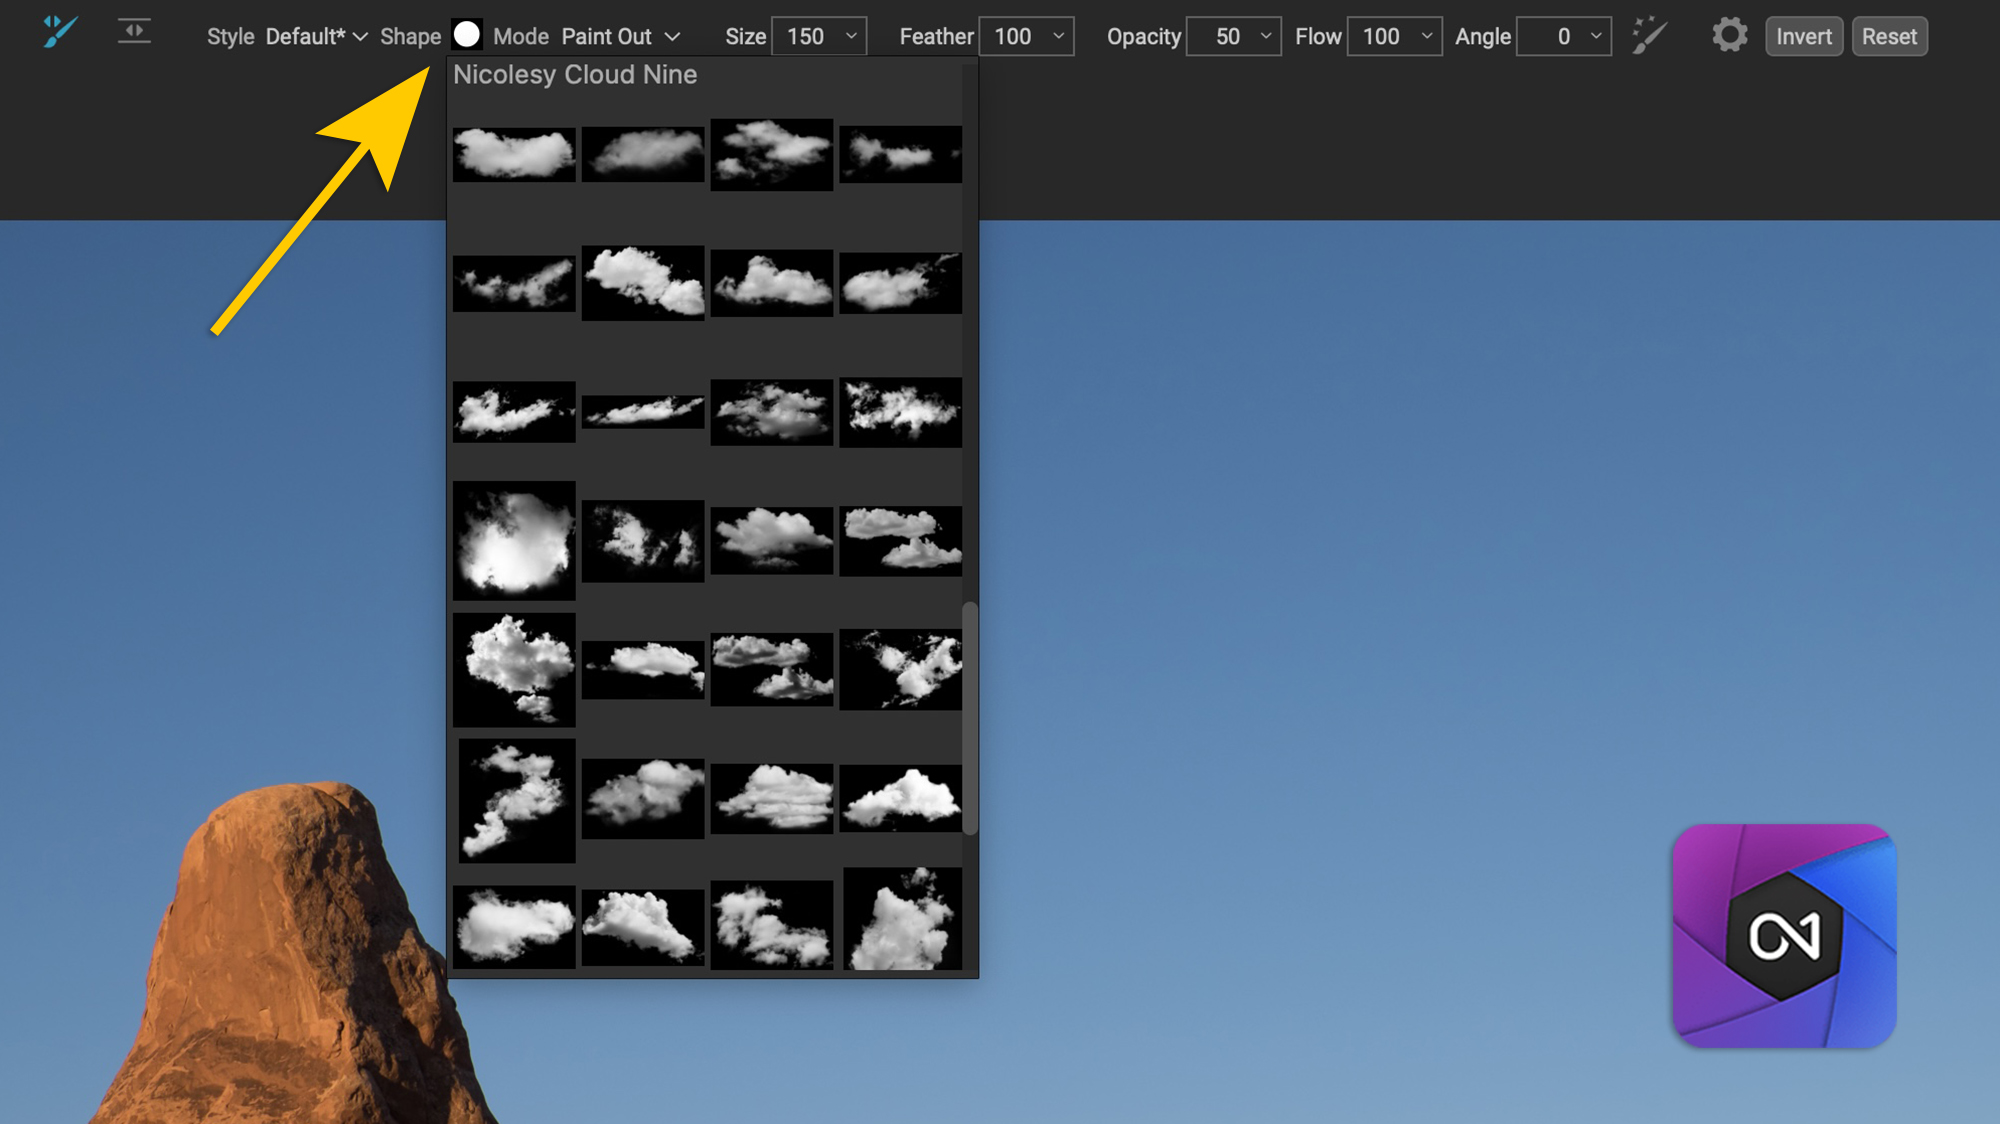
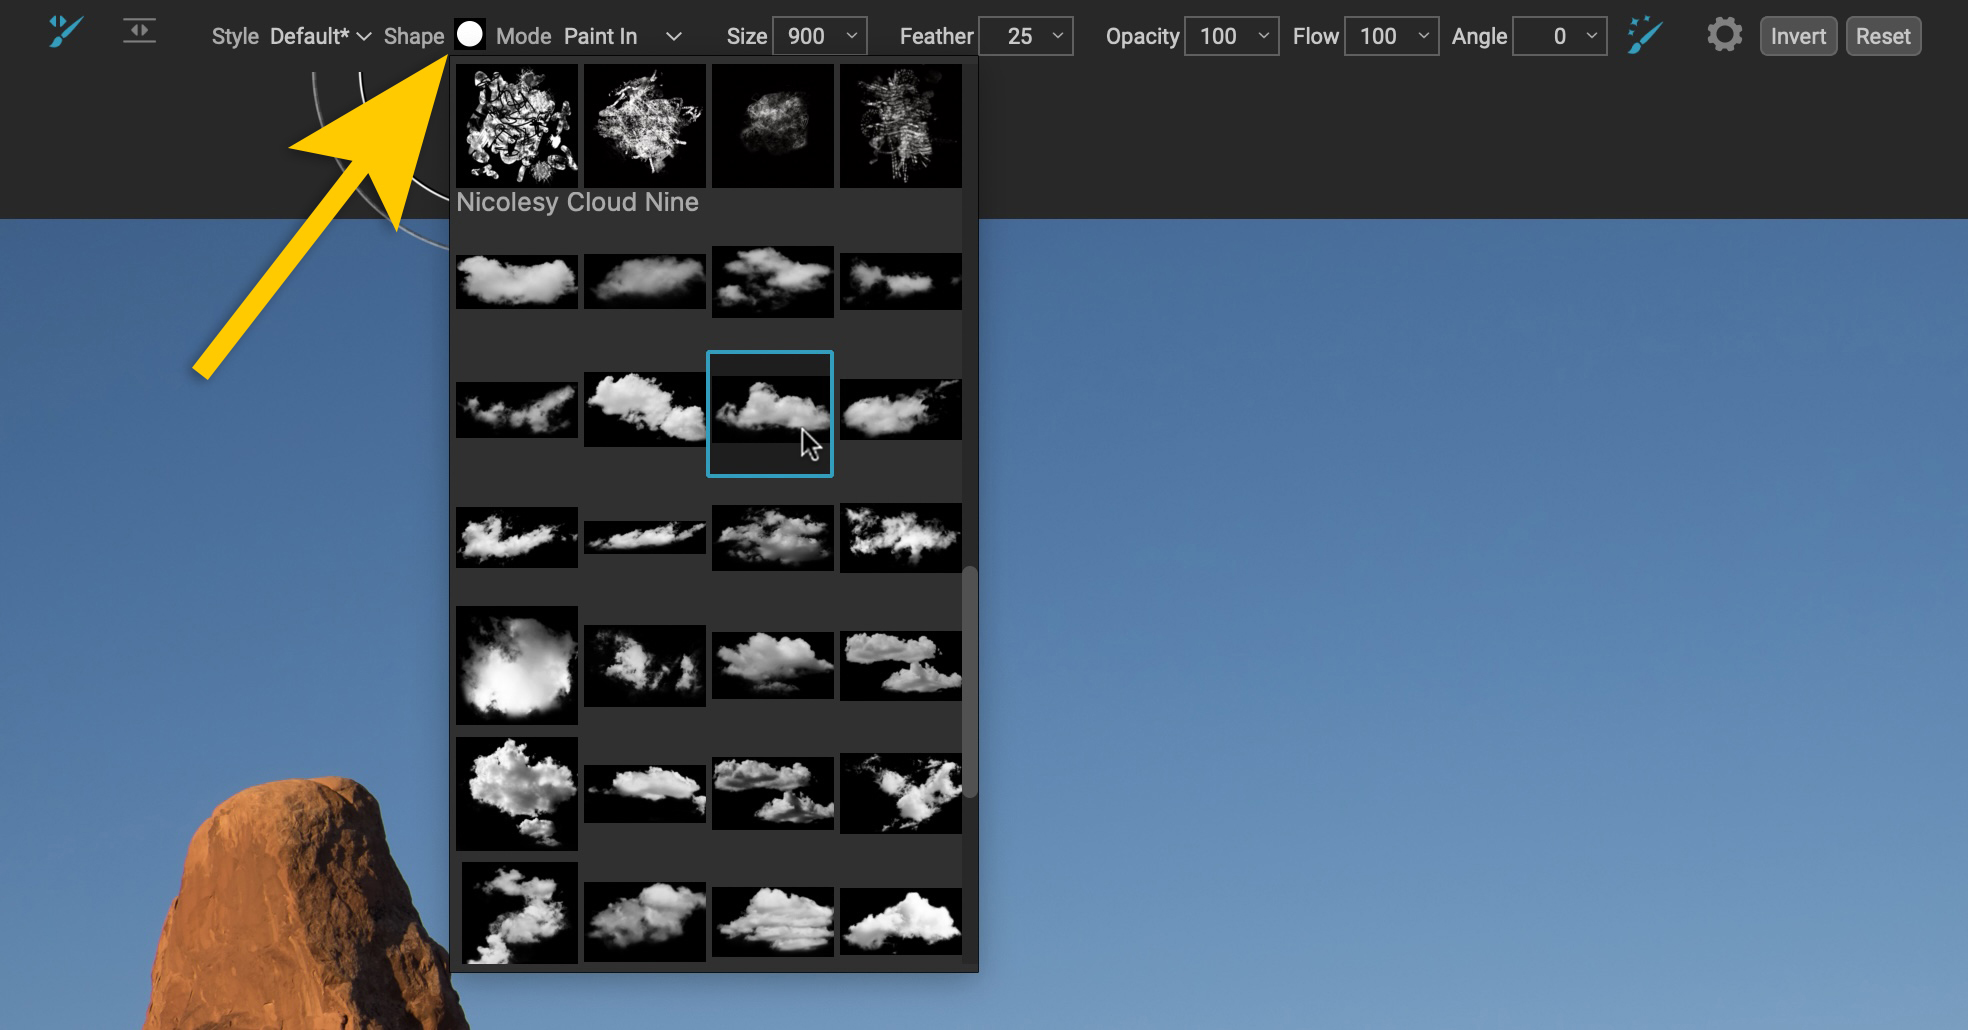
Now, in the Options bar at the top, click the Shape icon to reveal a drop-down menu with thumbnails of all custom brushes you have installed into ON1. Scroll down to reveal the pack you just installed and click on a shape to activate it.
Step 4: Set the Perfect Brush options
If you have a sky and you want to mask the clouds around objects in the foreground, you will want to use the Perfect Brush options to do this. I also recommend playing with the Color Threshold setting as well to make sure that a good amount of the cloud shape will be stamped on your image while also auto-masking behind any objects in the sky. This setting will vary depending on the color of your sky and the color of the details in the foreground.

Step 5: “Stamp” the cloud shapes on your image
Now it’s time to add the clouds to your photo! With a cloud shape selected, hover the brush over your image and use the right and left bracket keys — [ and ] — to decrease or increase the size of your cloud brush. Then click once over the image to stamp your cloud.
If you are stamping a cloud in an area that requires masking (with the Perfect Brush option selected), make sure that the center of your brush’s cursor is over the sky portion of the image. You might have to eyeball this a bit since the cursor crosshair is not visible with custom brushes.
Don’t worry about what the color or tone of the clouds looks like at this stage, this will be fixed in the next step.
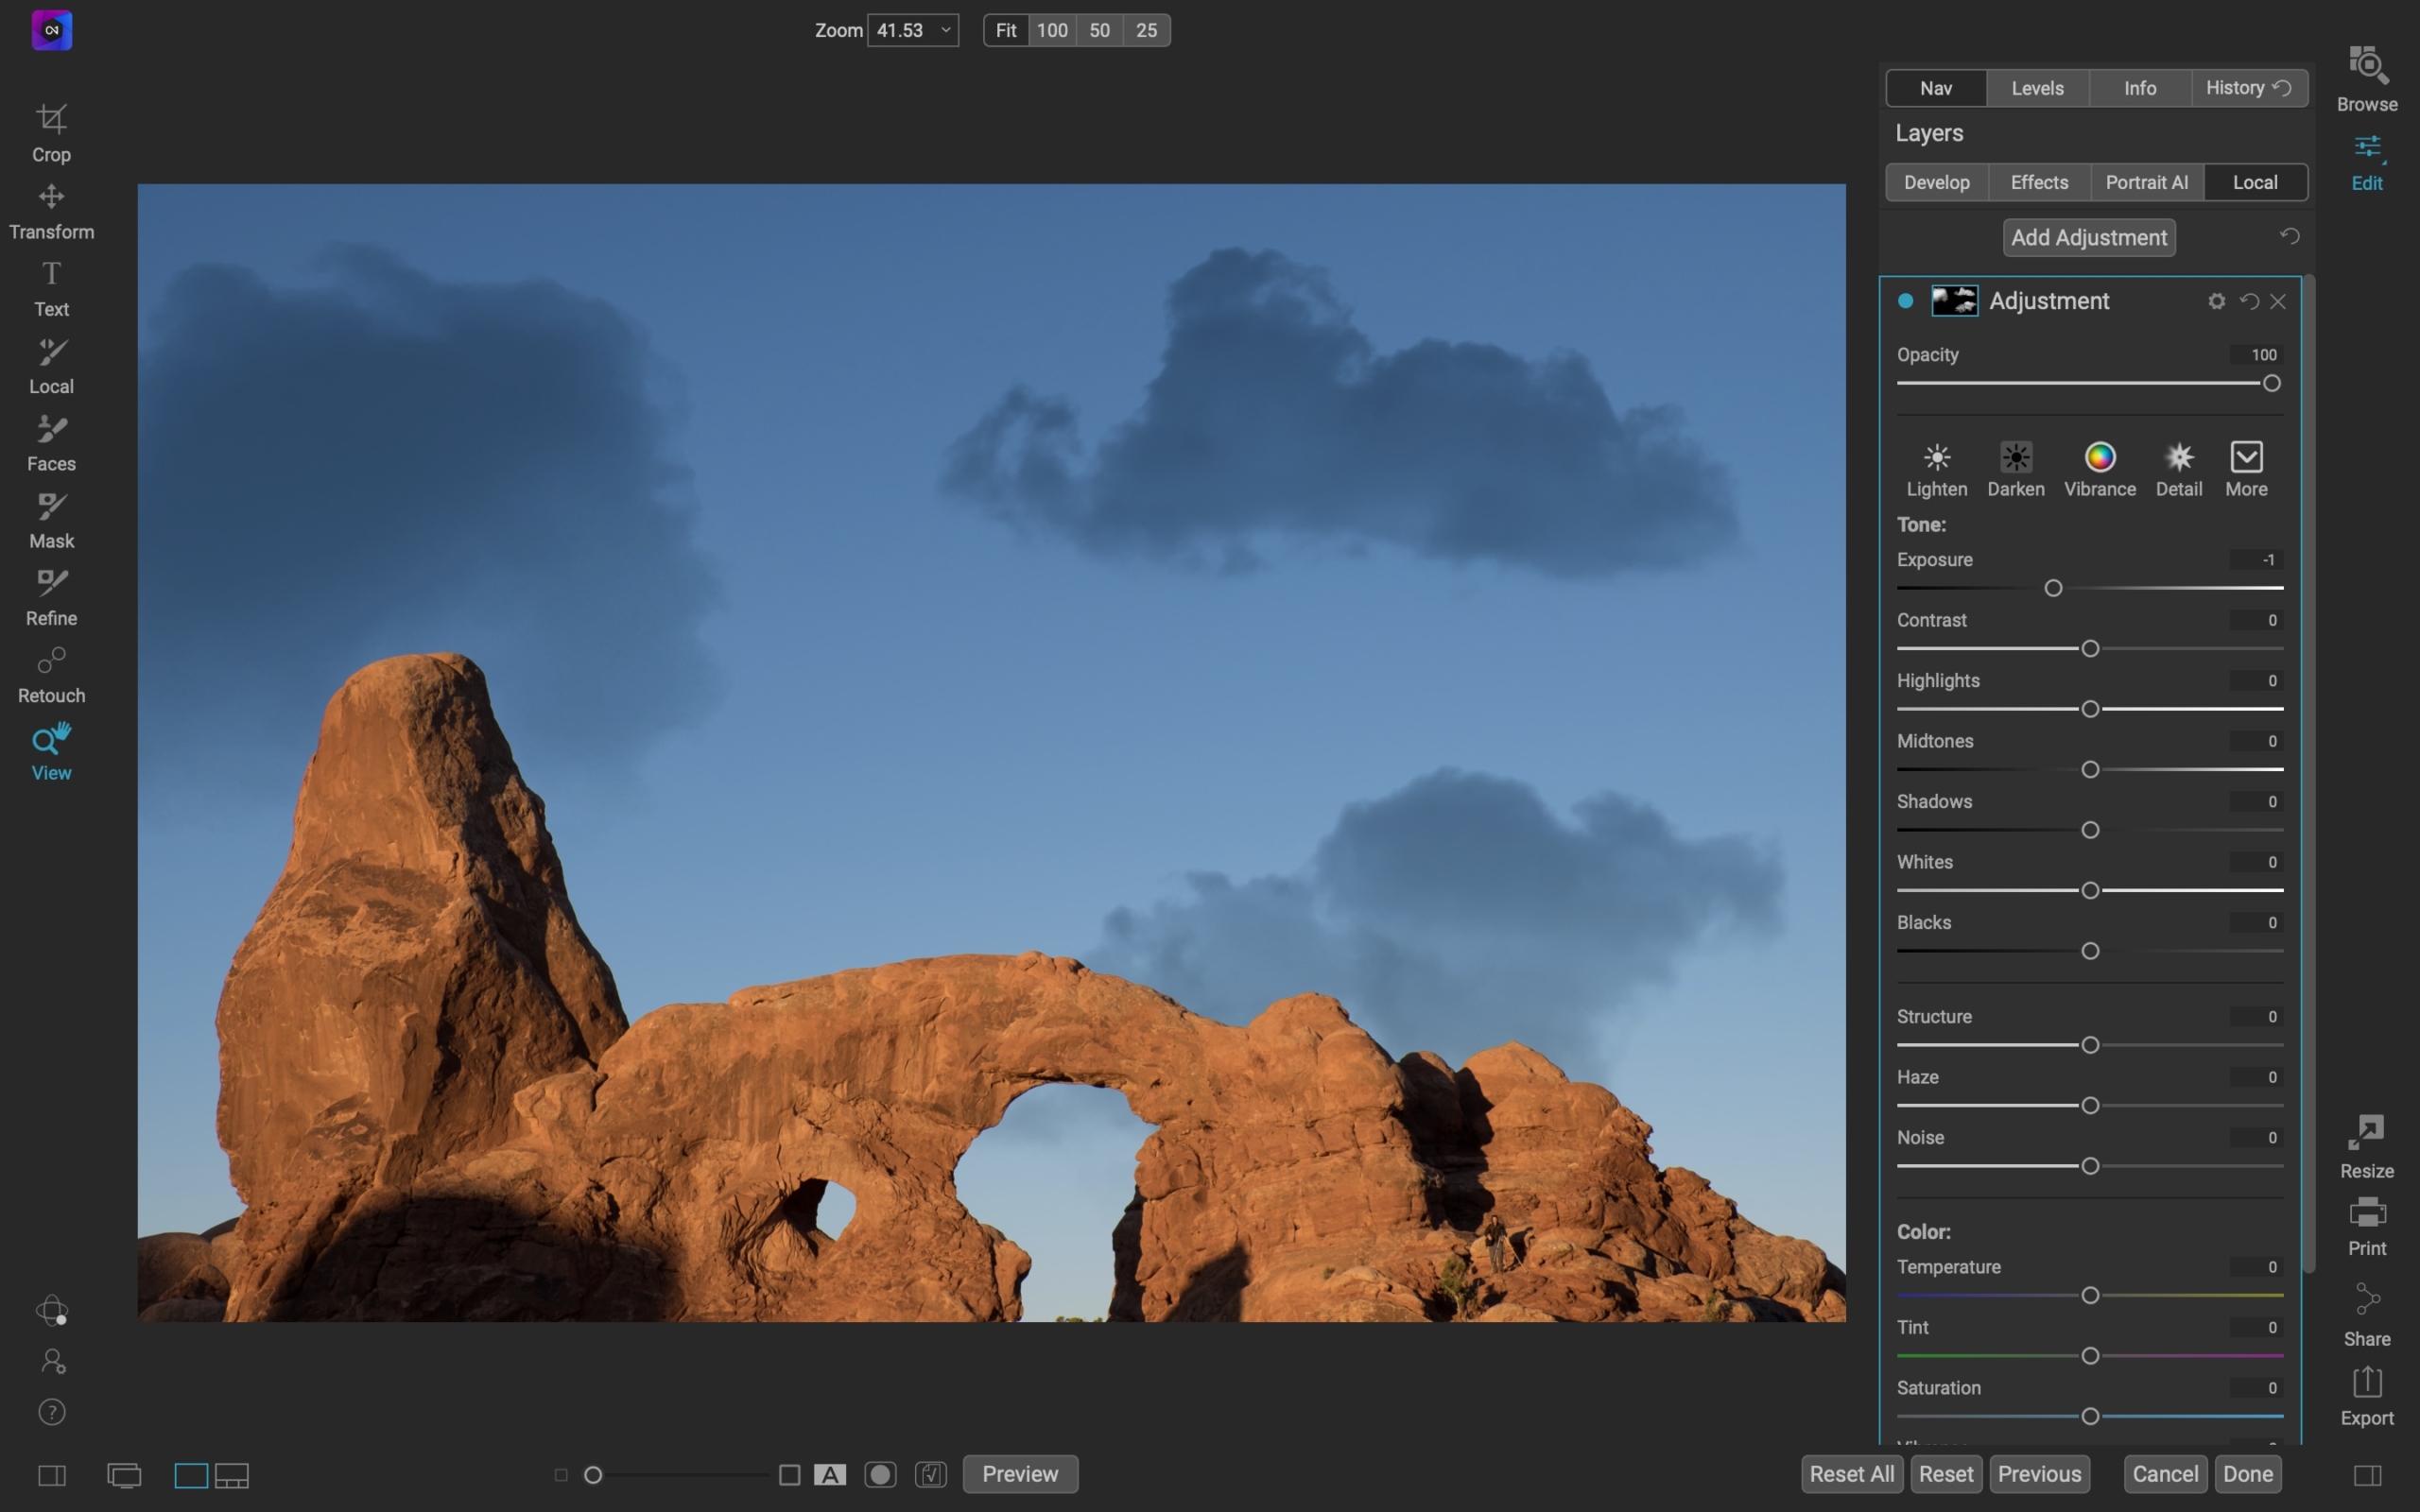
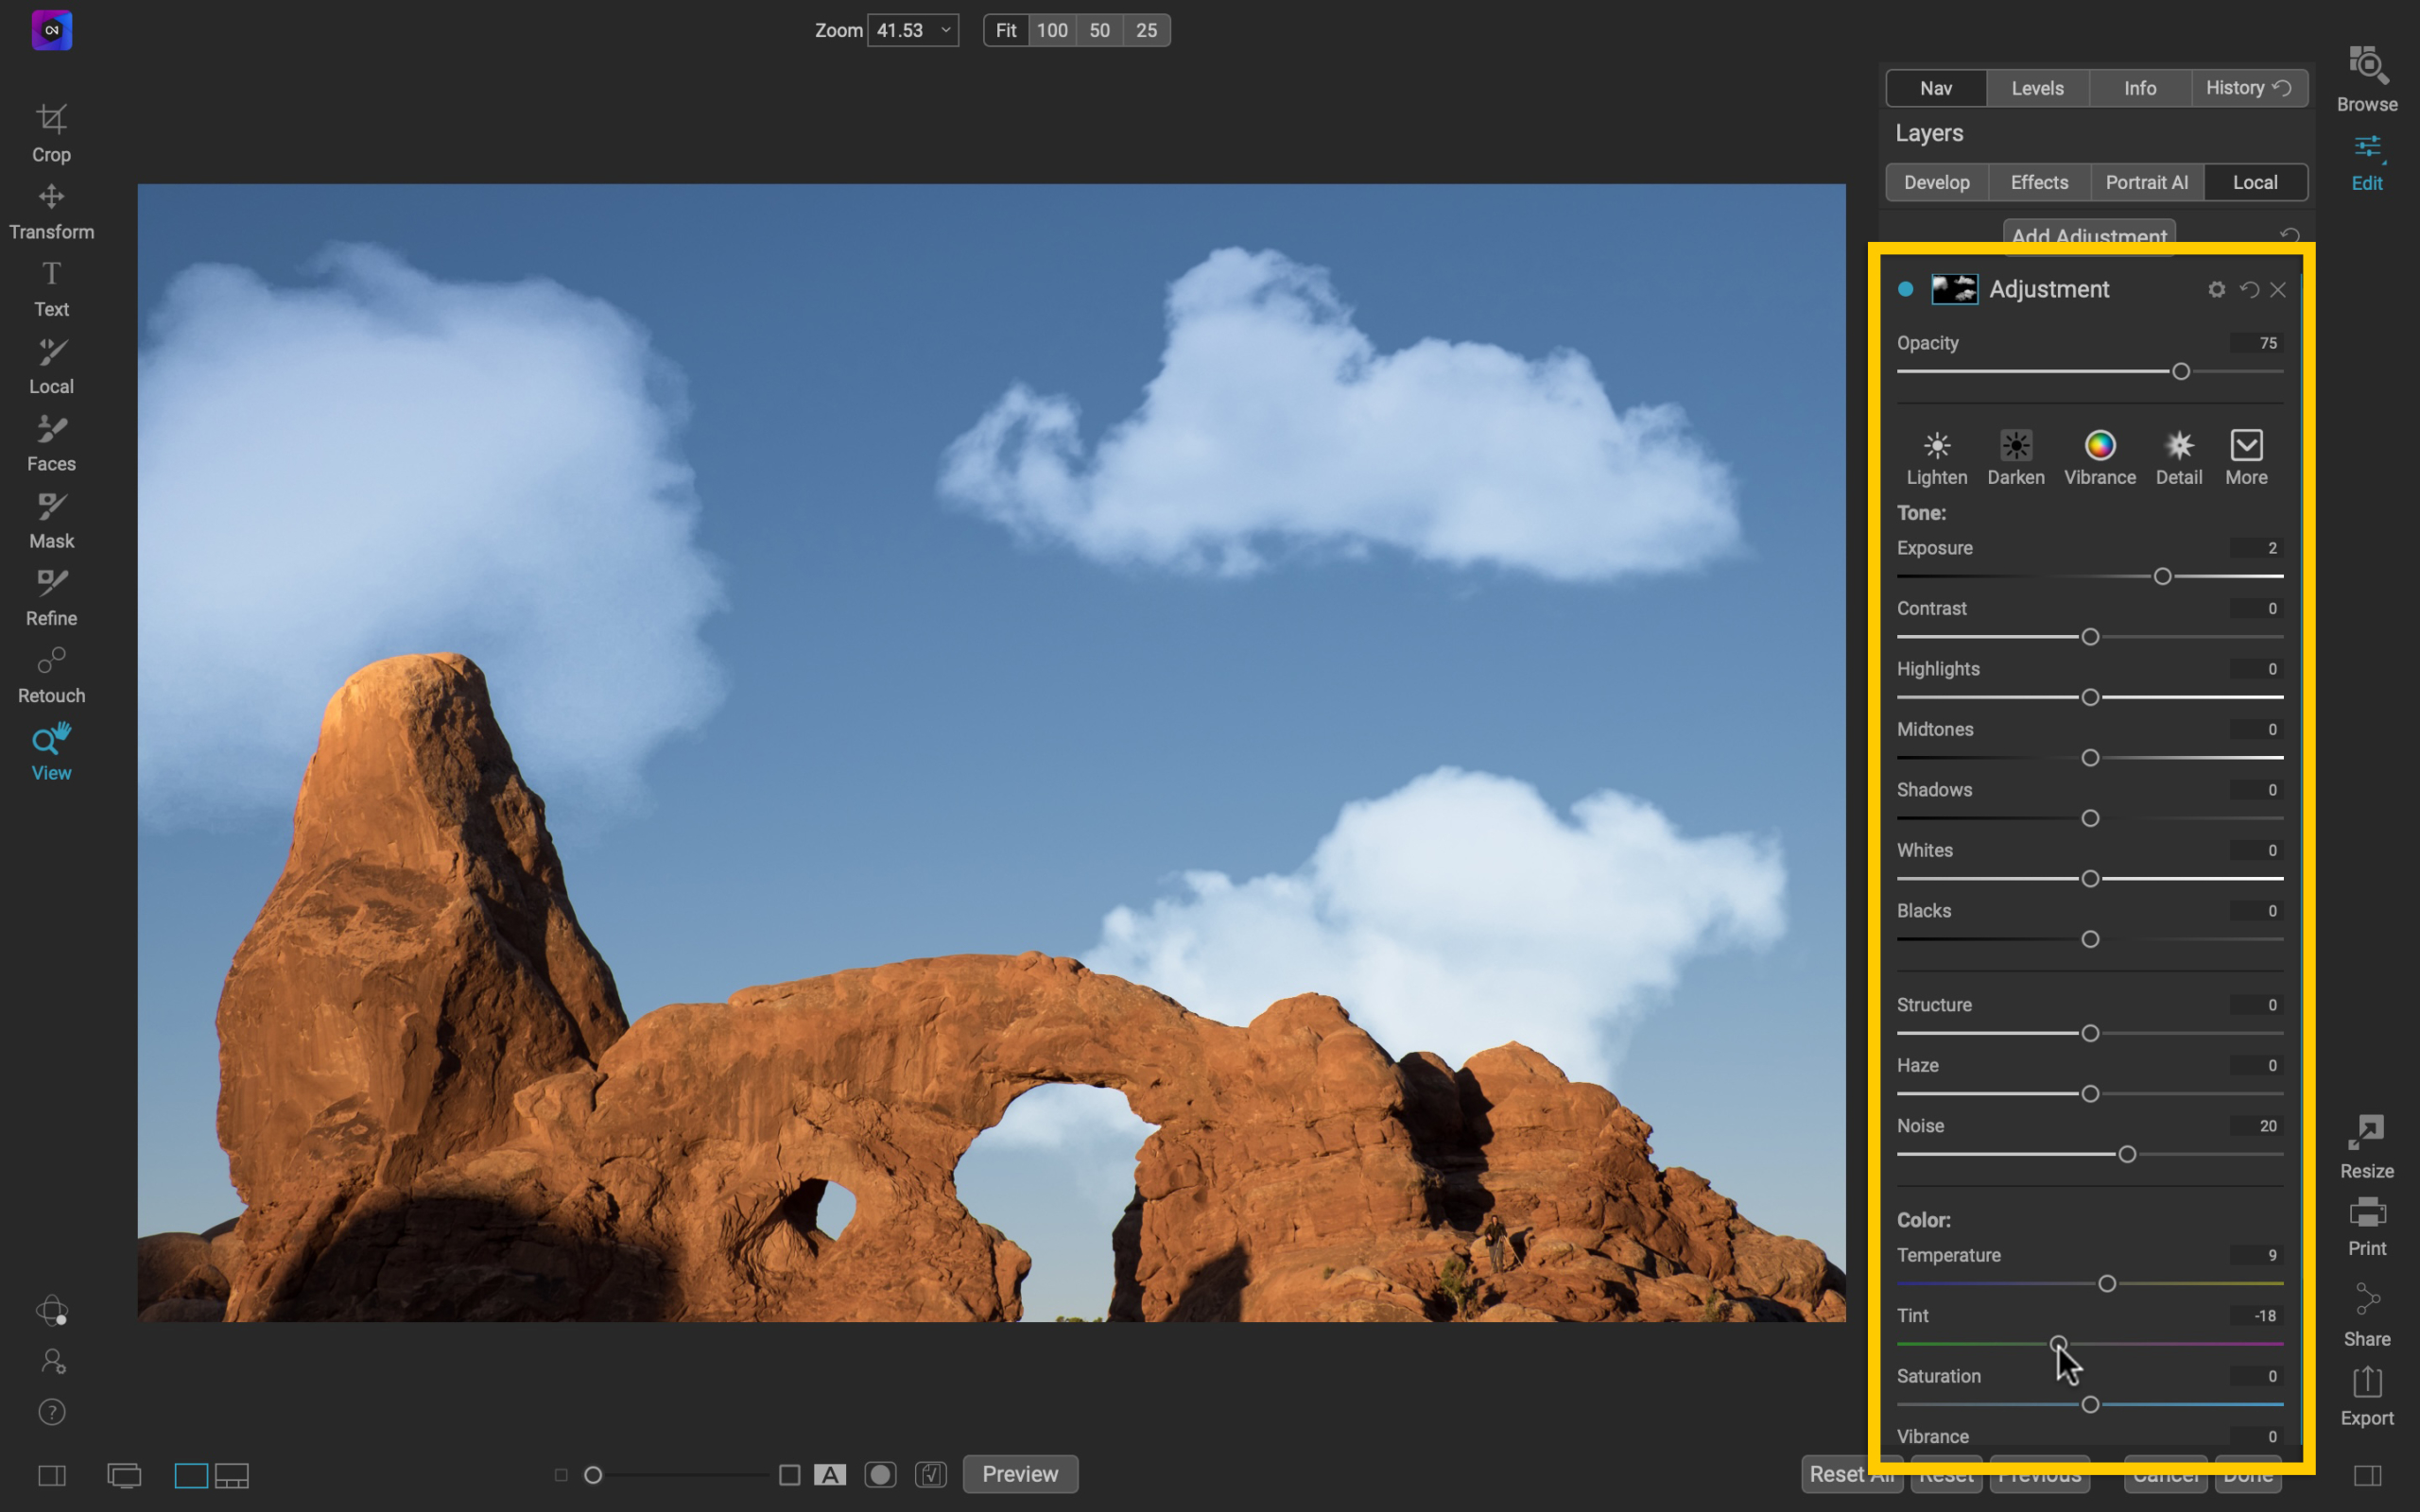
Step 6: Refine the Local adjustment settings
In the settings within the Local tab, you’ll need to make adjustments to the clouds look like they blend in naturally with the environment. For this scene, I made the following adjustments:
- Opacity: 75%
- Exposure: +2
- Noise: +20
- Temperature: +9
- Tint: –18
These settings will vary, depending on the light and colors of your sky and overall scene. You can also use the “Paint with color” optin if you need to add a colored tint to the clouds.
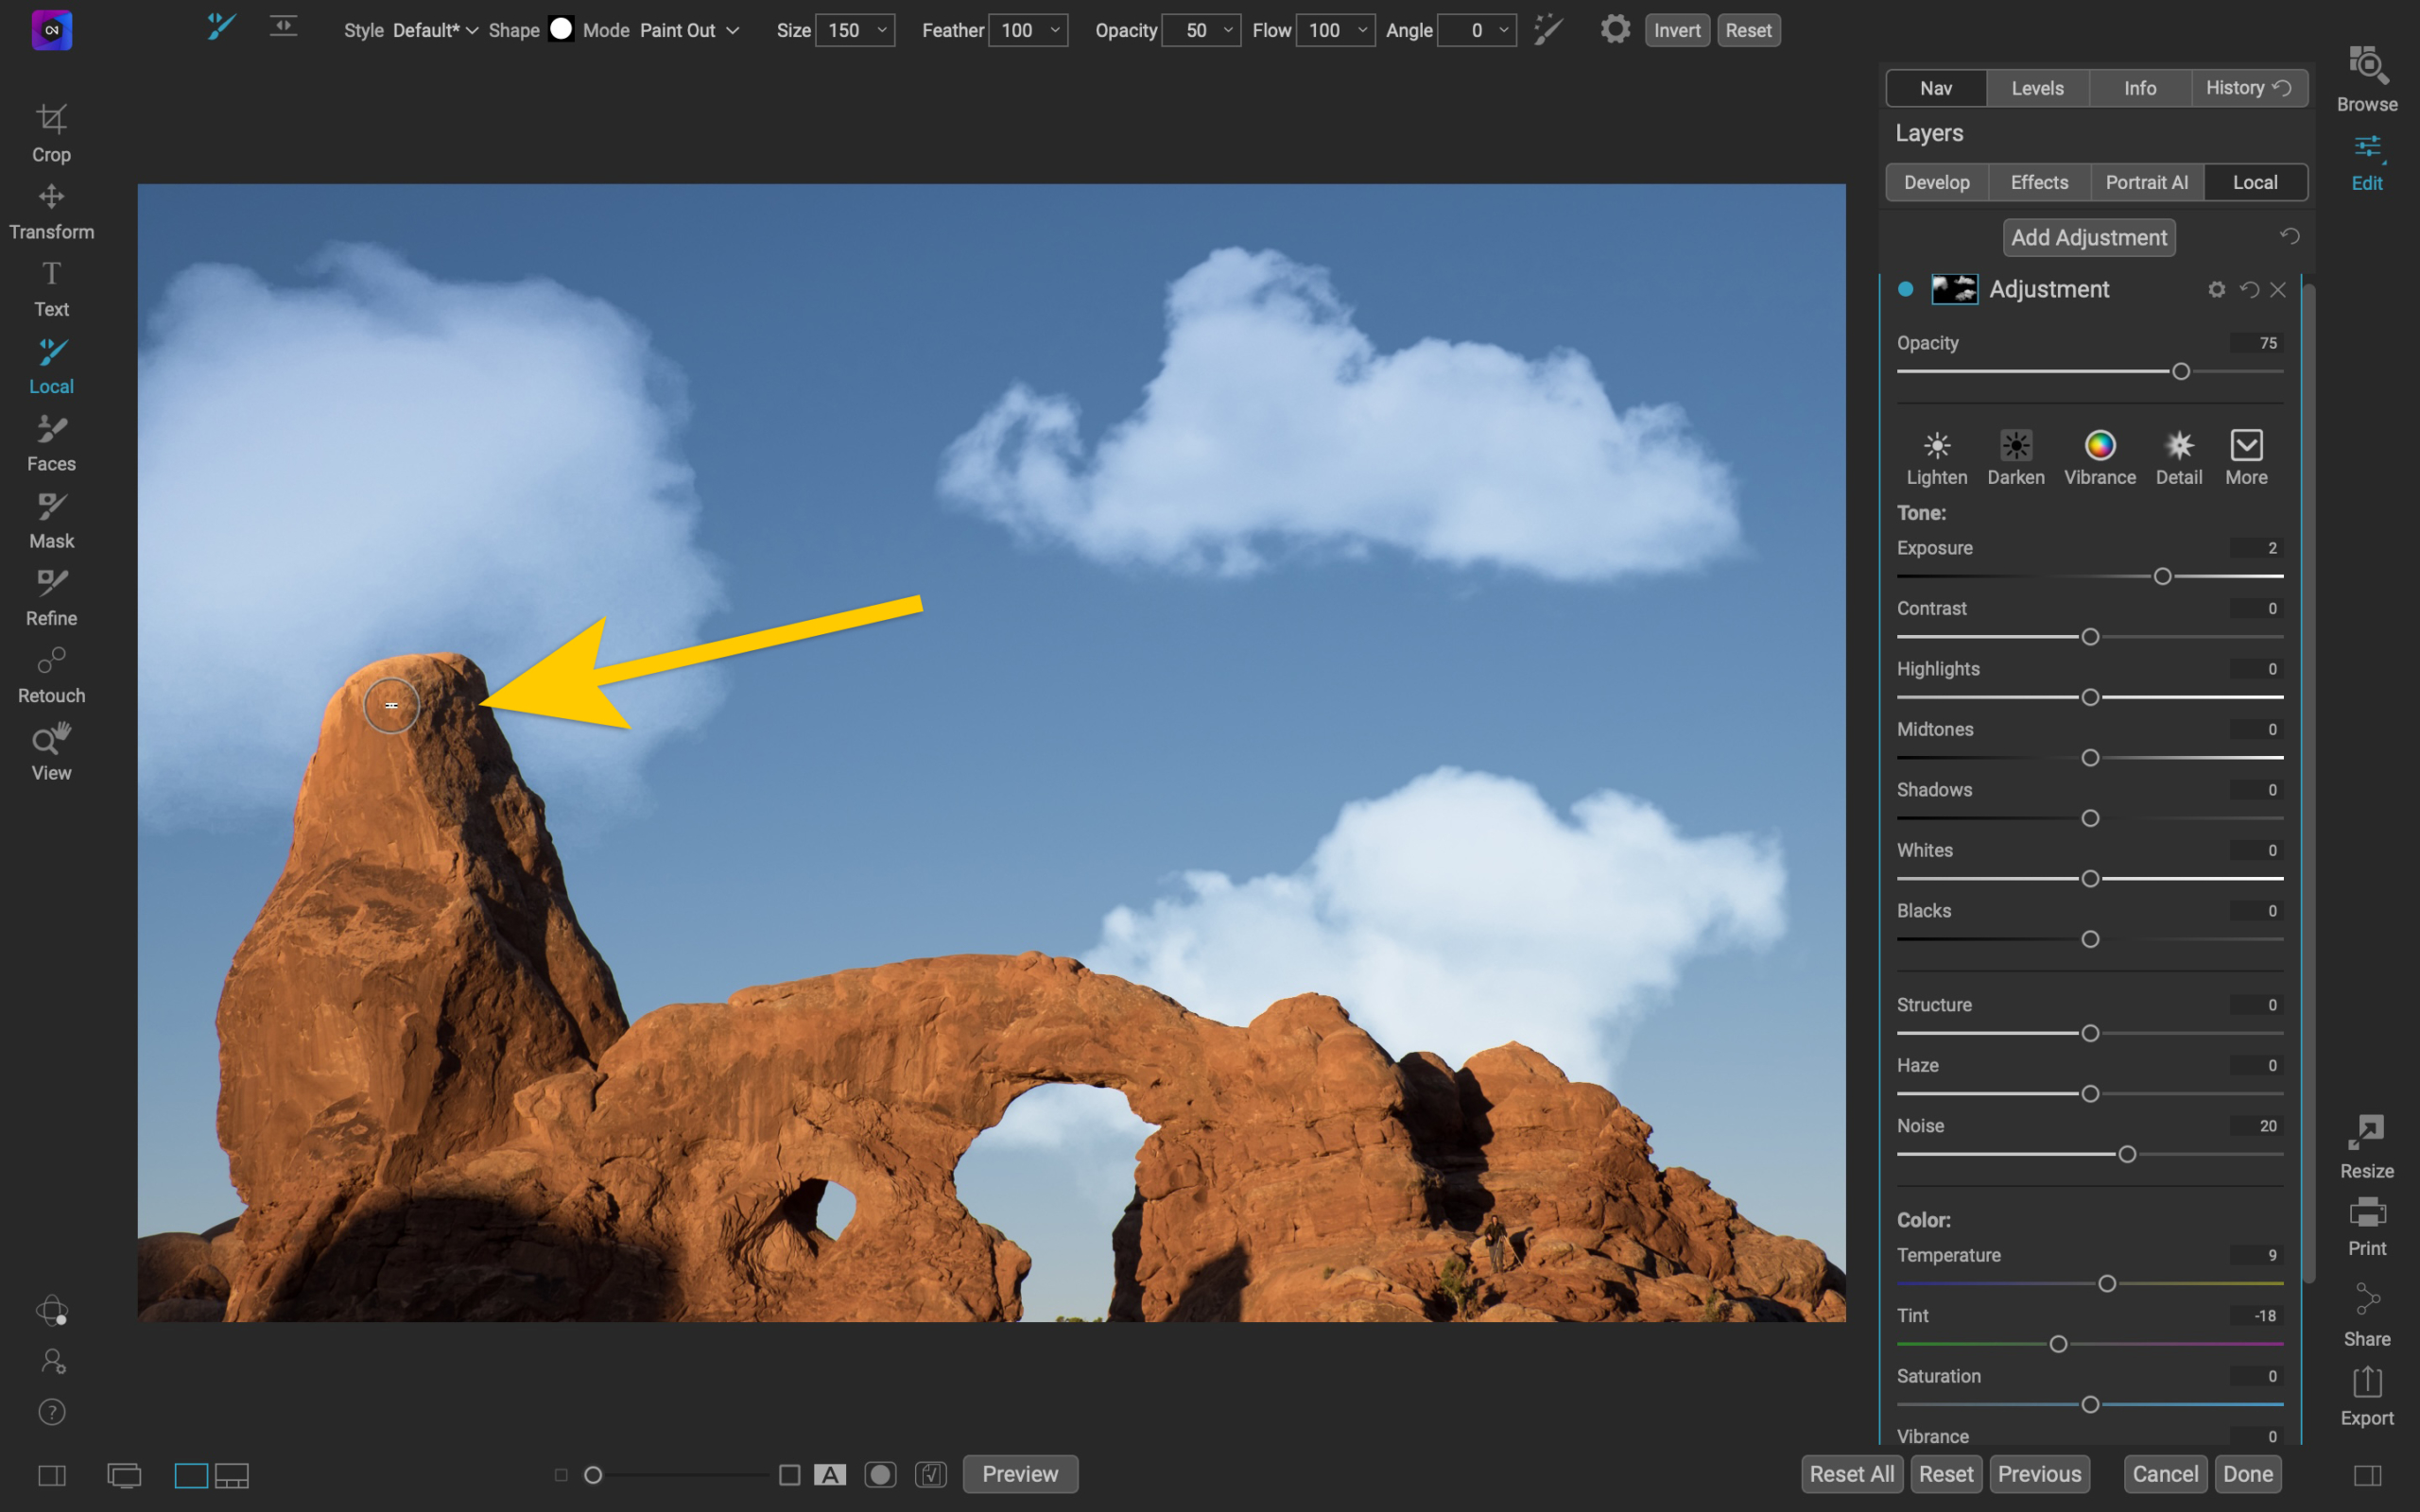
Step 7: Manually brush the mask (as needed)
If your cloud stamps are visible in the foreground, you will need to do some manual masking to bring back the origianl color and tone of these areas. There is a small area on the upper-left part of the rock that is too bright and needs adjusmtnet. To do this, I made the following adjustmetns to the brush options at the top:
- Shape: Round (default)
- Mode: Paint Out
- Feather: 100
- Opacity: 50%
- Perfect Brush: Off
Then I brushed over the area a few times, making sure to not brush over to the sky region of the image, until the bright area was removed.
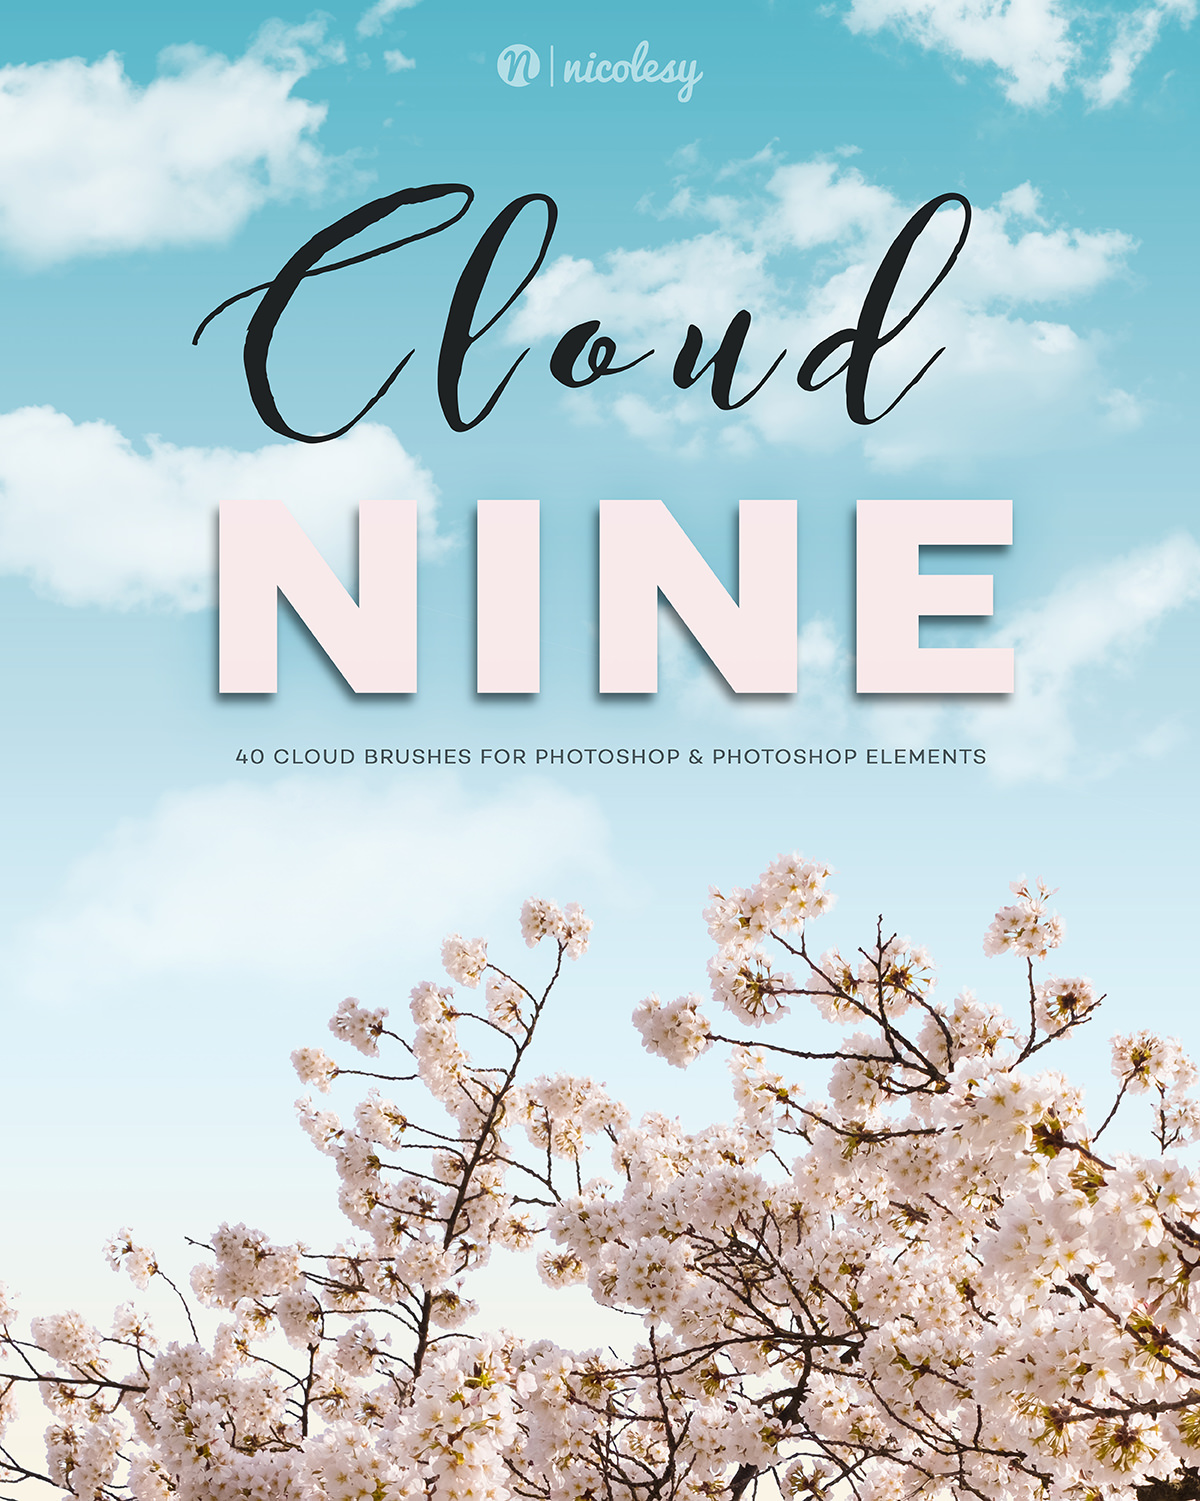
Cloud Nine Brush Presets
This set of brushes allow you to add real clouds to the skies of your photographs. They are simple to use and require no knowledge of masking or sky replacement.
Compatible with: Photoshop, Photoshop Elements, Affinity Photo, ON1 Photo RAW, and any application that can import and work with with .abr files.
In the 2021.1 update of ON1 Photo RAW, they added the ability to import custom Adobe Photoshop brushes to your files. One use for this is to add clouds to an image! I have a premium set of real cloud brushes in my online store, the Nicolesy Cloud Nine brush pack, which you can now use in ON1 Photo RAW 2021. And, if you’d like to test out a few brushes to see how it works, please use the form below to access this freebie:
Below I have instructions on how to import brush presets into ON1 Photo RAW 2021 and how to apply cloud brushes to your files easily.
Importing .abr brush files into ON1 Photo RAW 2021
Here’s how to import your .abr brush files to use in ON1 Photo RAW:
Step 1: Make sure you have an .abr file ready to import. You can find some online for free or purchase premium brushes, like my Cloud Nine cloud brush pack.
Step 2: In ON1 Photo RAW, go to File > Manage Extras.
Step 3: In the Extras Manager, click Brush Shapes at the top, then click Import on the bottom.
Step 4: Navigate to an .abr file and click Open.
Step 5: A Choose Category window will pop up. Click the drop-down and choose “Add Category”. Give it a name and click OK. Click OK again (in the Choose Category window) and your brush files will be imported.
Applying cloud brushes to your photos in ON1 Photo RAW
Now that the .abr file is imported into ON1 Photo RAW, below you can learn how to use them in your images. In this example, I’ll be demonstrating how to use the Nicolesy Cloud Nine brush pack.
Note: This feature only works in ON1 Photo RAW versions 2021.1 and later.
Step 1: Open a photo into ON1 Photo RAW
Open a photo into ON1 Photo RAW and access the Edit module.
Step 2: Access the Local adjustments
Next, click on the Local tool on the left (this can also be accessed using the Local tab within the Edit module).
Step 3: Select a custom brush
Now, in the Options bar at the top, click the Shape icon to reveal a drop-down menu with thumbnails of all custom brushes you have installed into ON1. Scroll down to reveal the pack you just installed and click on a shape to activate it.
Step 4: Set the Perfect Brush options
If you have a sky and you want to mask the clouds around objects in the foreground, you will want to use the Perfect Brush options to do this. I also recommend playing with the Color Threshold setting as well to make sure that a good amount of the cloud shape will be stamped on your image while also auto-masking behind any objects in the sky. This setting will vary depending on the color of your sky and the color of the details in the foreground.
Step 5: “Stamp” the cloud shapes on your image
Now it’s time to add the clouds to your photo! With a cloud shape selected, hover the brush over your image and use the right and left bracket keys — [ and ] — to decrease or increase the size of your cloud brush. Then click once over the image to stamp your cloud.
If you are stamping a cloud in an area that requires masking (with the Perfect Brush option selected), make sure that the center of your brush’s cursor is over the sky portion of the image. You might have to eyeball this a bit since the cursor crosshair is not visible with custom brushes.
Don’t worry about what the color or tone of the clouds looks like at this stage, this will be fixed in the next step.
Step 6: Refine the Local adjustment settings
In the settings within the Local tab, you’ll need to make adjustments to the clouds look like they blend in naturally with the environment. For this scene, I made the following adjustments:
- Opacity: 75%
- Exposure: +2
- Noise: +20
- Temperature: +9
- Tint: –18
These settings will vary, depending on the light and colors of your sky and overall scene. You can also use the “Paint with color” optin if you need to add a colored tint to the clouds.
Step 7: Manually brush the mask (as needed)
If your cloud stamps are visible in the foreground, you will need to do some manual masking to bring back the origianl color and tone of these areas. There is a small area on the upper-left part of the rock that is too bright and needs adjusmtnet. To do this, I made the following adjustmetns to the brush options at the top:
- Shape: Round (default)
- Mode: Paint Out
- Feather: 100
- Opacity: 50%
- Perfect Brush: Off
Then I brushed over the area a few times, making sure to not brush over to the sky region of the image, until the bright area was removed.
Cloud Nine Brush Presets
This set of brushes allow you to add real clouds to the skies of your photographs. They are simple to use and require no knowledge of masking or sky replacement.
Compatible with: Photoshop, Photoshop Elements, Affinity Photo, ON1 Photo RAW, and any application that can import and work with with .abr files.

Nicole is a photographer, published author, and educator specializing in Lightroom, Photoshop, and photography. She is best known for her books on food photography but is widely versed in various photographic genres, including landscape, nature, stock, travel, and experimental imagery.


This is an excellent intro to this new feature in ON1. Thanks for posting it.
One specialized use for local adjustment layers and the Paint With Color’s Solid Paint option is to add overlays with custom brush shapes.
Great tutorial and explination about using brushes to enhance skies. in On1Raw.