I prefer to travel light. After a frustrating trip to Morocco a few years back, where our checked-in luggage was “lost” for five days at the beginning of our trip, I have vowed to not check my luggage going forward (when possible). So, for my trip to Southeast Asia last month, I decided to travel only with carry-on luggage, and also to also travel as light as possible. This includes choosing smaller lenses to carry with my camera, as well as the other hardware I bring with me. And ultimately I decided that my laptop was going to stay home.
I’ve always found laptops to be ridiculously cumbersome when traveling. They’re heavy, even the smaller 13″ MacBook Pro that I currently own. And, when I bring it along, it is mostly used as an “import into Lightroom and check my email” device, so it doesn’t get that much use. Sometimes my laptop is required, however, such as if I’m going to a conference or photo workshop where I will be giving a photo-editing presentation using software or features that are not available on the iPad. But when traveling on my own with the sole purpose of creating photos, writing, or just relaxing, it’s overkill.
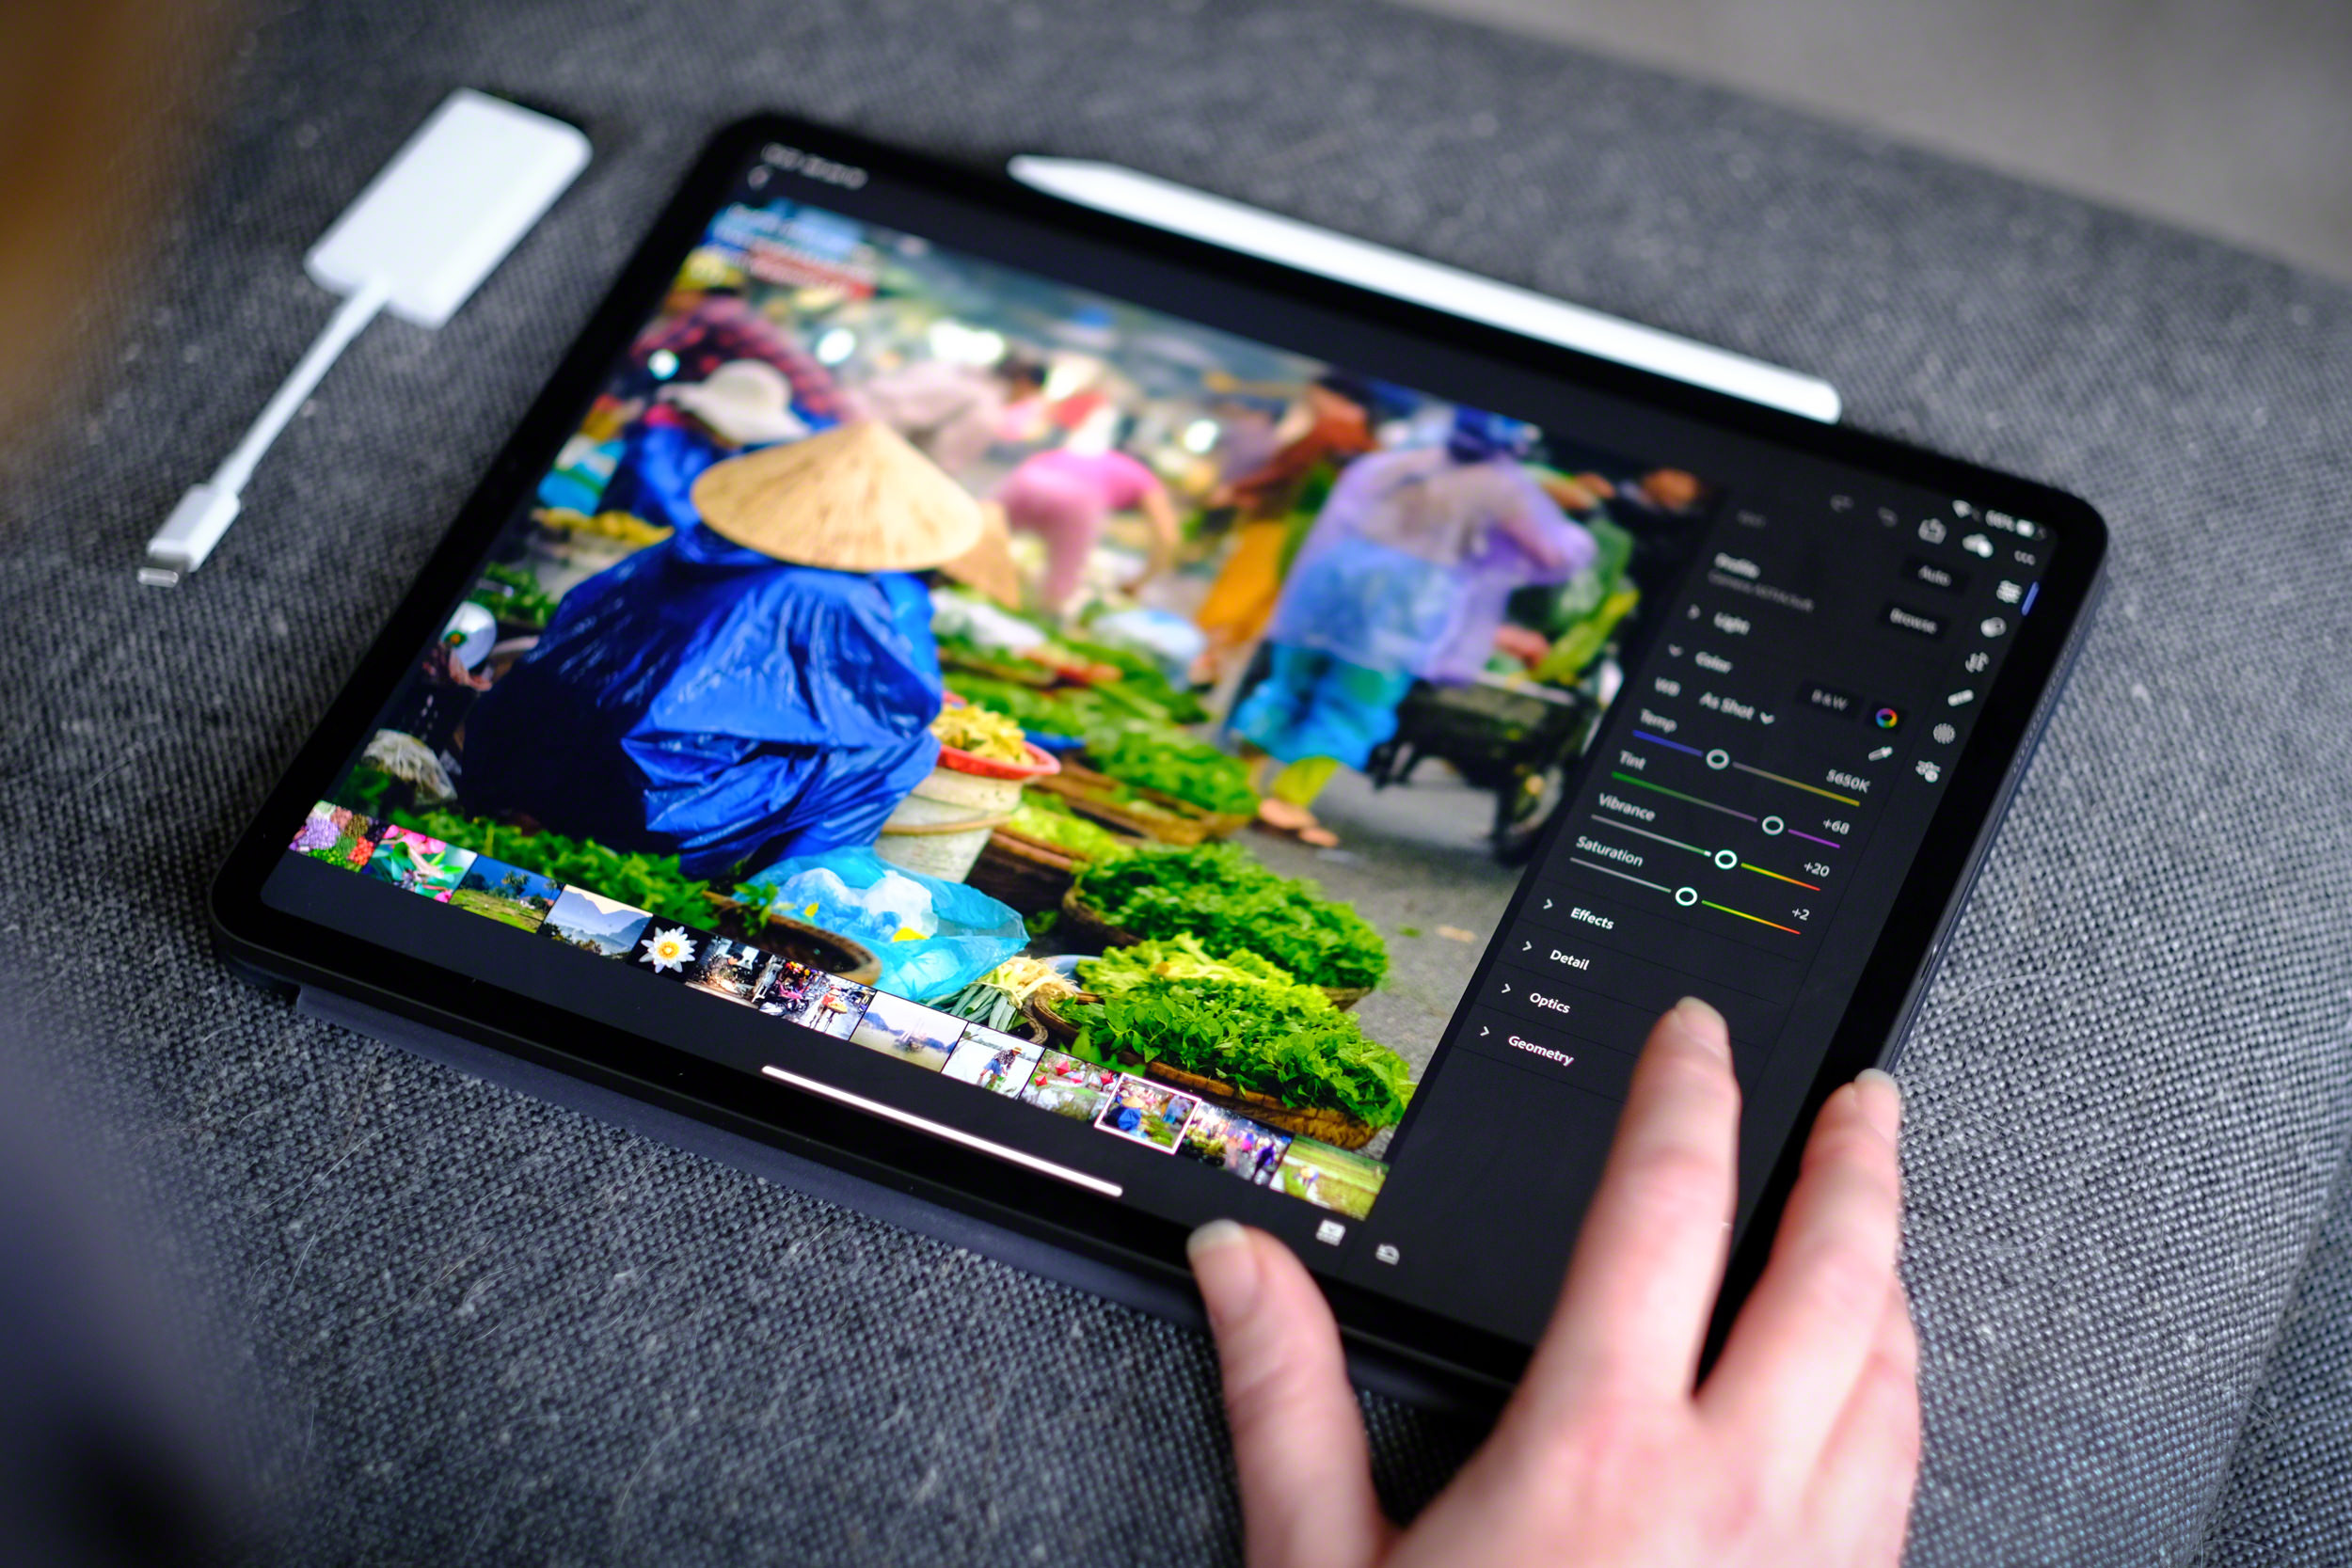
I don’t do a lot of heavy photo or video processing when I’m traveling, so I decided that the new iPad Pro would be a good replacement for these trips. I upgraded my old iPad (a four-year-old iPad Air 2) with a brand-new 12.9″ iPad Pro, and also got the keyboard case and pencil. This is my new laptop replacement when my travels don’t require a full-fledged laptop.
Disclaimers:
- Adobe has provided 10 TB of free storage space to use on my devices.
- This article contains affiliate links.
Here's what's covered in this article
- Setting up Lightroom CC and Lightroom CC Classic to seamlessly sync files together
- Using Lightroom CC Classic as the primary photo catalog, while also using Lightroom CC while traveling
Please note: This workflow could easily be adapted to work using Lightroom CC on a laptop, Android tablet, or any other device that uses Lightroom CC.
Using Lightroom CC with the iPad Pro
One hurdle that I needed to jump was figuring out how to make iPad-only travel work with my current Lightroom workflow. I currently use Lightroom Classic CC, but have not yet migrated over to the “cloud” version, Lightroom CC, which is the app I will use on my iPad.
Here is my goal:
- While traveling: To travel with and only use my iPad (and Lightroom CC) to import, sort, and edit my photos.
- Upon returning home: To have my photos move seamlessly from my iPad (Lightroom CC) to my iMac (Lightroom Classic CC), without losing my edits, metadata, or organization structure.
Fortunately, with only a few adjustments, Lightroom CC has made it possible to do this.
Recommended Software and Hardware
To make this work, at the very least this setup requires an iPad, an Adobe CC subscription, and an SD card reader for the iPad. Here’s the full list of the gear and software I’m using to make this happen:
Before the trip starts
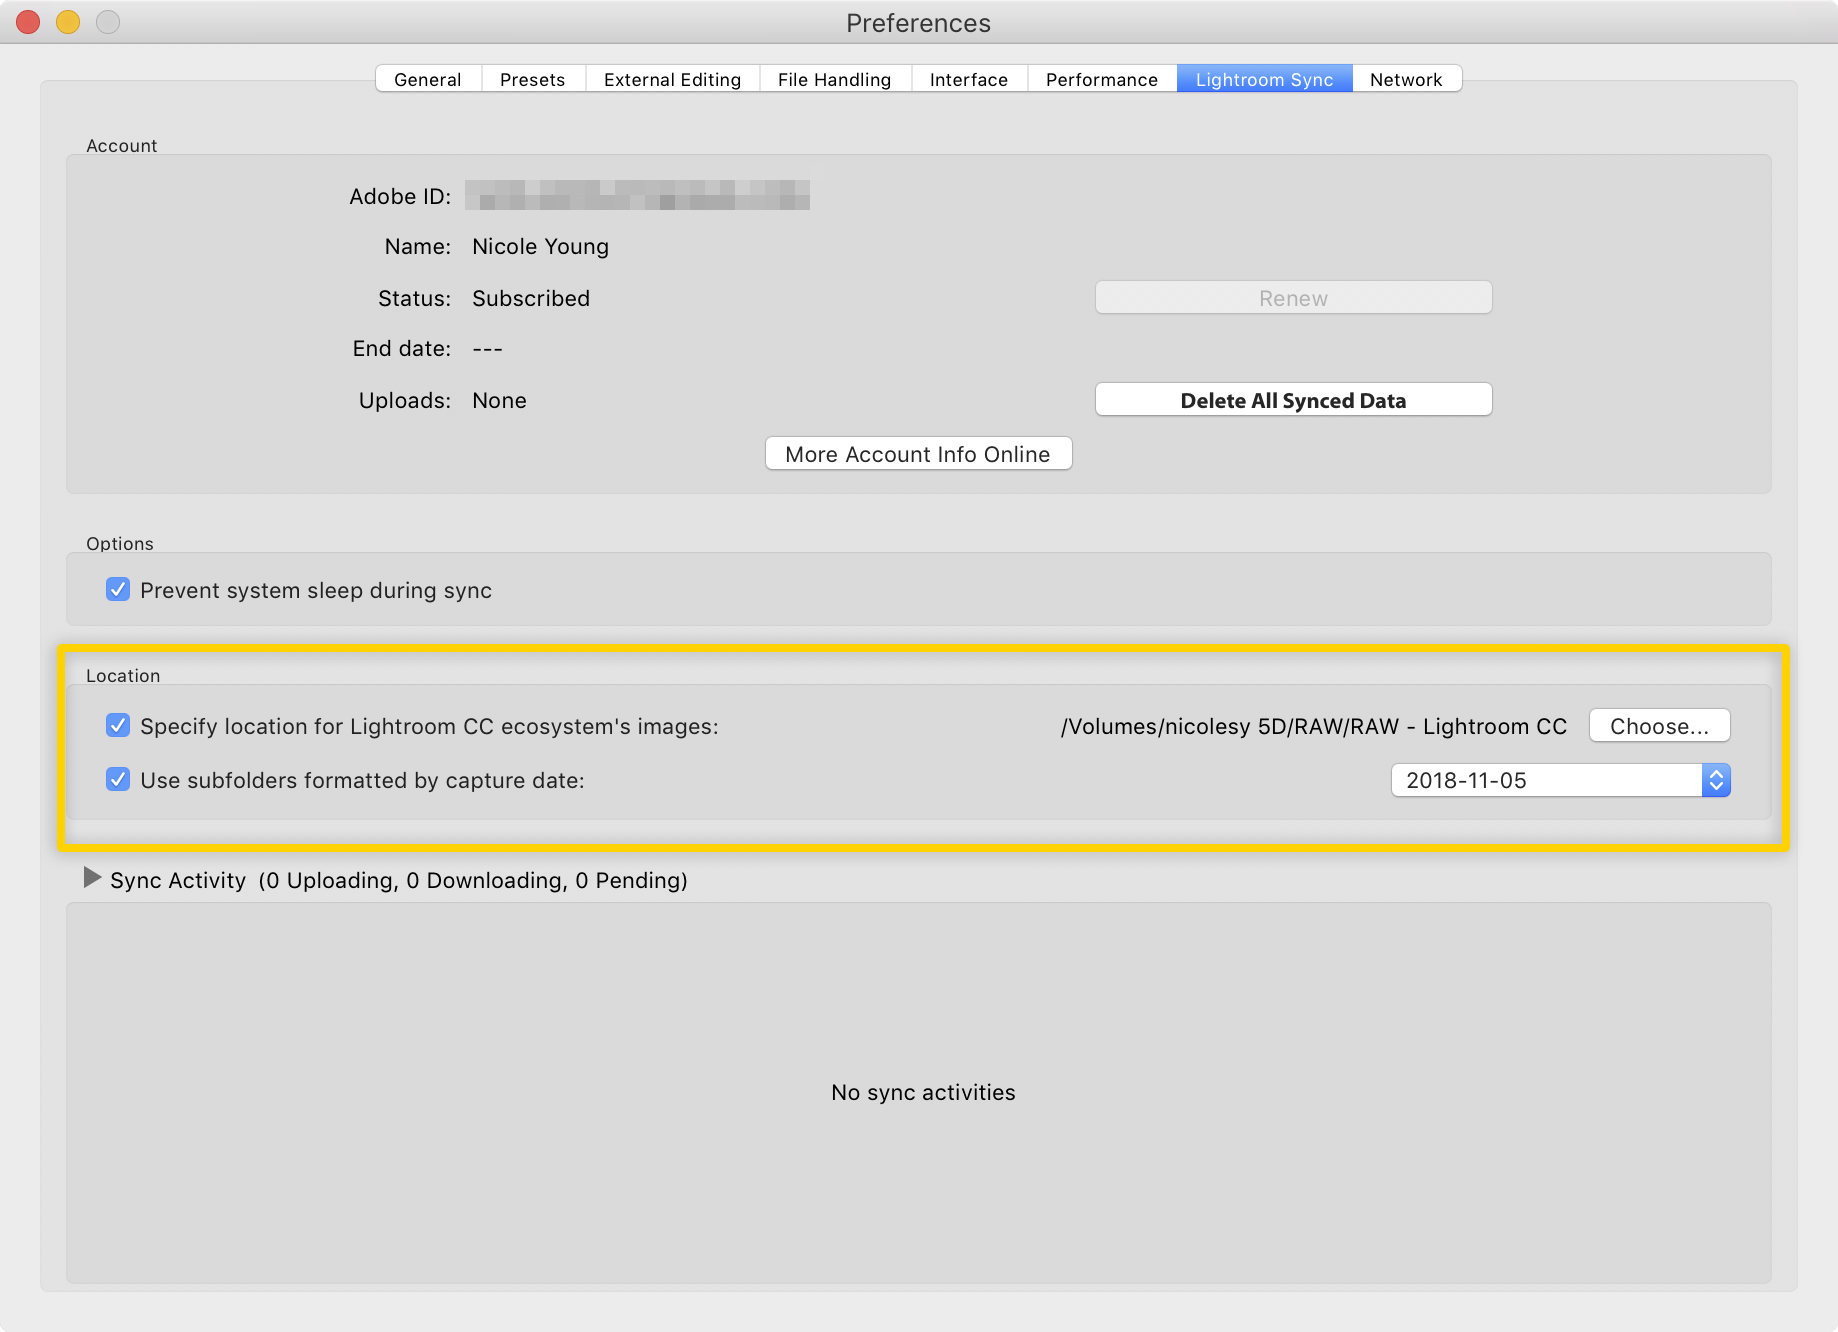
Before I travel I needed to make a few edits to the preferences on my iMac. Because I primarily use Lightroom Classic, I wanted to make sure that the photos I import will be added to my main external hard-drive automatically upon returning home (for me, that’s my Drobo 5D).
By default the Lightroom CC files are automatically synced to a folder within my main HD:
iMac > Macintosh HD > Users > [username] > Pictures > Lightroom
However, I wanted to change the default to an external folder:
iMac > [external HD] > [folder name]
Here’s how change the default Lightroom sync import folder:
- Go to Lightroom > Preferences > Lightroom Sync
- Change the location of the default folder to wherever you want the photos stored. In my case, I created a new folder called “RAW – Lightroom CC” on my Drobo.
Note: You can also do this quickly by locating a folder within your Folders panel, right-click it, and then select “Set as Lightroom CC Downloads location”
Once I get home, I will still need to move the photos into a different folder to organize my files properly. However, doing this ensures that the synced files from my iPad are imported into the proper volume from the beginning, where I know I have enough hard-drive space to hold them.
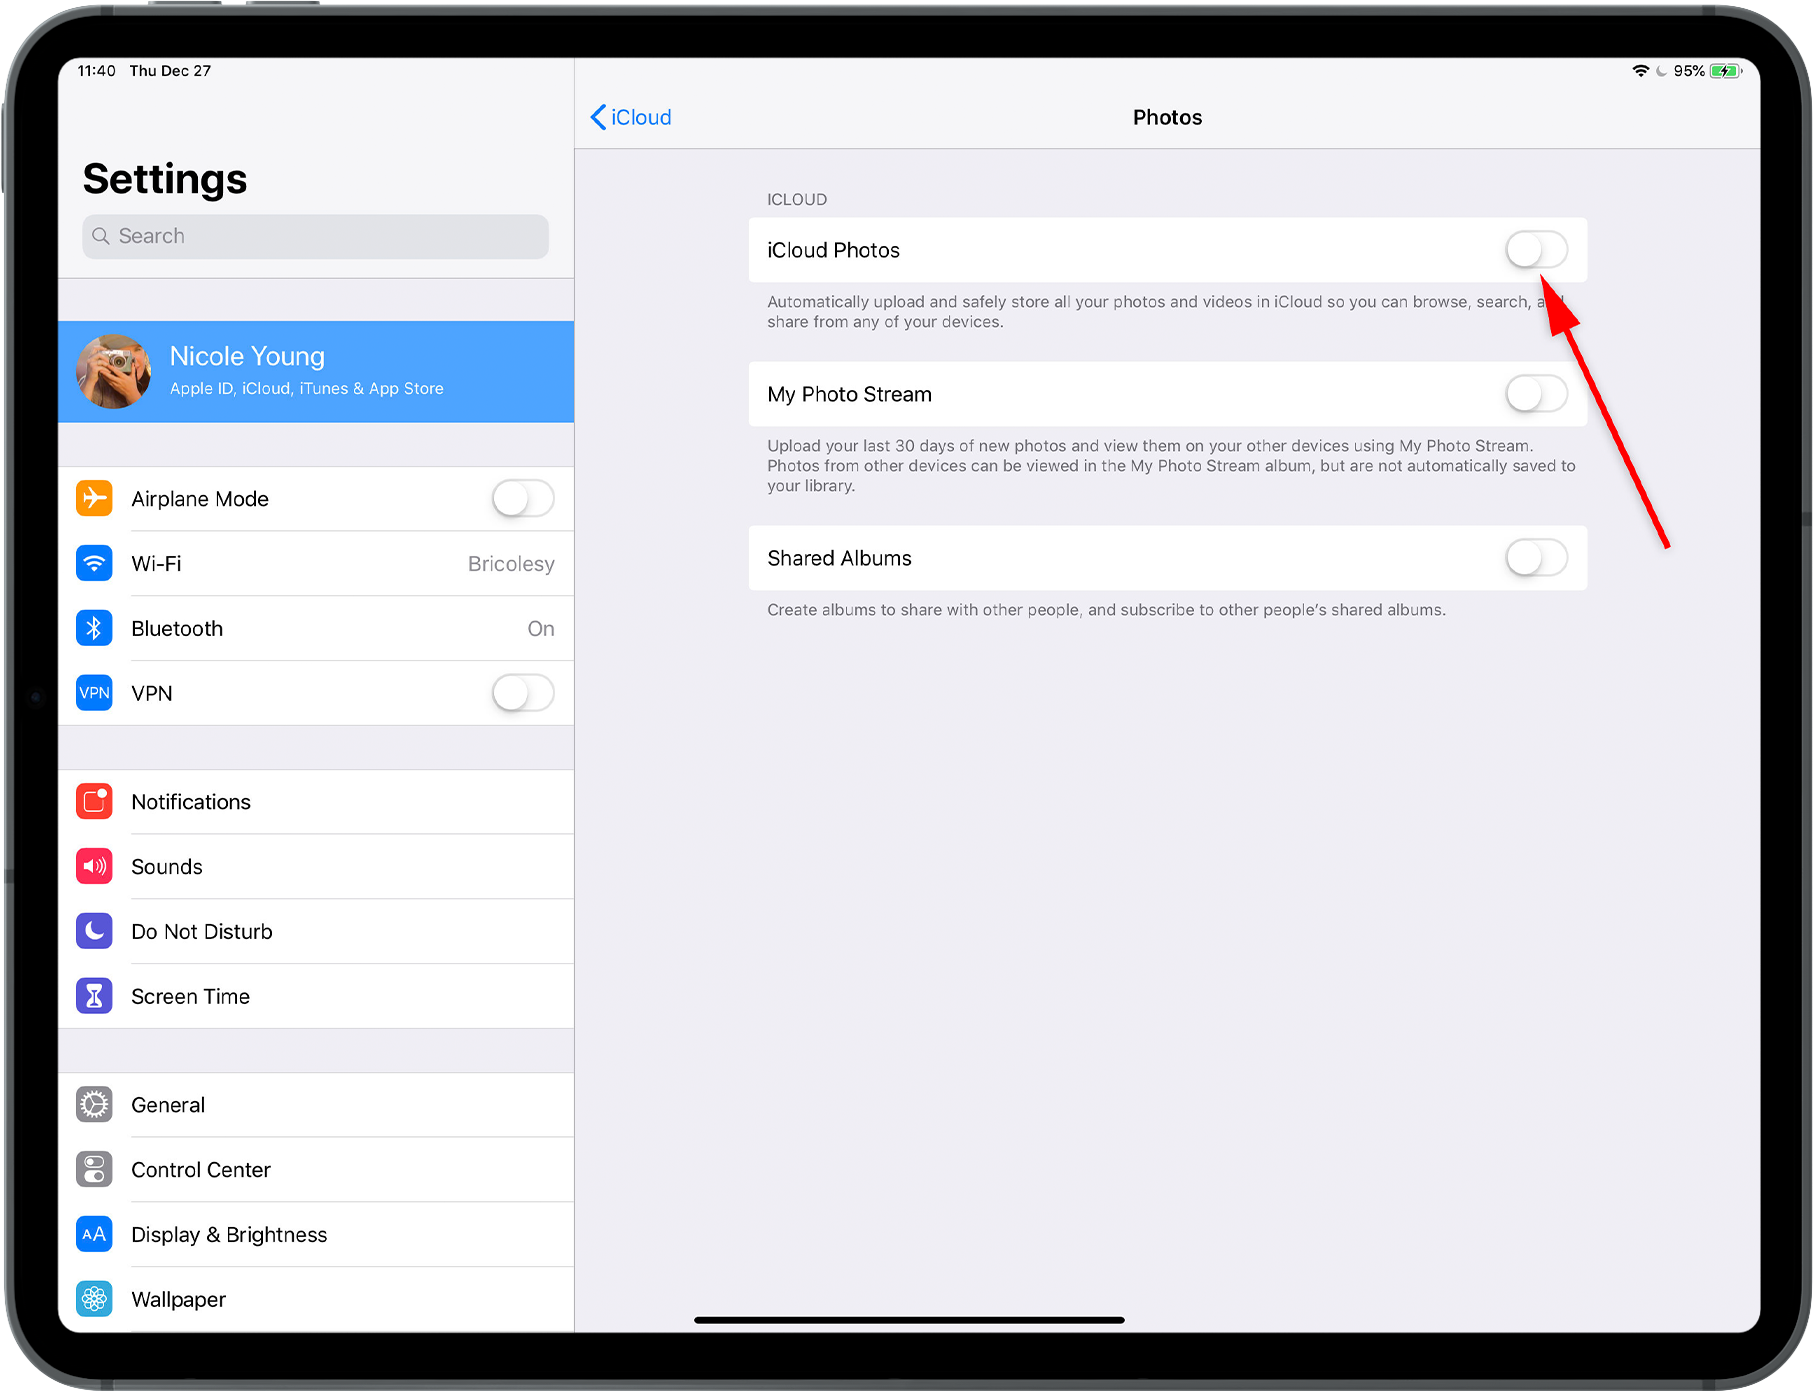
Turn off iCloud Photo Sync
Another thing you may want to do is make sure that the iCloud photo sync is turned off on your iPad. I made this mistake and all of my images synced over to my iPhone once I returned home and had decent WiFi! (If you use other photo backup services, such as Google Photos or Amazon Photos, you may also want to turn those off on the iPad as well.)
To turn off iCloud photo sync, first go here:
Settings > Username (top level in the settings) > iCloud > Photos
Then make sure that the toggle for iCloud Photos is turned off.
While traveling
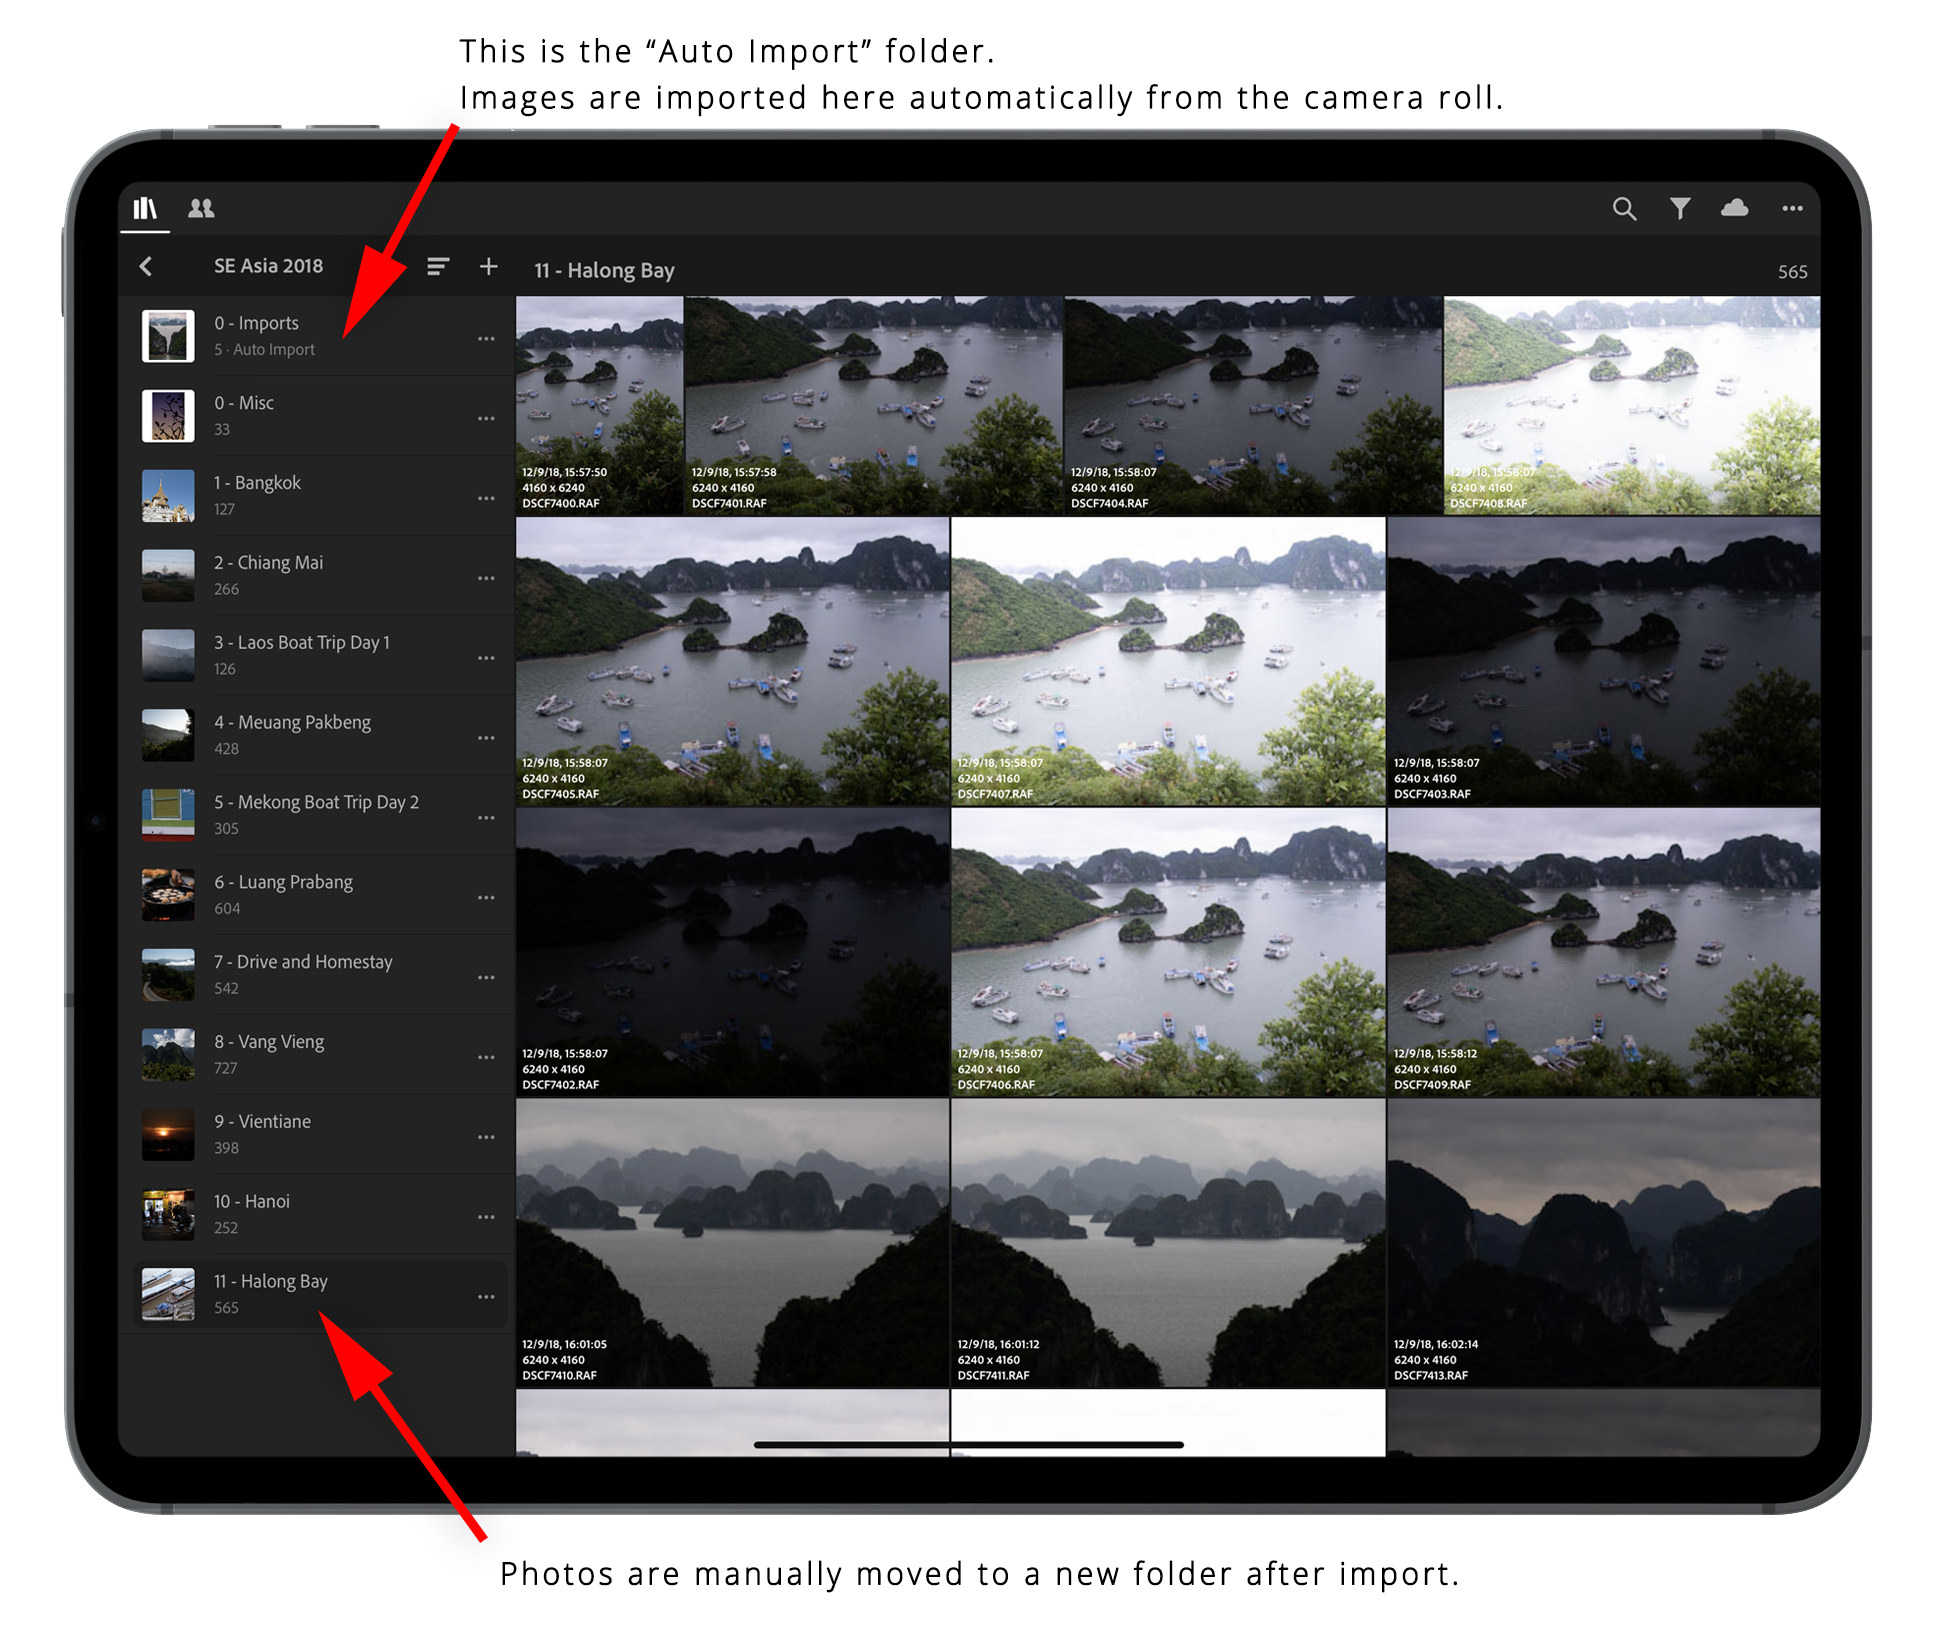
Before you import your photos into the iPad, it’s a good idea to first go into the Lightroom CC app and set up a folder that auto-imports your images. This will save you a LOT of hassle in trying to add your photos to Lightroom when you will be importing photos from a multi-day trip (especially if you don’t format your SD cards regularly).
STEP 1 — Set up an “Import Album”:
- First, open Lightroom CC on your tablet.
- Create a main Folder for your event. My folder for this trip was titled “SE Asia 2018”.
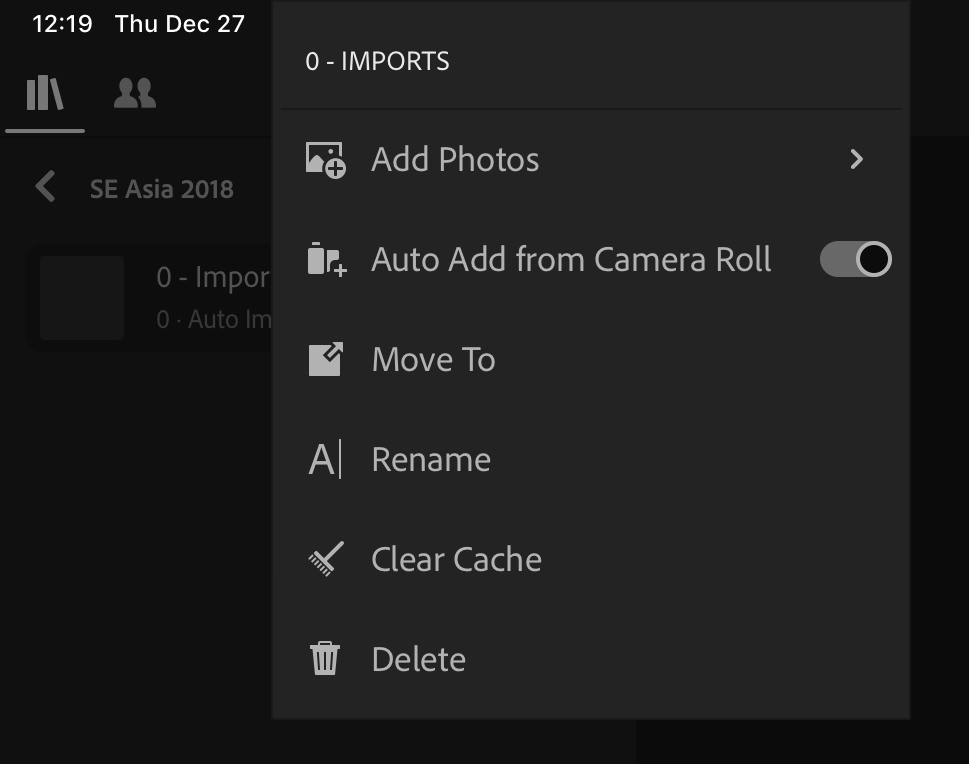
- Create an Album within this folder and give it a title. I simply titled mine as “0 – Imports” to make it easy to locate the files.
- Click on the … to the right of this album name (to open up the options) and turn on the “Auto Import from Camera Roll” option. Now when you follow the steps below, the photos will automatically import into this folder from your camera roll.
STEP 2 — Import the files to your iPad:
Now, after you’ve created some photos with your camera, use the steps below to import the files into your tablet. I did this about once per day.
- Connect the SD card to the iPad.
- Import the photos directly to the Photos album.
- When finished importing, you may want to select the “Keep” option to retain the photos on the SD card. I do this because I prefer to format the card directly on my camera (always the best choice). And I also want to keep those photos on the SD card so that I can import them to my backup hard drive.
STEP 3 — Open Lightroom CC on your iPad:
- The photos will automatically import into the “Import folder” you set up in Step 1.
- Create new Album where you want to add the photos you just imported.
- Open your Import (auto-add) album and select all of the images that were just imported.
- The photo(s) will be imported into Lightroom CC on your iPad, and it will also sync with Lightroom CC on whichever device you have Lightroom installed (phone, laptop, desktop, etc.)
Not only will the photos be imported into the iPad, but I can also flag, rate, and edit the files and all of these changes will sync with the cloud and those changes will also be synced with the final images imported to Lightroom Classic CC on my iMac.
Optional Step
Import a backup of your files to a separate travel hard-drive. I use the WD My Passport Wireless Pro 4 TB.
Additional Method
In a recent Lightroom CC mobile update for iOS (version 4.1.1) Adobe added the ability to use the Shortcuts app to create a shortcut that runs a script to do everything above, including the deletion of the photos from the iPad (but not from Lightroom CC) which you’ll find in the steps below.
To learn more about how this works I suggest you watch this tutorial on how to set this up, and you can also read Matthew Cassinelli’s article about it here.
Speed Up Your Lightroom Workflow
How to use the Shortcuts iOS app to import photos to Lightroom CC and delete them from the Camera Roll.
After returning home
Once I get home to my iMac, the photos first need to fully sync to the cloud before going any further.
Getting files from the iPad to the iMac:
- First, the files need to fully sync from Lightroom CC on the iPad to Lightroom Classic on the iMac. This may take very little time, or quite a while, depending on what the wifi speeds were while traveling, how many photos need to sync, as well as how fast your Internet speeds are at home.
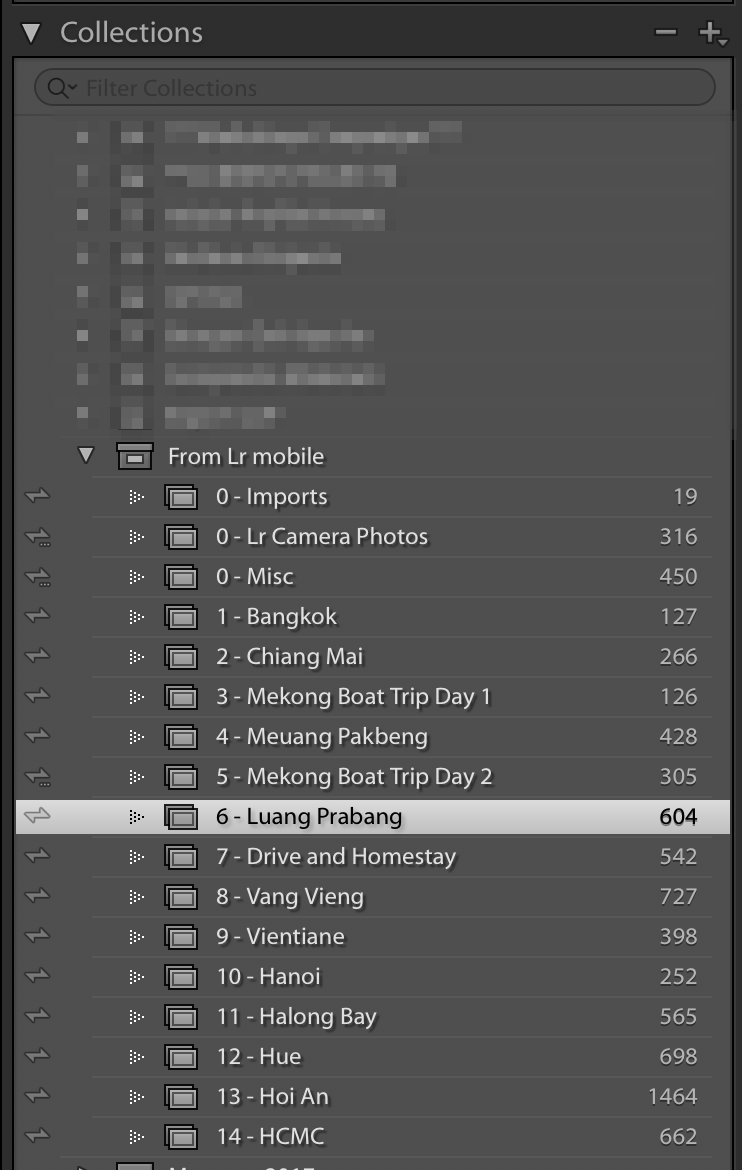
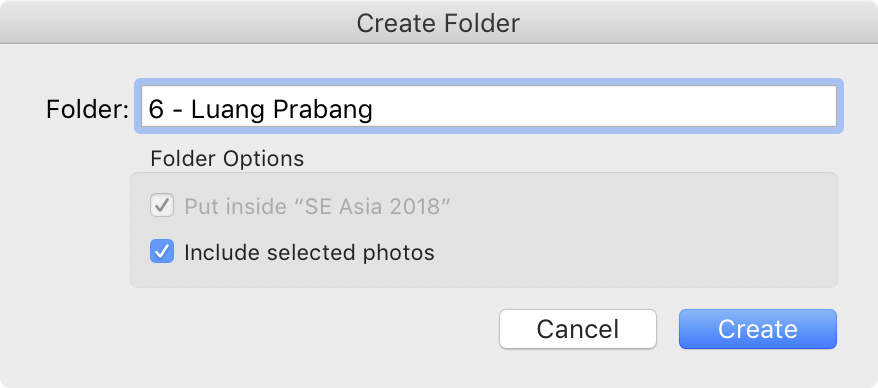
- Next, create a new folder structure within Lightroom. I used the same folder structure that I have my albums/collections set to, and then moved all of the files over to those folders. This removes the files from the default sync folder and to my main raw file storage folder:
And that’s it! Now all of my files are added into my Lightroom Classic catalog with all edits and rating synced.
Optional: Delete the Lightroom CC library
Deleting the photos from the iPad
The very last—and most tedious—step was to remove the photos from my iPad. Because they are already added to Lightroom CC, there’s no reason to keep them in the Camera Roll.
If you prefer to have your photos automatically deleted after importing, you may want to consider using the iOS Shortcuts app to automatically move the photos to the Lightroom CC app and delete them from the camera roll. Watch this video tutorial to learn how to do this.
Some final thoughts
Overall, this whole process worked like a charm. I am very happy with using this and will very likely do so for all of my future photography travels when a laptop is not required. However, there are a few things that didn’t work perfectly—or as I would have preferred—so it’s a good idea to keep these items in mind when using Lightroom CC on a tablet.
- It’s a good thing I opted for the 1TB iPad. After my three week trip I ended up with nearly 8,000 images and 414.24 GB of photos added to my iPad. Anything smaller and I would have been stretched for space (especially since I like to load up my iPad with movies and videos on long trips).
- The album and folder structure within Lightroom CC will not sync over to Lightroom Classic.
- If you shoot RAW+JPEG, please note that the JPEG files will not transfer using Lightroom CC mobile. I sometimes use the “Advanced” filter on my Fujifilm cameras to add a special filter effect to some images, which saves the file as a RAW and a JPEG (the JPEG applies the effect while the RAW is the standard raw file). Lightroom reads these images as the same and will only transfer over the RAW file. The only way I was able to transfer the JPEG was to access it from my backup hard drive and copy it over independently.

Nicole is a photographer, published author, and educator specializing in Lightroom, Photoshop, and photography. She is best known for her books on food photography but is widely versed in various photographic genres, including landscape, nature, stock, travel, and experimental imagery.








How is the preview and import speed from the new iPad? I’ve tried to do a similar plan like you did with my 9.7″ iPad Pro (3 years old now), but it takes a long time to show the photos from the SD card on it. It was too slow once I had a lot of images on my card to really use as a primary trip device. Does the new iPad + USB-C reader work a lot better?
Importing from the SD card is pretty fast. I don’t remember feeling like it was taking a while. I would say it’s probably faster than Lightroom importing on my iMac, but I haven’t run any comparison tests to know for sure.
Great article. I have made the change as well. I am looking forward to Photoshop for the iPad in the next few months. I’ve tried Affinity but have found the import/export process complicated.
Hi Nicole,
Thank you very much for this very nice and practical summary.
Just one question about your edits on the iPad Pro: how did you calibrate the iPad Pro screen to make sure your edits are not to be repeated once you have imported on your PC?
Tx for your insights.
Best regards,
Phil
I don’t think there’s any way to calibrate the iPad screen and use it in Lightroom. (There are calibration apps and devices, but the color management doesn’t work outside of the app.) However, the color rendering on the iPad is pretty good; it may not perfectly match up with my calibrated monitor at home, but in looking at my Instagram photos I shared, I’m happy with how they look.
I have been thinking along the same line although different. I purchased the 11″ iPad pro (might wish I went for the 12.9) with the 256Gb option. I don’t plan to store the images local to the iPad, but instead to a Samsung 1TB ssd that I have attached to a Ravpower Filehub. With this I can backup the SD and wirelessly view and import the files that I choose. When returning home I then simply reattach the SSD and bring the files to my main drive. Having two card slots in my camera I shoot to both and then use one as the spare in case of a failure or loss. Just another option!
Nicole,your posts always challenges me to try something new! Thank you for your concise explanation and great blog post.
This is all great information. I suppose if you have pressing deadlines, you should do what you suggest. But, these days my clients — advertising and corporate — don’t need pictures immediately. If I travel for fun and pictures, I don’t need them immediately. So, rather than sit in a hotel room working on pictures, I prefer to go outside, hang out, get to know the people, get to understand the place where I am. If, I’m not making pictures or hanging, I am learning about the place and planning to hopefully be at the right place in the right light.
I can do all the developing, culling, post at home when I’m working in consistent light, in a familiar place.
Certainly do download and back up your files to a portable HD if you are a little card light. But, even the judgement is out on that with many people feeling that current SD cards are safer in the short haul. Just like batteries, you can never have too many SD cards.
It’s not about needing to access them immediately, but when I travel I always have down-time, or travel time on a train or airplane (some trips more than others). And if I can spend some of that time organizing my images, then I’ll gladly use my time that way.
I realize this is a Lightroom/iPad topic, but since you also tout ON1, is there a similar process with ON1/iPad?
ON1 has an iPad app (only for browsing images, I believe), but it hasn’t been updated since November 2017. I wouldn’t count on it being very useful.
For cost reasons I’ve passed on the iPad pro and use an HP laptop that has a tablet mode. More powerful, though as you mention it’s heavier. For me, the small additional weight isn’t an issue. However, aside from that, my workflow is pretty much identical to what you use and it works great.
Excellent! Yes this workflow works similarly on nearly all devices.
Good article, however, I prefer not to take either a laptop or an iPad and wait until I get home to download and edit my images.
Another great job, Nicole. Congratulations and thank so much for sharing this very precious informations.
Thank you for a wonderful article and follow-up. It includes truly valuable detail for not only how well the process worked for you, but more importantly, how to do it. It’s the rare photographer who doesn’t also travel and have a need to lighten the load.
Beautiful job. Really appreciate the way you have broken down the process and clearly described each element. Moving to an iPad Pro soon, but sadly unlikely to be travelling any time soon. If I do, I will certainly use your approach. Thanks again, Nicole.
Very topical and informative article, thank you! I am currently travelling for a whole year so am amassing an incredible amount of images. I am only using the Lightroom Classic on my laptop, but would like to be able to be a bit more nimble sometimes. Some of my travelling companions are only using Lightroom CC and loving it. But I wasn’t sure about using the two products together, because my Classic catalog is so vast and my workflow so entrenched… I was afraid to make the switch to just CC. Now I don’t have to! And your instructions are very clear and concise. Thanks again!
Thank you for sharing this!
I’m interested in a hybrid of your workflow combined with Brian’s – he likes to keep a full copy of his Classic library sync’d (via Smart Previews) to LR CC. It seems that after deleting the LR CC imports (following their sync to Classic) you could then re-enable them for syncing from Classic which would upload their Smart Previews back to LR CC thereby completing the full collection in LR CC ala Brian’s approach?
Best, Scott
Brian has basically switched completely over to Lr CC, and I think he uses Classic for things that can’t be completed in CC yet. I, however, only use CC temporarily (while traveling or to have a small collection of images accessible at all times). So yes, I do basically what you mentioned … re-enabling some collections to sync to CC. It’s definitely a nice feature to have!
Thanks for the helpful review and I do the same with my workflow so reassuring to read. I only have 80GB free on my iPad but made it work. Can’t justify getting the new iPad Pro. One way I suppose is I used Lightroom Mobile to reject photos immediately after the import. Now for coincidences – last winter we went o SE Asia and I had a similar folder name plus we visited Siem Reap, Luang Prabang, Mekong cruise there, Han Oi, Hoi An, and then on to Borne for the rainforest!
Sounds like a similar trip! Did you go with a group? That’s how I made my way through the region.
I should’ve added I use Fuji raw RAF pics plus an iPhone X. For the latter I really like using LR Mobile – reject photos immediately or shorty afterwards and do some basic to fairly decent editing – e.g. crop, apply a preset, basic light & contrast, and even maybe a radial or linear filter.
Nicole, this post is so timely for me as I am going to France for 10 days in the fall, and I don’t want to bring my laptop.
Is there anyway I can get a printout of this post so I can work with it offline, make notes, try it out, etc. I don’t have an iPad, but I do have an android tablet device / not sure how much storage is on it. I also like the idea of being able to go directly from SD card to an external drive. Didn’t know that was an option.
You’re welcome to print this page; I don’t have a separate printable guide but using “Cmd/Ctrl + P” should allow you to print the article.
Nicole, your article is very interesting to me as I have just started travelling without my MacBook Pro and using my iPad instead to import my photos into LR Mobile. Please can you tell me if there is a way of adding keywords and file names to a group of photos rather than just one at a time.
Hi Belinda, at this time I don’t think it’s possible to batch-apply keywords (there are only a handful of things that you can do in batches so far in Lr CC mobile). Hopefully that feature will be updated soon!
Thank you for a great posting. I set this up and am able to download from my Canon 1D X (which uses CF cards) via cable to a 10.5″ iPad Pro. Apparently some folks are having difficulty downloading from Canon 5D Mark IV and Canon 1D X Mark II to 11″ iPad Pro. Does anyone following this blog have any experience?
I’m trying to figure out a way to add keywords and description to images on the iPad. I haven’t figured out how Lightroom CC will do that on iPad. Suggestions? I’m resigned to muscle-building laptop.
You can do that. To add keywords in Lightroom CC (mobile), open a photo and go to the editing screen. Then click on the top-left drop-down (it will probably say “Edit”) and select “Keywords” to add keywords. However, I think these keywords will only sync with Lightroom CC (not Classic).
Hi. I am trying to find a way to paste a caption text to multiple photos at once. It’s an essential and necessary aspect of my workflow to provide captioned photos to editorial clients. I can see I can do one by one by copying and pasting, but it’s too time consuming when on a deadline. A MacBook Air with LR Classic then would better than an iPad if captioning multiple images at once is not possible
Hi Nicole,
I have been following you from my office in the Pearl!! Am heading off to Mongolia in a month and I have a few questions re: setting up my new iPad Pro. Would you be willing to chat with me??? Wine, Coffee??
Best, Sandy
This is exactly the article that I was looking for. I’ll be trying it when I get my new iPad. Thanks for writing this out!
Hi Nicole,
Thanks to your great post I travelled to Vietnam with my new iPad pro instead of my bulkier 15” Macbook. I followed your workflow advice and it worked like a charm. With the iPad it was really easy to edit the images during our transfers by bus or by plane so that the images were ready when I arrived at home.
Many thanks for your post :)
Claude
Hi Claude, that is so great to hear!! Isn’t it wonderful not having to travel with the laptop?
Thank you very much for your article, it is very helpful. I’m also in the process of switching my workflow from MacBook Pro to iPad Pro when I’m traveling. But one thing is very important to me and it doesn’t seem to work: Applying settings to multiple images at once. As long as that doesn’t work, this solution is not practical for me. I shoot 600 to 1000 images a day, and if I want to apply a quick fix to all images, I need to copy/paste the settings picture by picture. Or do you have a solution?
When I was in Prague, I took BOTH my iPad Pro AND iPad Pro 12.9″ with 512GB storage as this was all that I could get here in Kyrgyzstan. I bought the SD card reader for it and tried it in Kyrgyzstan and it failed! Well, I took it all with me anyway. I actually did a lot of wonderful editing on many files on my iPad and, it was nice to sit in a coffee shop having a sip and munch while editing on this much lighter device. It did not take me long to see some of the things that I can’t do on the iPad; however, it did not hinder me. I just kept the SD cards and then put them on my iPad Pro as well at night when it was not out shooting. It was a productive, as well as wonderful, time. I wish that I had this guide at the time! But, that SD card worked right away in Prague as if the digital demons left me alone for a while. Thank you.
Hi Nicole;
First of all thank you for taking the time to write all this useful information.
Imagen planning on traveling on summer and want to use this same work flow. My iPad is a 256Gb space and I thing I won’t need more space. My problem is with CC space, as I only have 20Gb, how can we sync when this space is full? Can I import more than those 20Gb to my iPad?I know you’ve got tons off space but if you could help…
Thanks again! and cheers from Spain!
Maybe I am too stupid. If I am right then LR CC on your iPad synchronizes automatically to LR CC on your Mac because of the photo plan you have booked. OK. But I haven’t understood how LR CC on your Mac synchronizes with LR classic on your Mac. I used a trial period to do this, but I failed. Finally with a lot of attempts I saw my photos in LR classic, however none of the ratings, tags or keywords I had entered into the CC version were synchronized. The LR catalogues in CC and classic are different. Any idea how to save all the tagging etc. from the iPad to your Mac?
I’m thinking of getting the WD My Passport Wireless Pro 4 TB, which you use. But I’ve read many comments from people complaining about how difficult it is to set up. What was your experience with that?
perfect timing reading this excellent post, I was just pondering , well almost pressing the ‘buy now’ for iPad Pro 12.9, and this article has made my mind up, just one question though, my camera has a a usb-c connector & the iPad also has usb-c so I am guessing I will not require a card reader ? Do you have another reason for using a card reader ? Thanks again
Hi Nicole,
I am new to Lightroom, Classic and CC, can you provide a little more detail on the how you move the photos from the sync folders to your main folder/catalog in Lightroom Classic?
After syncing folders from LR CC, I see both the Newly Created Folders and “Synced Collections” in LR Classic in the Navigator. As expected some of my collections span multiple newly created folders as I have setup up LR Classic to create new folders based on creation date.
I am not clear on what to do next.
Thank you
Eric
Great write up Nicole. Thank you.
One thing that was unclear (to me anyway) is once I open LR Classic on my iMac and the images sync back to the iMac, I don’t want them physically residing in the sync folder. I want to move and rename them to my regular folders and using my standard naming method. So how do you recommend moving the files (is it just Finder and Reconnect in LR) and doing the rename of the physical files?
Thanks heaps!
John
Hi Nicole,
I subscribed to adobe’s 20g photographer program, the problem is that my raw file is significantly more than 20g. Is there any offline way to transfer the raw photos from the iPad back to the computer after my tour ends?
Thanks
Ding
I cannot possibly say “THANK YOU!!!” loud enough! As I was reading your article, I kept say, “that’s me…. that’s me.” I am about to embark on a tour of Northern Europe and decided I want to do my 18-day 6-country trip with only a carry-on. The first thing I did was purchase the new Leica Q2, which allows quality photography with a light-weight fixed lens camera. My next purchase was a new iPad. A bit perplexed about how do make all this work with Lightroom CC, I found your article to be complete and easy to follow. I have no questions now, just praise for your excellent work. Thanks again!
Question: Other than performance, is there anything herein that requires an iPad Pro (as opposed to an iPad amateur)?
Note: In theory, when iPadOS (iOS 13) comes out (September sometime?), it will no longer be necessary to import into Photos. Again, in theory, the Files app will have access to the card reader, so import directly into Lr should be possible.
We shall see…
https://www.idownloadblog.com/2019/06/07/ipados-ios-13-overview-files-app/
iOS 13 now makes it possible to copy from SD cards to laptop hard drives using just a powered USB hub without a computer/PC/laptop/Mac. Finally! I made a how-to video to show how: https://youtu.be/21O64lMAXZk
I recently bought a iPad Pro and I’m trying to move my workflow to a more mobile one, I can’t seem to figure out how to batch rename a group of photos on the iPad anywhere, Lightroom doesn’t have a export option I can find and I can’t seem to find a way to batch Lightroom adjustments on the mobile version either, do you know any work arounds?
This is a great article, we are always looking for ways to lighten our backpacks, that iPad is so thin and appears to work great as a laptop replacement when traveling.
This came in handy setting up my workflow after having bought an iPad Pro just for travel.
One issue I faced is that I’ll need to used a computer to download stuff of Adobe Cloud to back them up in order to free up space for the next batch of files.
Couldn’t figure out a way of doing that with iPad + external HDD – have perhaps found a way to do that?
I mention how I copy the files to my iMac in this article, it’s under the “Getting files from the iPad to the iMac” section. You first need to sync them to Lightroom CC, then locate the files in Lr CC and drag/drop them into a folder on your hard-drive. That doesn’t remove them from the cloud, so you will need to delete the photos from the Lr cloud in order to free up space. I also show how to do this, but it involves deleting the entire Lightroom CC cloud library (so you would need to make sure that ALL of your files are fully transferred over to your hard-drive before this happens).
Helpful article Nicole, but Lightroom CC has been updated. Can you update the article to reflect the changes?
Very interesting, good job and thanks for sharing such a good blog. your article is so convincing that I never stop myself to say something about it. You’re doing a great job. Keep it up.
Hi Nicole
Great article, thanks. As my iMac is fast approaching 10years old and I now spend more time away from home in my motor home than at home, I’m looking to see if I can have an iPad only workflow using LR CC. I will have internet access from time to time so will sync when I can but I’m concerned about iPad storage. When I sync will the original raw files on iPad be replaced by smart previews ?
Regards
Bill
Hi Nicole,
Sorry to bother you, there is only one thing that I didn’t understand (never used lightroom but capture one doesn’t have an ipad app):
-move picture from camera to ipad
-edit on ipad
-go home sync LRcc (move photos on the cloud?)
-from the cloud to an external HD (when you open LRclassic on your laptop)
after that can you cadncencel them from the cloud and keep the things on the HD and edit them again without resending them on the cloud?
I sound like a cave man I guess but I just really hate the idea of using the cloud, if there was a way to just do:
CAMERA->iPAD->EDIT->EXTERNAL HD without any cloud or laptop I’ll be happy.
Thanks for your help
Have a great day!
Hi Nicole,
Like everyone else I’m so delighted to have found this article as It’s very clear and concise.
Unlike everyone else, I have been using LR Mobile for about a year now. As my photography skill improves and my photo collections get larger, I feel like I’m ready to switch to LR Classic and enjoy the many features that are not available (yet?) in LR Mobile.
One question though, you mentioned one of the things that you would need for this workflow is: Computer at home with Internet access and both Lightroom CC and CC Classic installed: I use an Apple iMac.
Does it mean that we’re installing both LR CC desktop and LR classic on 1 computer? i’ve been reading that “Syncing between Lightroom Classic and Lightroom for desktop isn’t recommended on the same computer”. I can’t seem to find the answer as to why this could be a problem and was hoping if you could shed some lights.
Thanks!
How fast is processing on the iPad? I tried to export 90 photos from Lighroom Mobile on my iPhone XR and it took one hour! Is it better on iPad?
I agree with Bill. With the new updates to Lightroom, any chance of updating this article?
I’ll have to look into the updates to see what would need to be changed in the article … not sure if it’s something I currently have time for but I’ll see what I can do!
I shoot with Canon 5DM4 and use both a SF and SD card. Can you download images from a CF card onto the ipad pro and then into LR? I have the adobe subscription, and a iMac 27 i desktop that I use for my photo needs. But I will be moving from Pennsylvania to Oregon, and my desktop will probably be in storage for 3 or more months, so I wanted something that would work in the interim.. I know I coud buy a laptop, but wasn’t lookking to duplicate a computer. An iPad would be a nice addition, if I can download my images while traveling.
Thank you for any suggestions
When I wrote this article, the method I used was to transfer the photos directly from my SD card using the card reader connected to my iPad. They get stored in Lightroom on the iPad and then sync to the cloud. But I have not done this method in some time so I’m not sure if things have changed with the update.
Hi Nicole, currently trying your workflow and I have some questions. When I create a new folder within my external hard drive, and include photos from the LR Synced Collection (From LR mobile) does it mean that they are exactly the same file of photo? I tried to make an edit to one of the photos that is inside the hard drive folder and the edits seem to be syncing to the Synced Collections, and vice versa.
Once I’ve moved the photos to my external hard drive, how do I make sure that when I delete the Synced Collections (to make up for more space), it doesn’t delete the photo from my external hard drive?
I think that once the photos are moved out of the normal “Lr mobile” synced location (such as, to an external HD), they are no longer the original photos from your mobile app. As for deleting them, I suggest doing a test delete (get rid of one that you don’t care about) and see what happens. The Lr CC/Classic workflow has changed slightly since I wrote this article so I don’t have an exact answer for you, and I only use this workflow when I travel and I have not traveled in quite some time so I’m not fully up to speed on the workflow.
Thanks for this, Nicole…
My wife and I run a travel blog and I presently do everything in Lightroom Classic. I am considering switching to the Lightroom CC plan that includes 2TB of storage after Adobe added the ability to share presets across devices. This would also allow my wife to access the library on her devices as well.
What are your thoughts on being able to make this work in a travel environment (spotty/nonexistent Wifi)?
Thanks for your advice.
I would say that so long as your iPad/device has enough storage to hold all of your images, then you will probably be okay. If your internet is spotty then it will not update to the cloud immediately or accessible on other devices, so they won’t be backed up until that happens. But if you have moments when you can do a big “dump” to the cloud then it might work.
Dear Nicole,
Thanks for sharing your setup, it is very helpful!
Please, can you help me better understand the last point?
How do you move all the files to the new structure folder? Do you move them from the iPad to the iMac? How?
Next, create a new folder structure within Lightroom. I used the same folder structure that I have my albums/collections set to, and then moved all of the files over to those folders. This removes the files from the default sync folder and to my main raw file storage folder:
Dear friend, I always visit your site. Your site is excellent and informative. Your site address was introduced by a friend of mine. I was able to introduce your site to some of my friends.
Good luck
You can click on our site for information and transfer of your goods
Thank you very much
Hi Nicole! When you get home and download everything to your computer, are you able to generate the sidecars files (xmp)? Thanks!
Hi Nicole…
Excellent article on travel work flow with iPad using LR CC and Classic. I was contemplating how to approach travelling light as aging pays a toll on your back. After 3 years COVID hiatus went back on the road to Europe for a 3 weeks sample decided to apply your work flow. Returning with 5k plus images have to say your method works like a charm, travelled with an iPad Pro 11in 512g storage.shooting only Fuji RAW.
Where I had to modify due to some usb-C issues ended up uploading most of the images to Adobe Cloud .
Storage rather than the external SSD HD I brought. When back home I moved images from SYNCED LR Mobile Folder to LR Classic and store such images on home external drive.
Sorry about this silly question …should I delete the Folder and albums from the trip stored in LR CC(mobile) and images in Adobe Cloud if not needed to gain space. And as well will start a collection from LR Classic to have access in LR CC
Sorry for the long write up….but feels so good someone had the same travel photography issues and found a solution to the problem.
I’m so glad this method works for you! Regarding your question about your photos in the Lightroom cloud: if you don’t use the Lightroom (cloud) app to store any other photos, and all of your photos are safely stored on another hard drive location, then you should be safe to delete the cloud files. I pretty much only use Lightroom Classic, so I don’t have much of a problem with deleting the cloud data. BUT, if you have ANYTHING stored exclusively in the Lightroom cloud, it will be erased. So just double-check all of your files to make sure you don’t lose anything before deleting.