We all want tack-sharp images. Our cameras & lenses can only do so much for us, and once a photograph is out of the camera, the process of sharpening has really just begun. And because I use Lightroom for nearly every single photograph I process, I’m going to share with you my method of sharpening in Adobe Lightroom’s Develop module. But before we begin, there are a few things to keep in mind:
- Every photo, even if it is tack-sharp out of camera, can benefit from sharpening.
- You can’t sharpen a photo that is out-of-focus. Sure, you can add sharpening in post-processing, but all you will be doing is sharpening blurred-out pixels.
- You don’t need to sharpen the entire image. In fact, you typically will not want to. Selective sharpening, or even masking your images (as I will demonstrate below), is usually the best way to go.
- If you are going to print your photos, sharpen them! It should be the last thing you do in your post-processing workflow.
Now that we’ve covered the basics, here is a very simple step-by-step on how to sharpen your images in Adobe Lightroom.
Sharpening in Lightroom’s Develop Module
Step 1 — Masking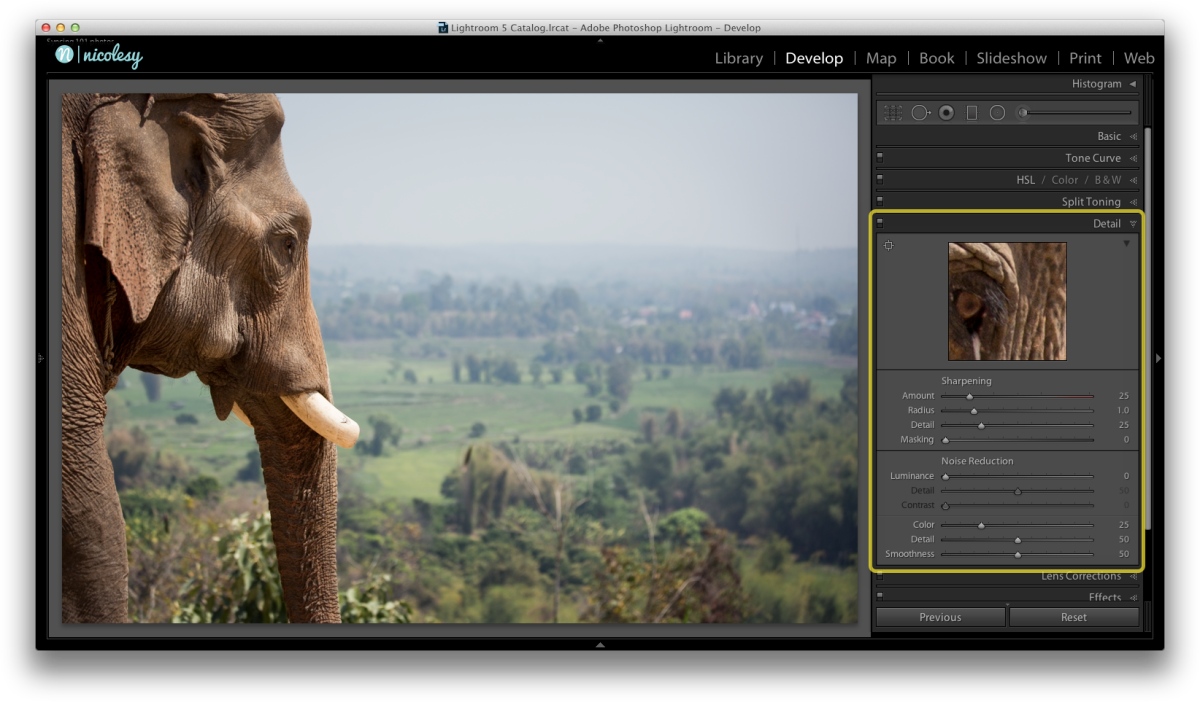
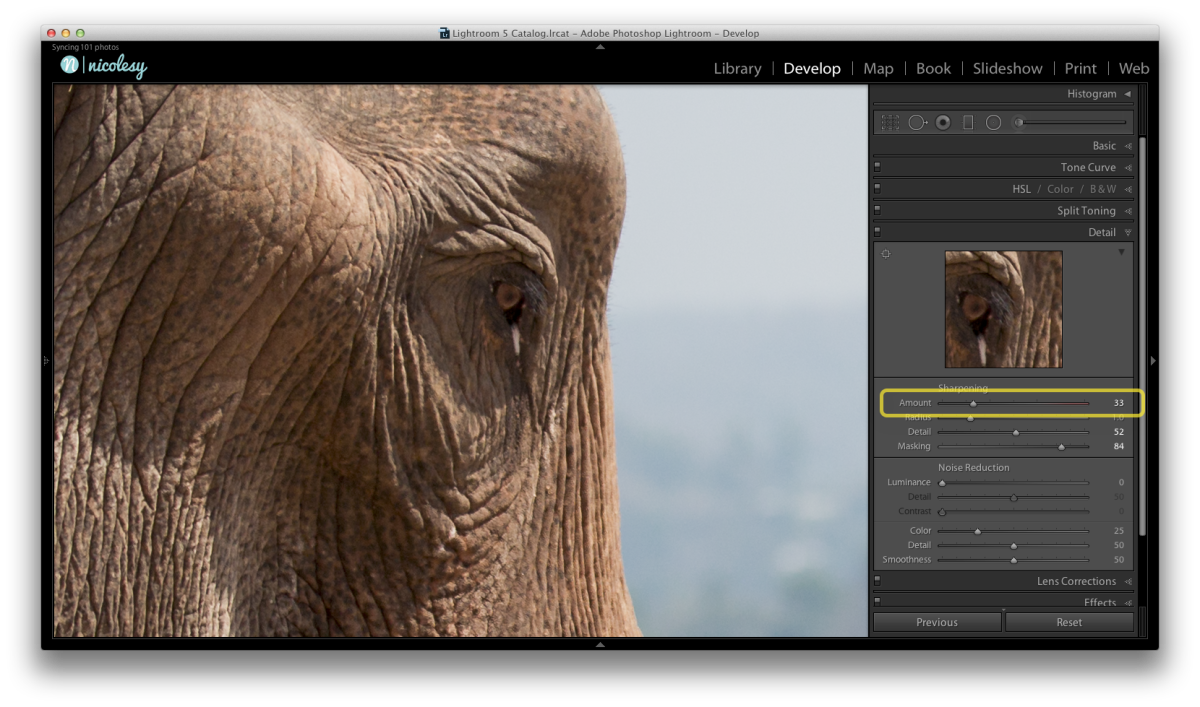
I’m going to start out by opening my image into the Develop module, and make sure that the Detail panel is in view. My preference for sharpening my images is to start at the bottom and work my way up, so for this tutorial we’ll start with the Masking slider. This slider, when pushed to the far left, is set so that the entire image will sharpened. As you move the slider to the right, it masks out everything but the edges. This way you can selectively adjust ONLY the edges of your image.
In this image of an elephant in Thailand, the background was blurred out and I do not want to sharpen the burry areas. The masking slider allows me to only sharpen the areas that already have crisp edges.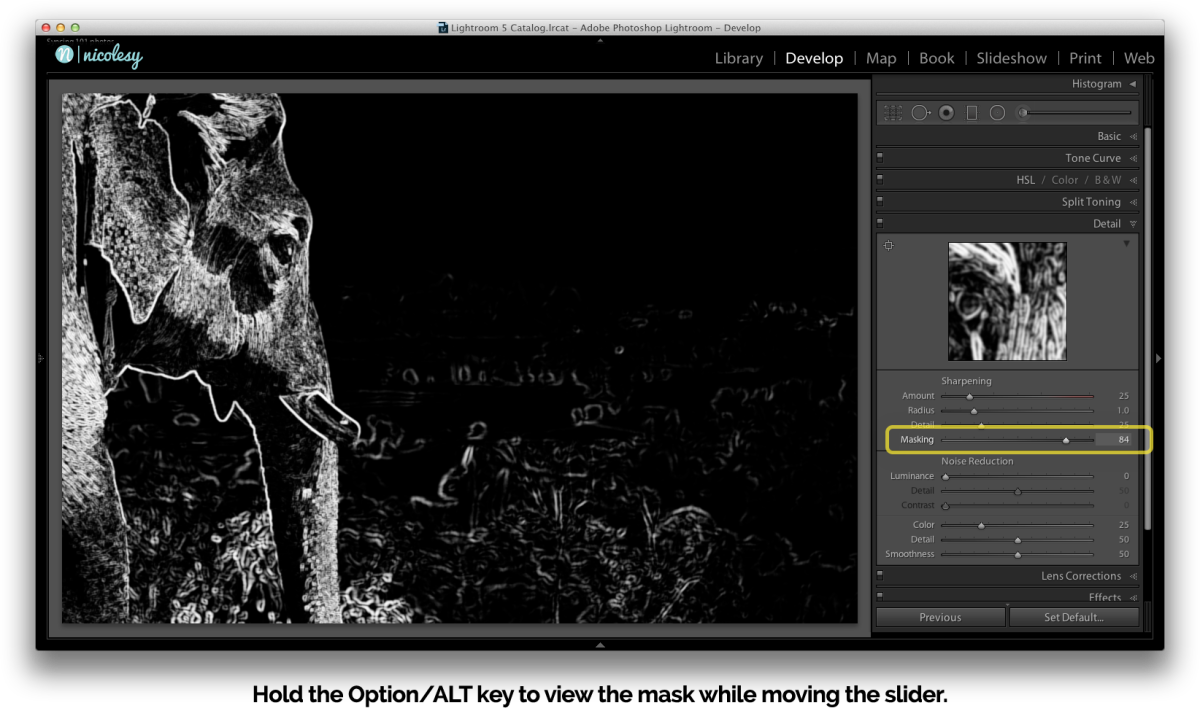
TIP: If you were to move this slider back-and-forth, you may wouldn’t see any immediate changes. The key to this slider is to press-and-hold the Option/ALT key down while moving it so that you can view the actual mask change. The white areas of the preview are the areas that will be sharpened, while the black areas will remain untouched by the sharpening adjustments.
Step 2 — Detail
When you use the Detail slider, think “edges”. This slider will sharpen and intensify the edges of your image. If you have a highly textured image, it will emphasize the texture and give your image a much more grungy look.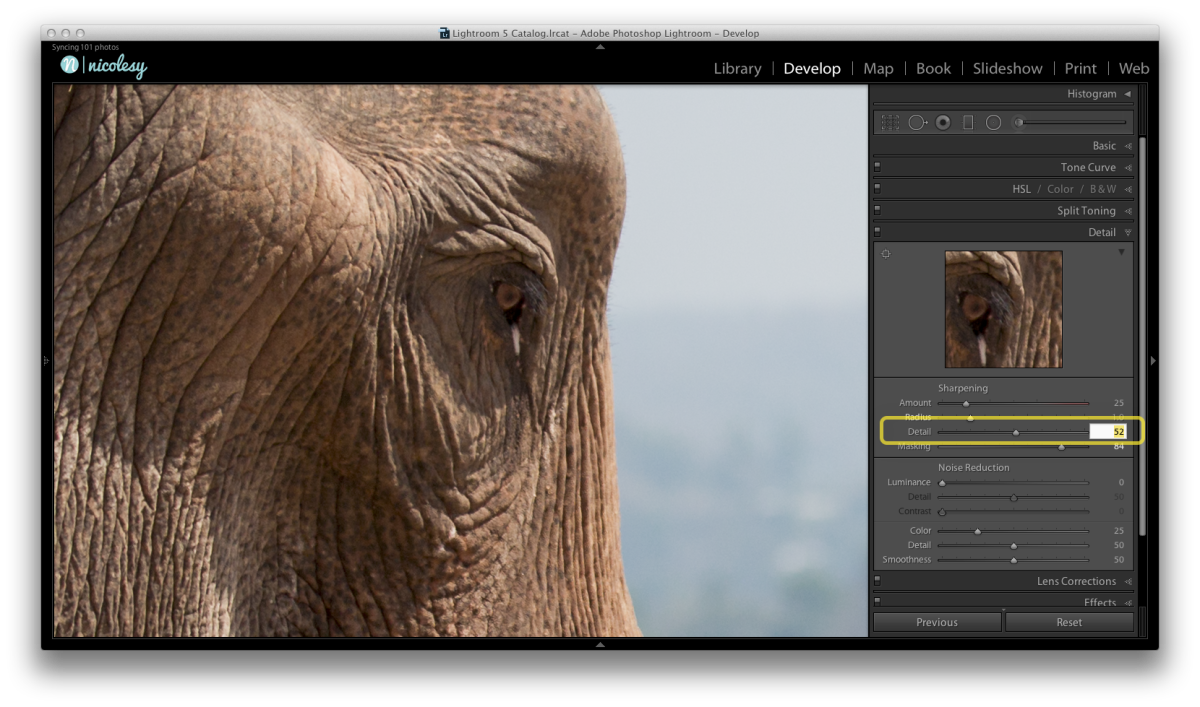
Tip: Zoom in to your photo at 1:1 view so that you can see the changes taking place as you make your adjustments.
Step 3 — Radius
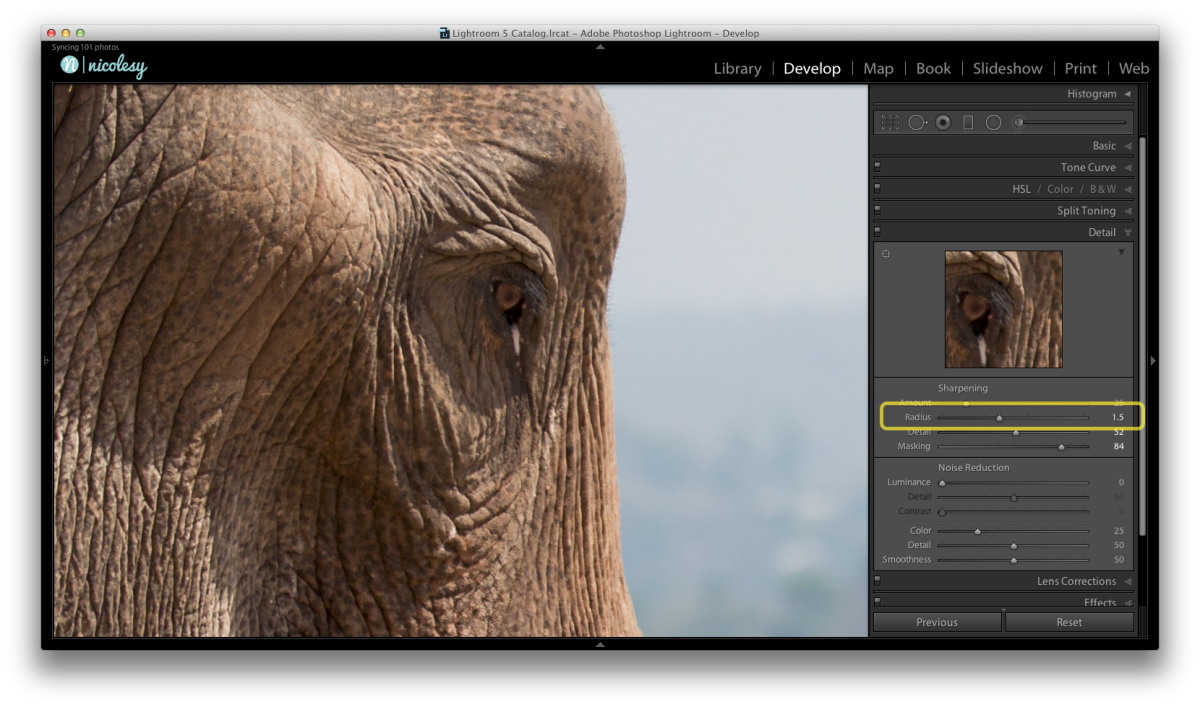
Next is the Radius slider. This slider will increase the size of the sharpened details in your image. A good rule of thumb to stick to is this:
- Photos with small details (such as a field of grass, or a highly-textured surface) should be set to a lower number.
- Photos with larger details (such as a photo of a car or smooth surface) can tolerate a little bit higher Radius setting.
Step 4 — Amount
The Amount slider will adjust the amount of the overall sharpening inside of Lightroom. When set to zero, no sharpening will be applied. I have this step listed as the last step, but you can start at a higher number before you start with “Step 1”, and then just make adjustments to after you have finished working the other sliders.
After you have walked through each of the steps above, go back and make subtle adjustments to each slider as-needed to perfect the sharpened look.
TIP: It’s important that you not set the sliders too high (with the exception of the Mask slider). Doing so may over-sharpen your images and give unnatural-looking results.
Tips for Success
Use the Option/ALT Key!
As I mentioned in the steps above, one of the best ways to visually view how much you are sharpening your photos is to hold down the Option/ALT key while making adjustments. It works for every single slider in the Sharpening section! Go ahead, give it a try. You just have to make sure that you press and HOLD the Option/ALT key while moving the slider to see the effect.
Basically, what you are viewing is a black-and-white visual of the effects. Seeing these changes in black-and-white gives you a clearer representation of how much sharpening you are actually applying while moving the sliders. (Click the image below to view larger.)
Set your Detail Zoom Area
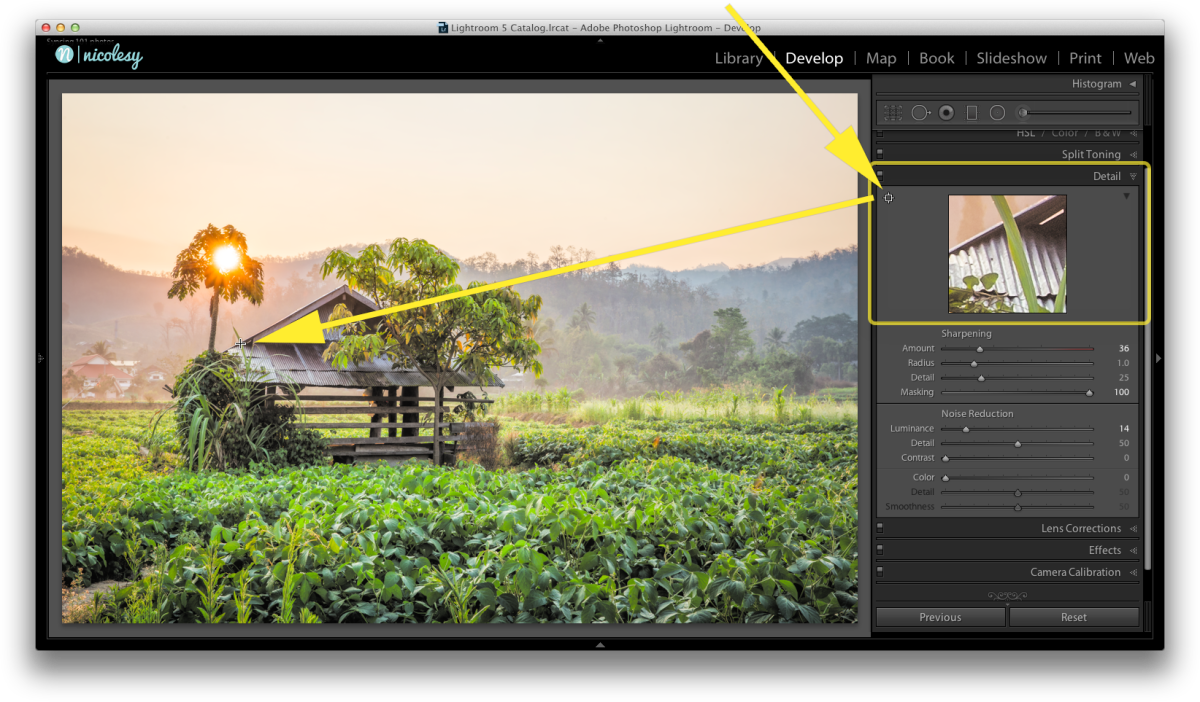
If you look in the upper-left section of the Detail panel, there is a cross-hairs icon. Click on it, and then click on an area in your image that you want to watch while setting the sharpening settings. My advice is to find an “important” area, such as the eyes or the most in-focus spot of your photograph.
Beware of Artifacts
After you have made your sharpening adjustments, be sure to scan through your entire image at 100% (the 1:1 magnification setting in the Navigator panel on the top-left of your screen) to ensure that you did not add any unwanted artifacts to your image. These artifacts will appear if you over-sharpen your image, and they are pretty easy to spot once you know what to look for. Just watch out for splotchy pixelated blobs along the edges of your images. In people, you’ll definitely want to check the eyes.
Here are a few images that demonstrate over-sharpening an image (click on the photo to view larger). This is what NOT to do!
Save Your Sharpening Settings as a Preset!
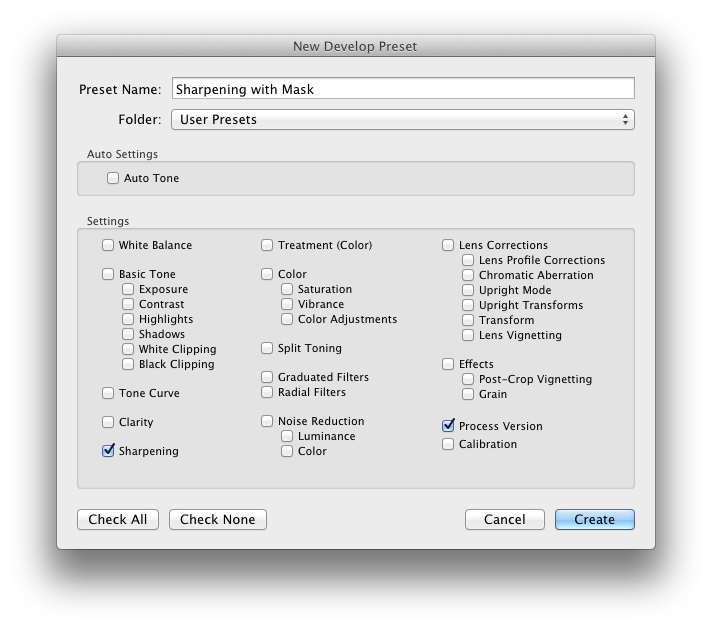
Last but not least, save these sharpening settings as a preset so that you can reference them on other images. Here’s how:
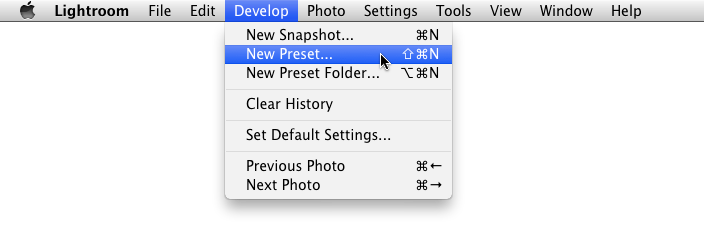
1. In the Develop Module, go to the menu and select “Develop > New Preset…“.
2. Then, give your preset a name and select a category.
3. Because you only want to save the sharpening settings, make sure that the only boxes checked are the “Sharpening” and “Process Version” options.
4. Click CREATE and your preset will now appear in the Presets panel.
We all want tack-sharp images. Our cameras & lenses can only do so much for us, and once a photograph is out of the camera, the process of sharpening has really just begun. And because I use Lightroom for nearly every single photograph I process, I’m going to share with you my method of sharpening in Adobe Lightroom’s Develop module. But before we begin, there are a few things to keep in mind:
- Every photo, even if it is tack-sharp out of camera, can benefit from sharpening.
- You can’t sharpen a photo that is out-of-focus. Sure, you can add sharpening in post-processing, but all you will be doing is sharpening blurred-out pixels.
- You don’t need to sharpen the entire image. In fact, you typically will not want to. Selective sharpening, or even masking your images (as I will demonstrate below), is usually the best way to go.
- If you are going to print your photos, sharpen them! It should be the last thing you do in your post-processing workflow.
Now that we’ve covered the basics, here is a very simple step-by-step on how to sharpen your images in Adobe Lightroom.
Sharpening in Lightroom’s Develop Module
Step 1 — Masking
I’m going to start out by opening my image into the Develop module, and make sure that the Detail panel is in view. My preference for sharpening my images is to start at the bottom and work my way up, so for this tutorial we’ll start with the Masking slider. This slider, when pushed to the far left, is set so that the entire image will sharpened. As you move the slider to the right, it masks out everything but the edges. This way you can selectively adjust ONLY the edges of your image.
In this image of an elephant in Thailand, the background was blurred out and I do not want to sharpen the burry areas. The masking slider allows me to only sharpen the areas that already have crisp edges.
TIP: If you were to move this slider back-and-forth, you may wouldn’t see any immediate changes. The key to this slider is to press-and-hold the Option/ALT key down while moving it so that you can view the actual mask change. The white areas of the preview are the areas that will be sharpened, while the black areas will remain untouched by the sharpening adjustments.
Step 2 — Detail
When you use the Detail slider, think “edges”. This slider will sharpen and intensify the edges of your image. If you have a highly textured image, it will emphasize the texture and give your image a much more grungy look.
Tip: Zoom in to your photo at 1:1 view so that you can see the changes taking place as you make your adjustments.
Step 3 — Radius
Next is the Radius slider. This slider will increase the size of the sharpened details in your image. A good rule of thumb to stick to is this:
- Photos with small details (such as a field of grass, or a highly-textured surface) should be set to a lower number.
- Photos with larger details (such as a photo of a car or smooth surface) can tolerate a little bit higher Radius setting.

Step 4 — Amount
The Amount slider will adjust the amount of the overall sharpening inside of Lightroom. When set to zero, no sharpening will be applied. I have this step listed as the last step, but you can start at a higher number before you start with “Step 1”, and then just make adjustments to after you have finished working the other sliders.
After you have walked through each of the steps above, go back and make subtle adjustments to each slider as-needed to perfect the sharpened look.
TIP: It’s important that you not set the sliders too high (with the exception of the Mask slider). Doing so may over-sharpen your images and give unnatural-looking results.
Tips for Success
Use the Option/ALT Key!
As I mentioned in the steps above, one of the best ways to visually view how much you are sharpening your photos is to hold down the Option/ALT key while making adjustments. It works for every single slider in the Sharpening section! Go ahead, give it a try. You just have to make sure that you press and HOLD the Option/ALT key while moving the slider to see the effect.
Basically, what you are viewing is a black-and-white visual of the effects. Seeing these changes in black-and-white gives you a clearer representation of how much sharpening you are actually applying while moving the sliders. (Click the image below to view larger.)
Set your Detail Zoom Area
If you look in the upper-left section of the Detail panel, there is a cross-hairs icon. Click on it, and then click on an area in your image that you want to watch while setting the sharpening settings. My advice is to find an “important” area, such as the eyes or the most in-focus spot of your photograph.
Beware of Artifacts
After you have made your sharpening adjustments, be sure to scan through your entire image at 100% (the 1:1 magnification setting in the Navigator panel on the top-left of your screen) to ensure that you did not add any unwanted artifacts to your image. These artifacts will appear if you over-sharpen your image, and they are pretty easy to spot once you know what to look for. Just watch out for splotchy pixelated blobs along the edges of your images. In people, you’ll definitely want to check the eyes.
Here are a few images that demonstrate over-sharpening an image (click on the photo to view larger). This is what NOT to do!
Save Your Sharpening Settings as a Preset!
Last but not least, save these sharpening settings as a preset so that you can reference them on other images. Here’s how:
1. In the Develop Module, go to the menu and select “Develop > New Preset…“.
2. Then, give your preset a name and select a category.
3. Because you only want to save the sharpening settings, make sure that the only boxes checked are the “Sharpening” and “Process Version” options.
4. Click CREATE and your preset will now appear in the Presets panel.

Nicole is a photographer, published author, and educator specializing in Lightroom, Photoshop, and photography. She is best known for her books on food photography but is widely versed in various photographic genres, including landscape, nature, stock, travel, and experimental imagery.






Traditional sharpening filters are useful up to a point, but cameras and lenses are improving all the time. So for me the best way to sharpen an image is to use D&B to manipulate form shadows, and then use Colour grading as a precise edge separation technique. I understand that all this means far more time spent in post (Photoshop). However, to my eye, colour modifications, guided by colour theory, make for a balanced and natural look. By first using a traditional sharpening filter with a very light touch in combination with definition (light/dark/contrast) and colour adjustments, provides an alternate way to sharpen images. The amalgamation of these processes significantly boosts the image, on screen and in print; up or down scaled.