I do a lot of landscape photography, and with that, I also do use HDR to make some of my images. I do my best to keep the processing as minimal as possible, without “nuking” or over-saturating the end result. It can be easy to be heavy-handed with HDR processing, so in this article I wanted to share my process and what I do to make my photographs look their best.
Step 1: Bracket Your Exposure
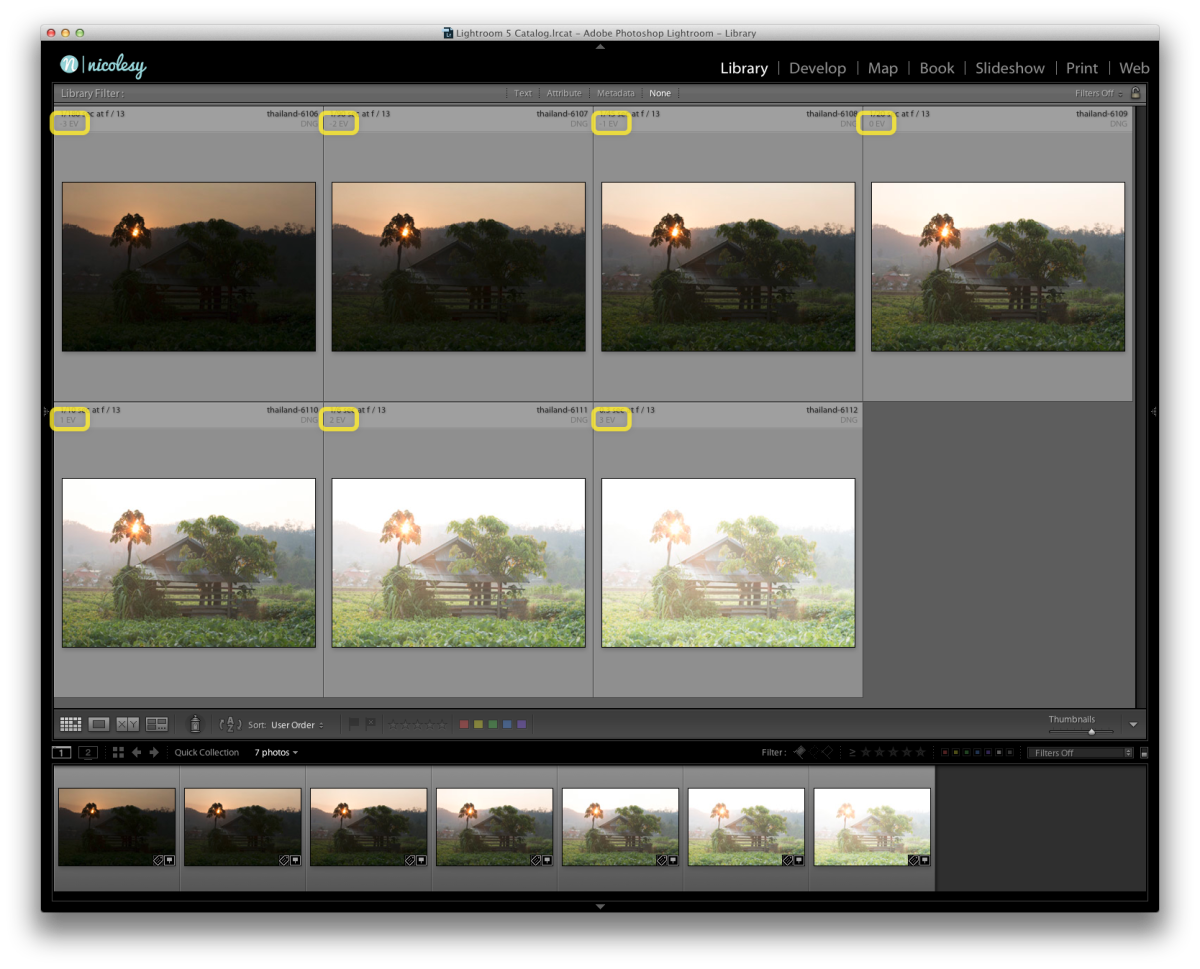
In order to process a photo with HDR, you need to photograph it the right way. By “right way” I am referring to bracketing your exposures and having at least three photographs to work from (in this example, I have seven). When you bracket your exposures, it means that you create several frames of the same at different levels of exposure. In this example, I have a set of seven photographs exposed from -3 EV to +3 EV, which means that three of them are underexposed (-3, -2, -1), one of them is exposed as the camera thought it should be (0), and three of them are overexposed (+1, +2, +3).
To set up your camera for photographing bracketed images, please refer to your user’s manual.
Step 2: Set up Lightroom to edit as TIFF files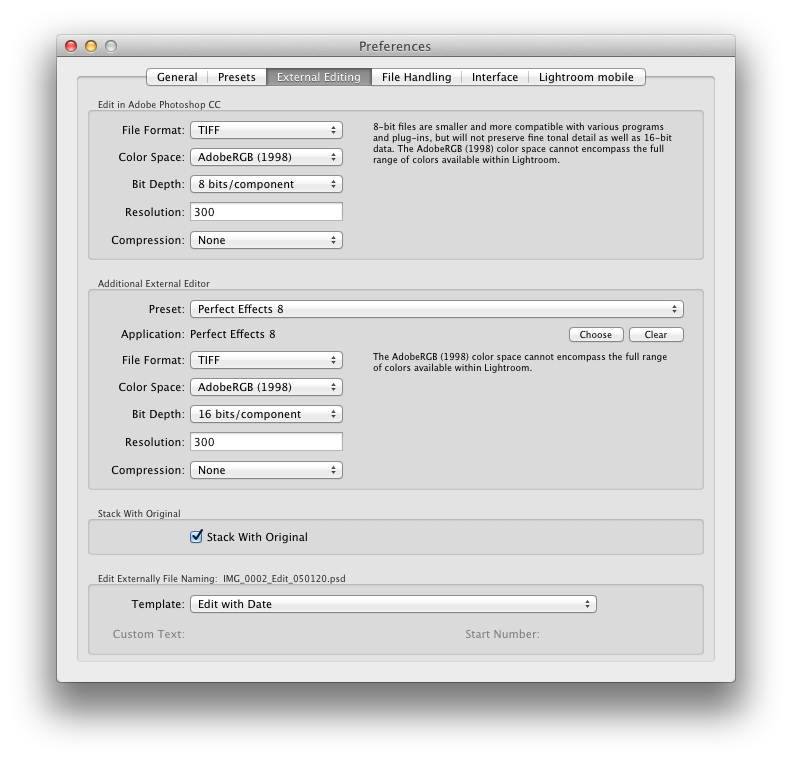
In order to take full advantage of HDR processing using Lightroom and Photoshop, then you will definitely want to make sure that your settings are set up properly. What I love about the little “HDR dance” that these two programs perform is that it allows you to start in Lightroom, merge the files to Photoshop, then back into Lightroom with a file that has SO MUCH exposure data inside of it. The way to do this properly is to make sure that you are working with TIFF files once the images go into Photoshop:
- First, go to the Lightroom Preferences window:
• Mac: go to Lightroom > Preferences
• PC: go to Edit > Preferences - Then, click on the “External Editing” tab.
- Make sure that the “File Format” at the top is set to “TIFF”. This will allow your photographs that are processed as HDR in Photoshop to retain all tonal data from the multiple exposures.
Step 3: Use Lightroom to Prep You Photographs for HDR
When I process an HDR photo, my preference is to start them all inside of Lightroom. When you process your images, it is very important that the only setting you change is the white balance. And, if you change the white balance in one image, you need to change it with all of them so that they are identical. Don’t touch anything else, especially the tone settings! (Ok, you can adjust the lens correction, just make sure that they are all corrected the same way.)
One really good way to do this in Lightroom is in the Library Module’s “Quick Develop” panel:
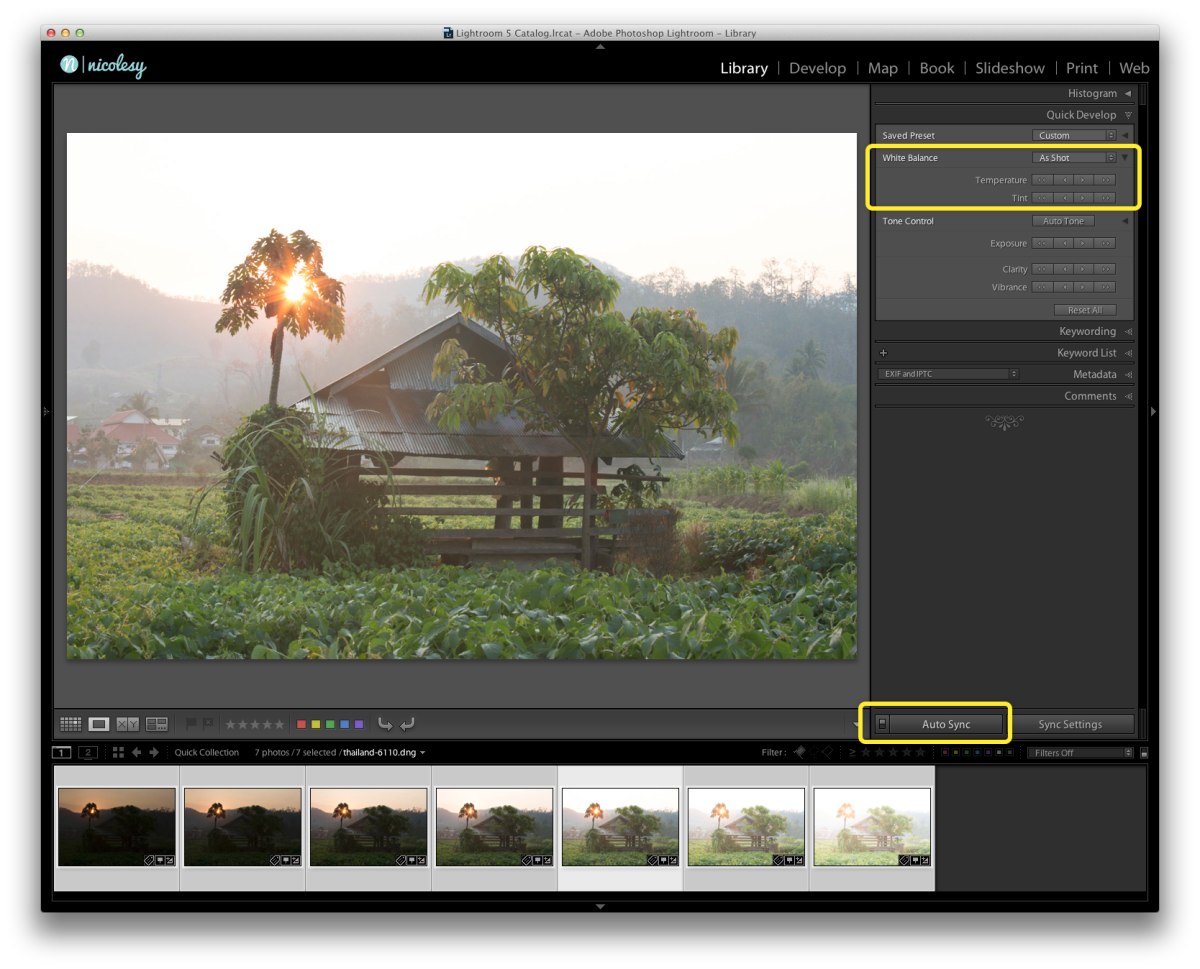
- Highlight all of the images, press the “E” button and then scroll to the one photo that you can see best (usually the 0 EV setting image).
- In the bottom-right, flip the switch where it says “Sync” so that it is set to “Auto Sync”.
- Then, in the Quick Develop panel, make sure that you can see the expanded White Balance settings. Use the arrows to adjust your white balance with the image in the preview window, and (assuming that all of the photos are highlighted) it should automatically sync the changes with the other photos.
Step 4: “Merge to HDR Pro in Photoshop”
Once your files are ready to go, the next step is to push them to Photoshop to let it do its magic. Here’s how:
- First, make sure that all of the photos are still highlighted.
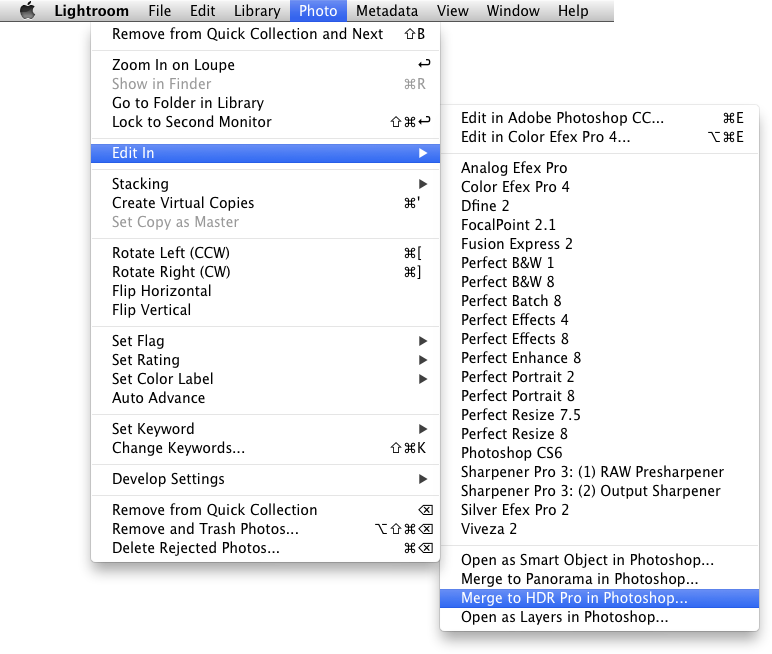
- Then, go to “Photo > Edit In > Merge to HDR Pro in Photoshop”.
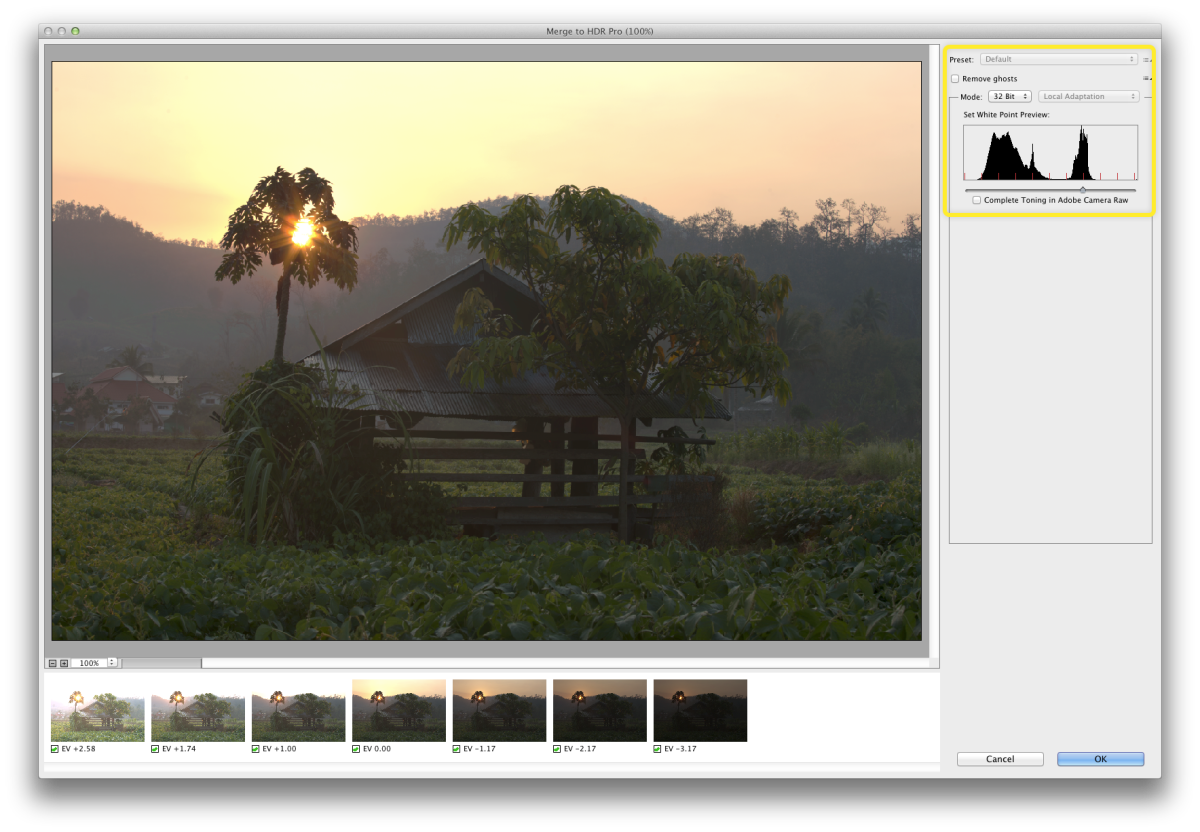
After all of the photos bounce into Photoshop, they will end at the “Merge to HDR Pro” window. In this window, make sure that you have the “Mode” set to 32-bit, and that the check-box below the histogram is un-checked. (You can check the “remove ghosts” button if you had moving objects in your scene, such as leaves or people.) Then, click OK.
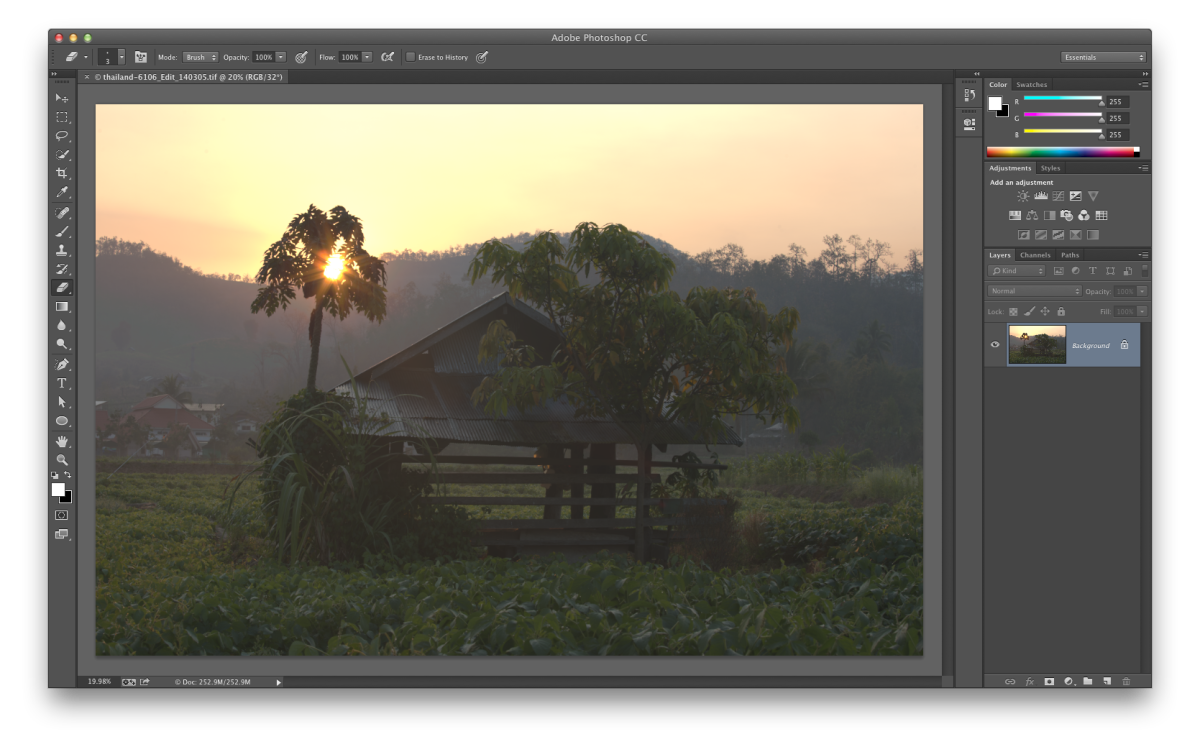
Your photo will now be in a standard Photoshop window. Save the file and close it, and then go back to into Lightroom.
Step 5: Processing the TIFF File in Lightroom
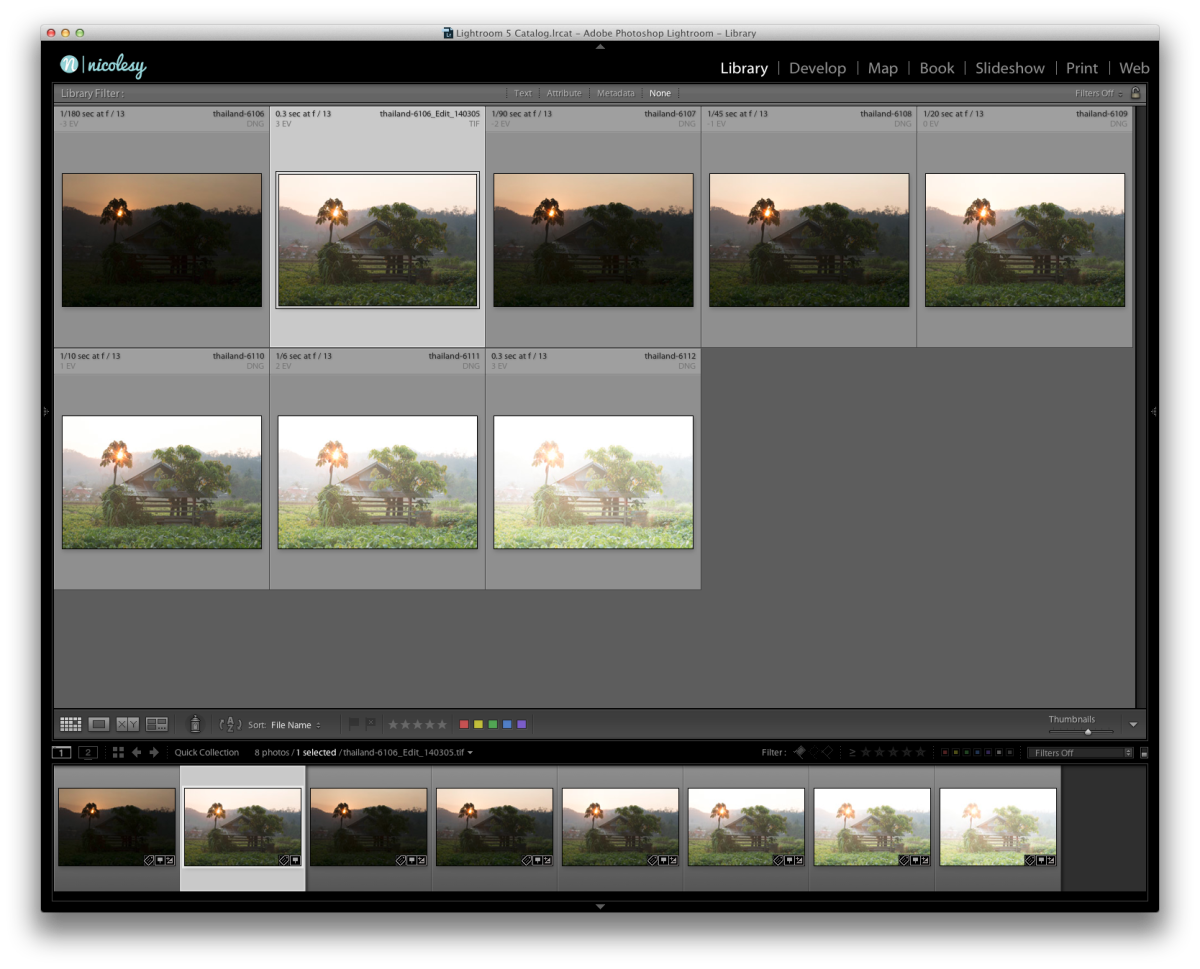
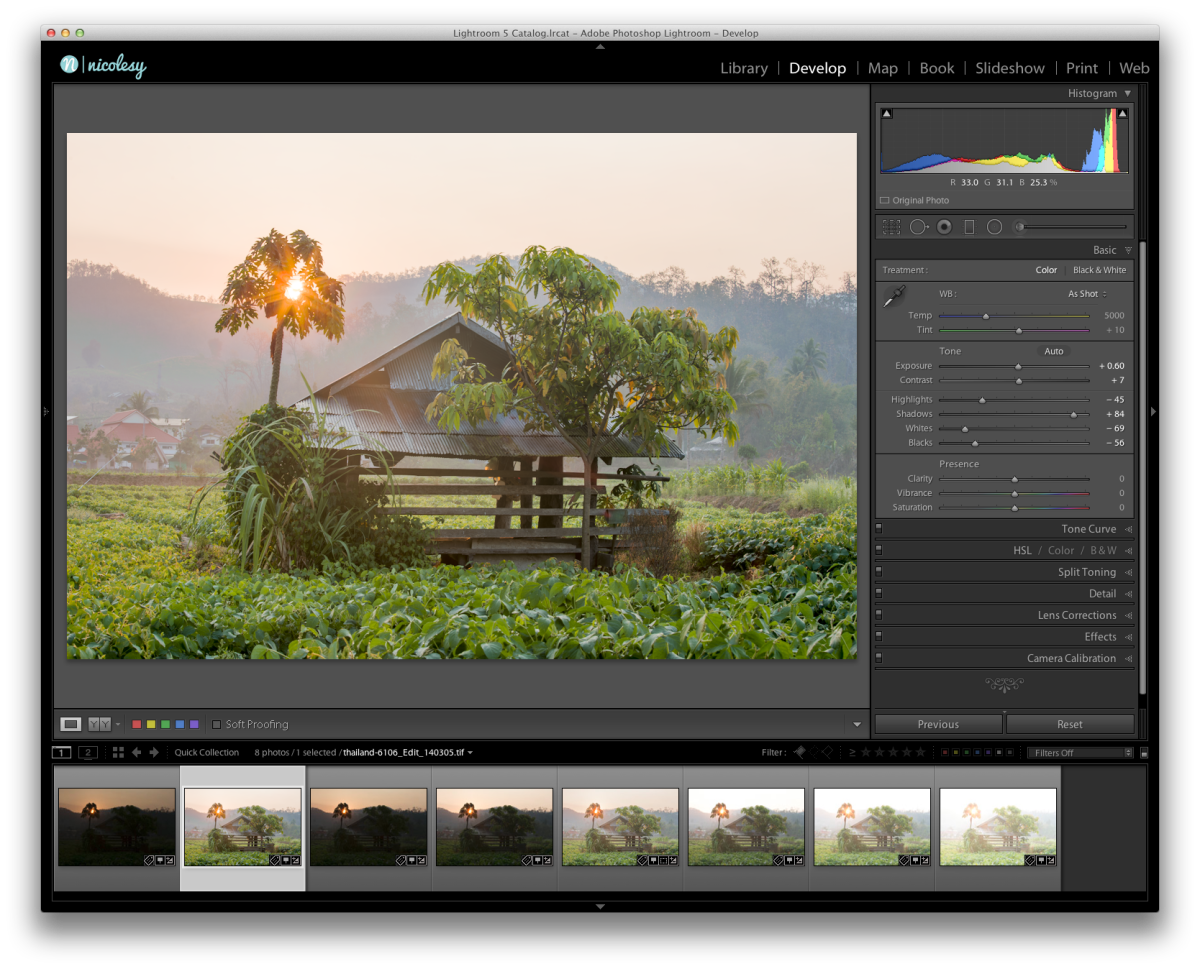
Now, back in Lightroom, locate the newly-created TIFF file. It should pop up somewhere nearby your original images; if not, just sort the images by File Name (View > Sort > File Name) and it should re-appear in the correct place. This is my photo in Lightroom after saving and closing it from Photoshop:
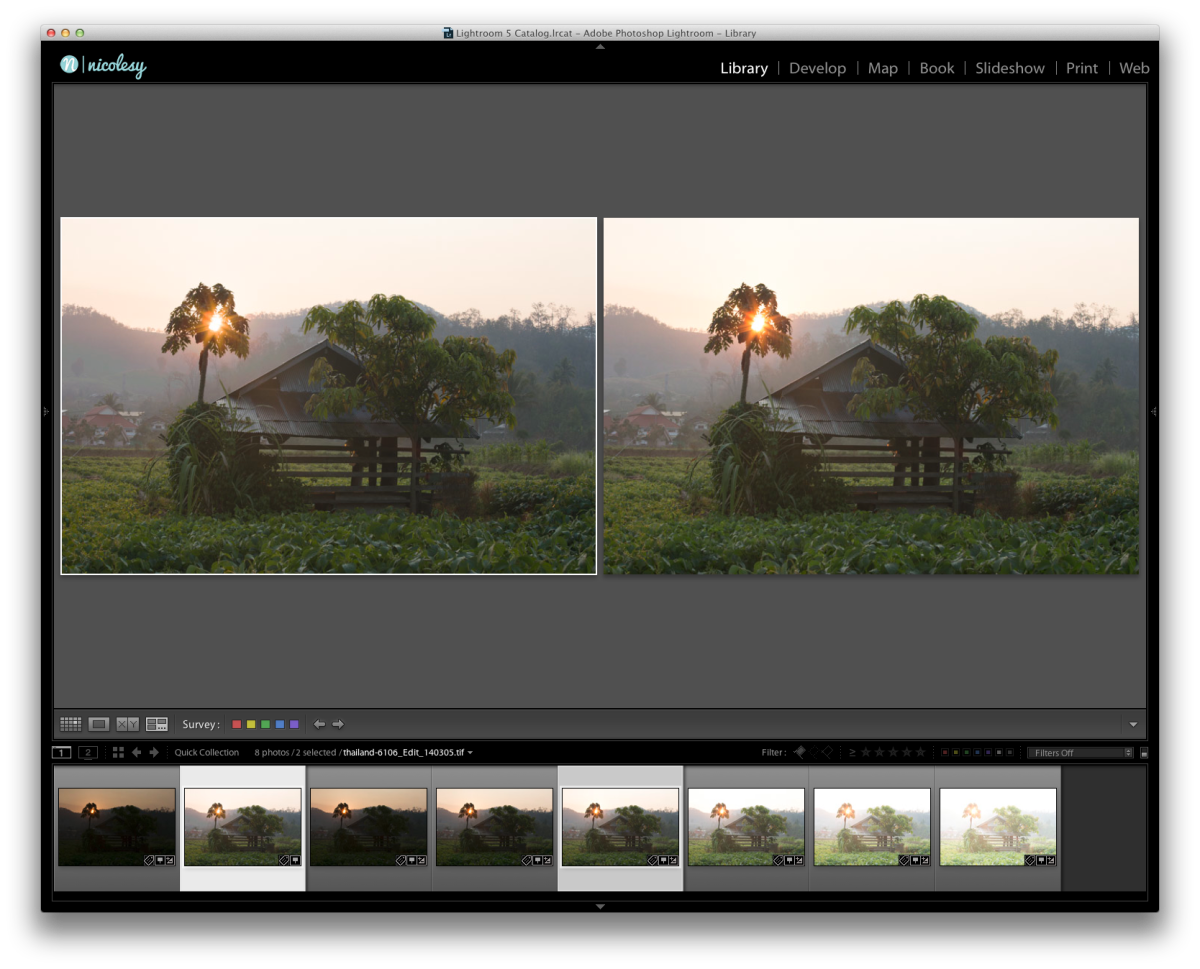
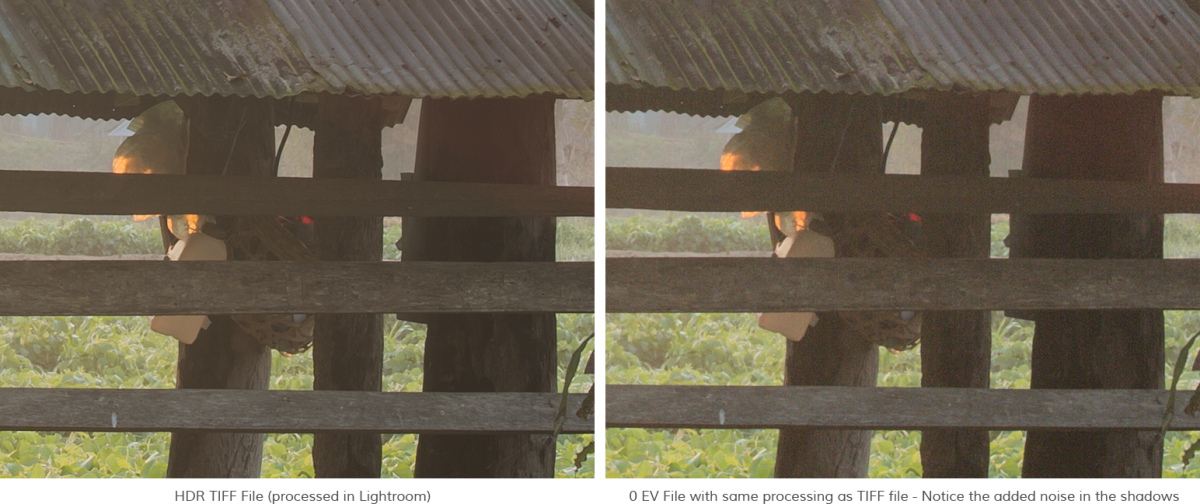
Because you have a 32-bit TIFF file, this means that all of the tonal data from the bracketed images is inside of your image. So, as long as you don’t push your adjustments too far, you should be able to pull out a LOT of detail from the image. With this example, you can see that the “straight out of HDR Photomerge” photo really doesn’t look too much different from one of the other bracketed frames. The image on the left is the HDR processed TIFF file, while the image on the right is the 0 EV image with no adjustments:
The HUGE difference between these two is the amount of data inside of the TIFF file. The reason that this HDR process is so great is that I can process the TIFF file by doing things such as lightening up the shadows, darkening the sky, etc, with very little (to no) detriment to the images. If I were to apply the same adjustments to the standalone file (the 0 EV image) then it starts to really show, especially when you zoom in to view it at 100%:
For this TIFF file, I processed it in the Develop module’s Basic Panel with the following changes to bring out the shadows and darken some of the bright areas:
Step 6: Style and Process as you like
After you’ve gone through the steps of processing the TIFF file to bring it to a good balance of tone and color, you can do whatever stylization you like. For me, that may be some more in-depth editing inside of Lightroom, or I might push it to onOne Software’s Perfect Effects to play with it from there.
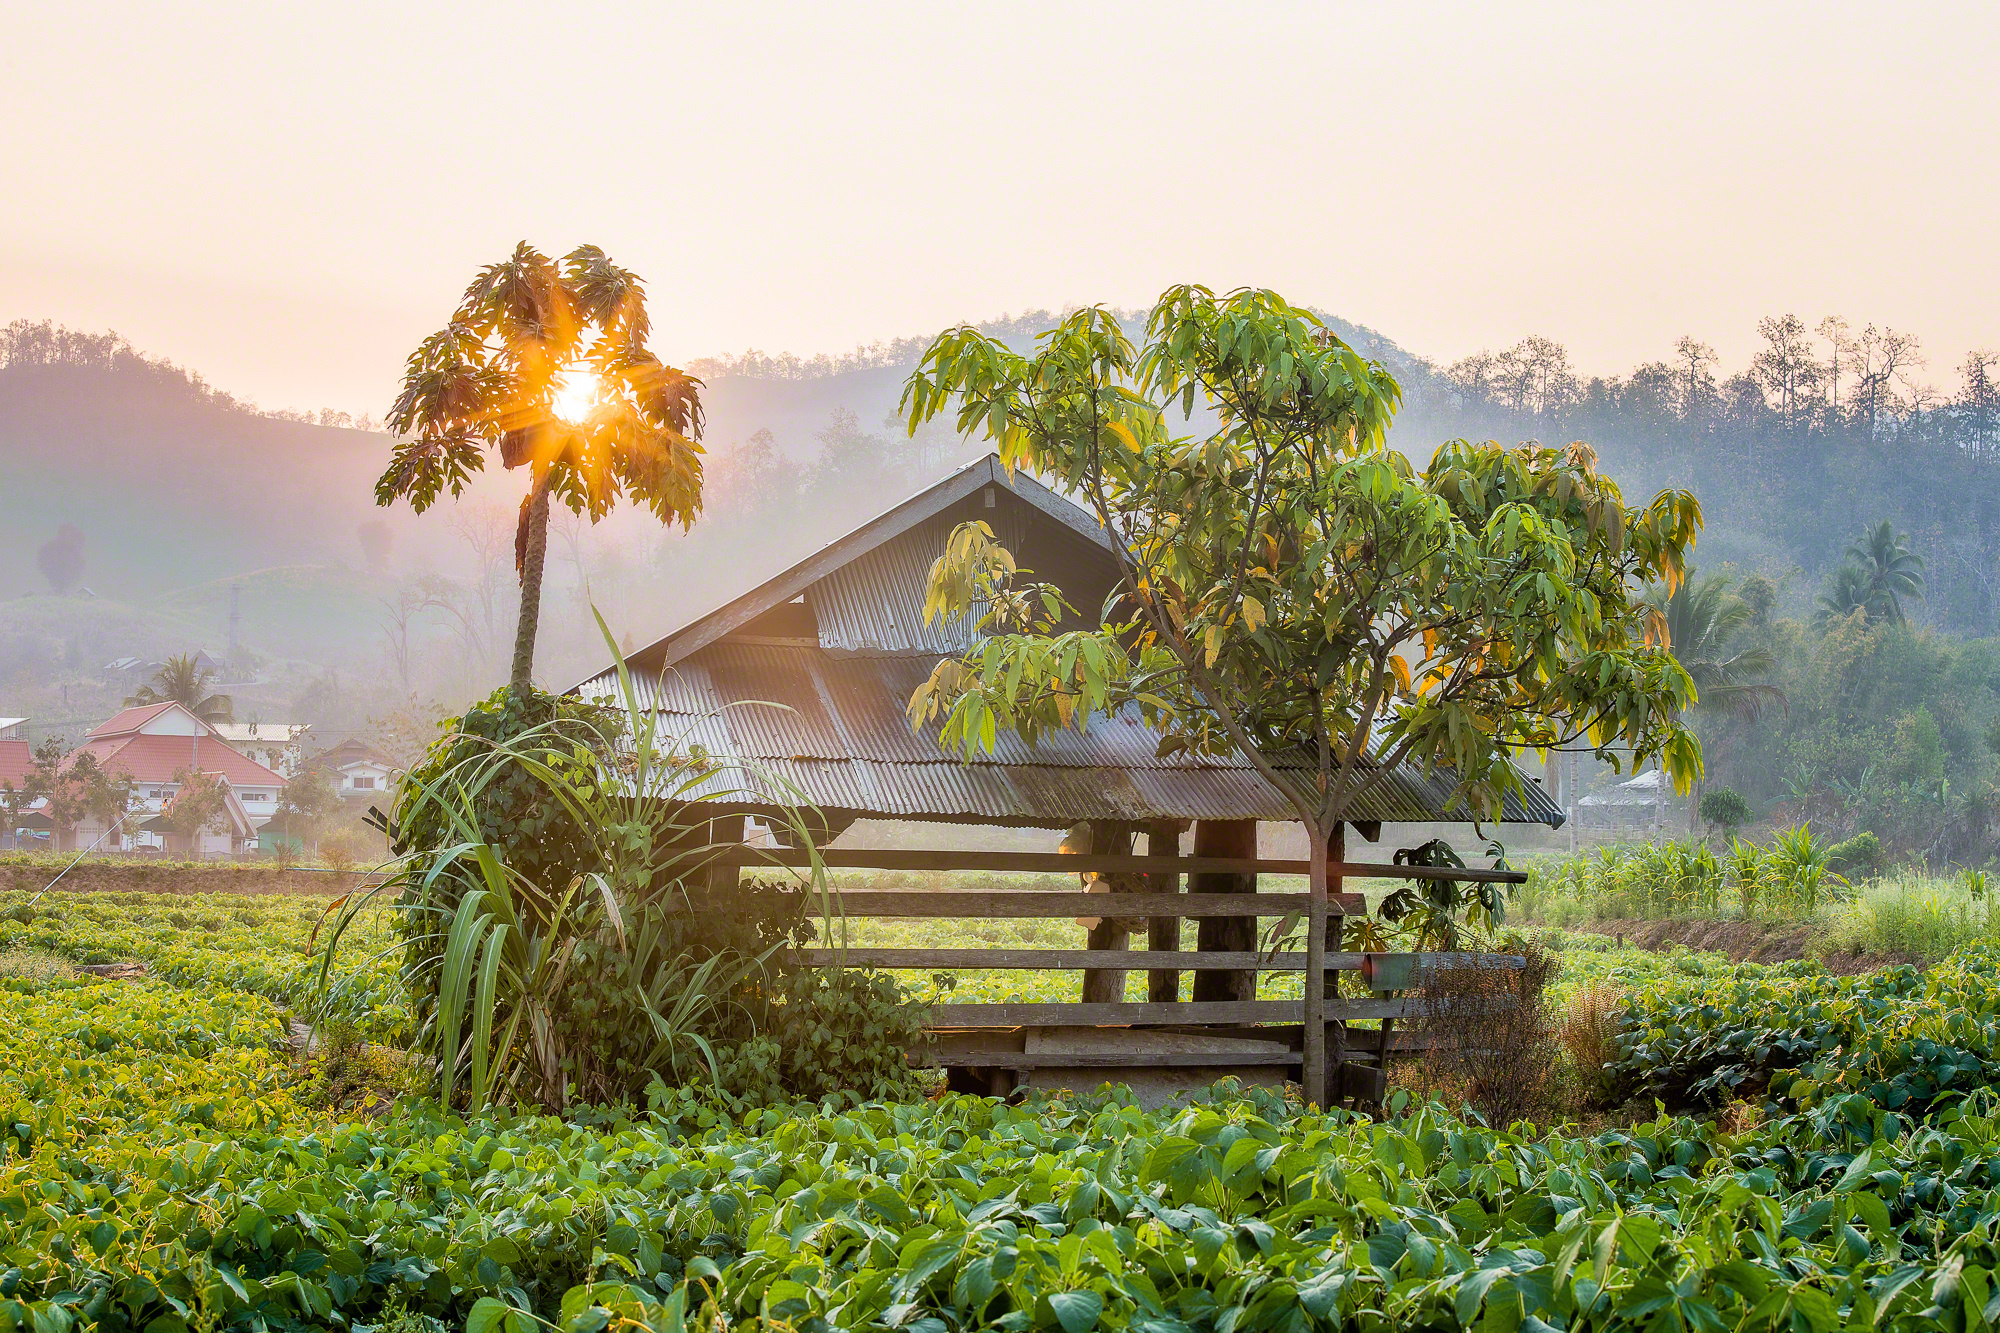
Here’s my final photograph, processed as an HDR through Lightroom and Photoshop, with final touches added using onOne Software’s Perfect Effects 8 and Lightroom 5:
I do a lot of landscape photography, and with that, I also do use HDR to make some of my images. I do my best to keep the processing as minimal as possible, without “nuking” or over-saturating the end result. It can be easy to be heavy-handed with HDR processing, so in this article I wanted to share my process and what I do to make my photographs look their best.
Step 1: Bracket Your Exposure
In order to process a photo with HDR, you need to photograph it the right way. By “right way” I am referring to bracketing your exposures and having at least three photographs to work from (in this example, I have seven). When you bracket your exposures, it means that you create several frames of the same at different levels of exposure. In this example, I have a set of seven photographs exposed from -3 EV to +3 EV, which means that three of them are underexposed (-3, -2, -1), one of them is exposed as the camera thought it should be (0), and three of them are overexposed (+1, +2, +3).
To set up your camera for photographing bracketed images, please refer to your user’s manual.
Step 2: Set up Lightroom to edit as TIFF files
In order to take full advantage of HDR processing using Lightroom and Photoshop, then you will definitely want to make sure that your settings are set up properly. What I love about the little “HDR dance” that these two programs perform is that it allows you to start in Lightroom, merge the files to Photoshop, then back into Lightroom with a file that has SO MUCH exposure data inside of it. The way to do this properly is to make sure that you are working with TIFF files once the images go into Photoshop:
- First, go to the Lightroom Preferences window:
• Mac: go to Lightroom > Preferences
• PC: go to Edit > Preferences - Then, click on the “External Editing” tab.
- Make sure that the “File Format” at the top is set to “TIFF”. This will allow your photographs that are processed as HDR in Photoshop to retain all tonal data from the multiple exposures.
Step 3: Use Lightroom to Prep You Photographs for HDR
When I process an HDR photo, my preference is to start them all inside of Lightroom. When you process your images, it is very important that the only setting you change is the white balance. And, if you change the white balance in one image, you need to change it with all of them so that they are identical. Don’t touch anything else, especially the tone settings! (Ok, you can adjust the lens correction, just make sure that they are all corrected the same way.)
One really good way to do this in Lightroom is in the Library Module’s “Quick Develop” panel:
- Highlight all of the images, press the “E” button and then scroll to the one photo that you can see best (usually the 0 EV setting image).
- In the bottom-right, flip the switch where it says “Sync” so that it is set to “Auto Sync”.
- Then, in the Quick Develop panel, make sure that you can see the expanded White Balance settings. Use the arrows to adjust your white balance with the image in the preview window, and (assuming that all of the photos are highlighted) it should automatically sync the changes with the other photos.
Step 4: “Merge to HDR Pro in Photoshop”
Once your files are ready to go, the next step is to push them to Photoshop to let it do its magic. Here’s how:
- First, make sure that all of the photos are still highlighted.
- Then, go to “Photo > Edit In > Merge to HDR Pro in Photoshop”.
After all of the photos bounce into Photoshop, they will end at the “Merge to HDR Pro” window. In this window, make sure that you have the “Mode” set to 32-bit, and that the check-box below the histogram is un-checked. (You can check the “remove ghosts” button if you had moving objects in your scene, such as leaves or people.) Then, click OK.
Your photo will now be in a standard Photoshop window. Save the file and close it, and then go back to into Lightroom.
Step 5: Processing the TIFF File in Lightroom
Now, back in Lightroom, locate the newly-created TIFF file. It should pop up somewhere nearby your original images; if not, just sort the images by File Name (View > Sort > File Name) and it should re-appear in the correct place. This is my photo in Lightroom after saving and closing it from Photoshop:
Because you have a 32-bit TIFF file, this means that all of the tonal data from the bracketed images is inside of your image. So, as long as you don’t push your adjustments too far, you should be able to pull out a LOT of detail from the image. With this example, you can see that the “straight out of HDR Photomerge” photo really doesn’t look too much different from one of the other bracketed frames. The image on the left is the HDR processed TIFF file, while the image on the right is the 0 EV image with no adjustments:
The HUGE difference between these two is the amount of data inside of the TIFF file. The reason that this HDR process is so great is that I can process the TIFF file by doing things such as lightening up the shadows, darkening the sky, etc, with very little (to no) detriment to the images. If I were to apply the same adjustments to the standalone file (the 0 EV image) then it starts to really show, especially when you zoom in to view it at 100%:
For this TIFF file, I processed it in the Develop module’s Basic Panel with the following changes to bring out the shadows and darken some of the bright areas:
Step 6: Style and Process as you like
After you’ve gone through the steps of processing the TIFF file to bring it to a good balance of tone and color, you can do whatever stylization you like. For me, that may be some more in-depth editing inside of Lightroom, or I might push it to onOne Software’s Perfect Effects to play with it from there.
Here’s my final photograph, processed as an HDR through Lightroom and Photoshop, with final touches added using onOne Software’s Perfect Effects 8 and Lightroom 5:

Nicole is a photographer, published author, and educator specializing in Lightroom, Photoshop, and photography. She is best known for her books on food photography but is widely versed in various photographic genres, including landscape, nature, stock, travel, and experimental imagery.






Hi Nicole,
Do you still use apps like Photomatix and/or Nik HDR Efex (or any of the many others)? While they provide a lot of presets (which I hardly ever use), I like the idea of using LR to complete the edit, or as you say use something like Perfect Effects or one of the others.
I tried Photoshop’s Merge to HDR as you said above, and also tried using Enfuse, and both came out looking pretty good. I’m not sure if Enfuse’s output is 32 bit though.
Regards
Craig
Hi Craig. To be honest, I don’t use Photomatix much with HDR, mostly because I use Photoshop so much more and prefer that interface. Also, Nik works but it can be heavy-handed with the presets and process. Overall, the LR>PS>LR 32-bit method is the workflow I prefer, mostly because I like how Lightroom works to process my images.
I started processing my HDR shots a few weeks back with this method… Love the results I’m getting. I do wish I’d found this blog sooner, though; you make it so easy to understand. Do you have any issues with the 32-bit files in Lightroom? Mine don’t look exactly as they do in Photoshop CC; I read somewhere that Lightroom automatically applies some basic “adjustments” (I have no idea what else to call them) when you import a 32-bit file. I love the results I’m getting all the same, it just seems strange that Adobe doesn’t allow you to make this choice yourself.